
About Tipper

This author has not yet filled in any details.
So far Tipper has created 134 blog entries.

1099‑NEC $2,000 (2026): What U.S. Creators Owe and How to Track Tips

Yes, if you make money creating content in the United States, that income is taxable, and the IRS treats you as running a business the moment you accept your first paid sponsorship or tip. Set up a separate bank account, start logging every payment now, and calculate quarterly estimated taxes before you spend the cash. A new temporary “no tax on tips” provision may exempt a slice of tip income for some creators, but it comes with strict limits, so don’t count on it to erase what you owe.


TL;DR:

  • Most creator income, including ad revenue, tips, sponsorships, and barter deals, must be reported and is subject to self-employment and income taxes regardless of whether a 1099 is issued.
  • A temporary tax rule allows a deduction on some tips for certain occupations, but only if the creator’s work fits the IRS classification, and tips are always fully taxable for self-employment tax purposes.
  • Starting in 2026, the IRS will require a 1099-NEC only if payments exceed $2,000 annually, but creators must still track and report all income below that threshold manually.
  • Deductible expenses include equipment, software, travel, home office, and props used primarily for creating content, but personal or mixed-use expenses are not deductible.
  • Quarterly estimated taxes are required if expecting to owe over $1,000, with payments due in April, June, September, and January, and maintaining organized records prevents costly IRS issues.

Tipper
Make Tips Easier to Track
Tipper helps creators receive instant tips through one personalized link, with payment options including Apple Pay and Google Pay.

Table of Contents

What Counts as Taxable Creator Income Under U.S. Tax Rules

The IRS doesn’t care whether a payment lands in your bank account with a 1099 attached or shows up as a $5 tip through a link. If you received it because of your content, it’s income, and it’s reportable.

That list is longer than most new creators expect. Platform ad revenue, subscription income, one-time tips and donations, paid DMs or consulting calls, affiliate commissions, brand sponsorships, merch sales, licensing fees, and speaking gigs all count as ordinary business income on your tax return. So does anything you receive in exchange for promotion, even when no cash changes hand.

  • Gifted products: If a brand sends you a $400 camera in exchange for a review, you owe tax on its fair market value, not just cash payments.
  • Barter arrangements: Swapping a shoutout for free services (a haircut, a hotel stay, a website redesign) counts as income equal to what that service would normally cost.
  • Small or irregular tips: A $3 tip through a payment link is still taxable, even if the platform never sends you a form for it.
  • Foreign sponsorship payments: Income from an overseas brand deal is taxable in the U.S. regardless of where the payer is based.

Here’s the part that trips people up: a lot of this income never generates a 1099-NEC or 1099-K at all. Cash App transfers from fans, small tips, and informal barter deals rarely come with paperwork. That doesn’t make them optional to report. Keep your own running log with the date, source, amount, and what it was for. When the IRS asks questions years later, your own records are what save you.

How Self-Employment Tax and Income Tax Work for Creators

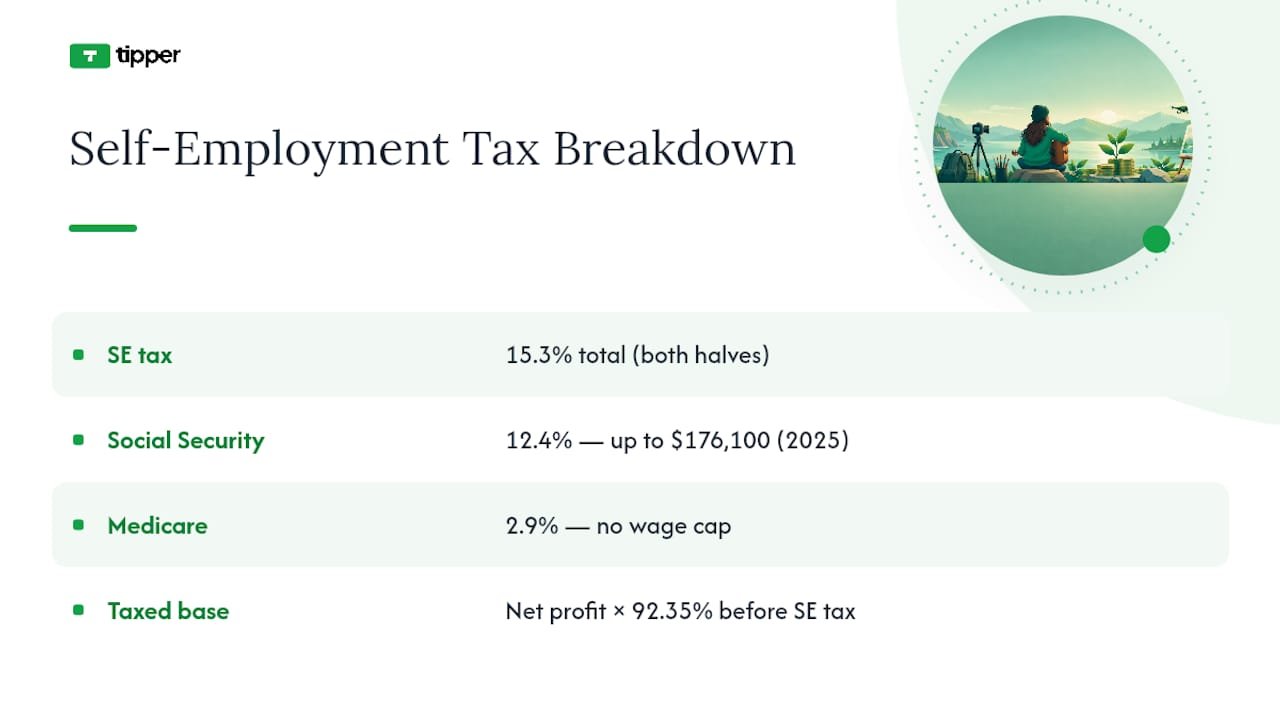
Most creators get blindsided by one number: 15.3%. That’s the self-employment tax rate you pay on top of regular income tax, covering the Social Security and Medicare contributions an employer would normally split with you. When you’re self-employed, you cover both halves yourself.

By the numbers: Self-employment tax breaks down into 12.4% for Social Security (up to the wage base) and 2.9% for Medicare on all net self-employment income. The Social Security portion only applies up to $176,100 in wage base income for 2025; earnings above that threshold still owe the 2.9% Medicare share, with no cap.

Here’s how the math actually works. You start with your net profit from Schedule C, then multiply it by 92.35% before applying the 15.3% rate. That adjustment exists because the IRS treats the employer-equivalent portion of self-employment tax as if it were never earned in the first place. On a $60,000 net profit year, that puts roughly $55,410 subject to self-employment tax, working out to around $8,478 owed just for Social Security and Medicare, before a dollar of income tax.

The good news: you get to deduct half of that self-employment tax on your Form 1040, which lowers your adjusted gross income and, in turn, your regular income tax bill. It’s not a dollar-for-dollar wash, but it softens the blow. Combine the self-employment tax with federal income tax brackets, and many full-time creators land in an effective tax rate well above what a traditional W-2 employee pays on similar earnings. That’s the tradeoff for controlling your own schedule and keeping every dollar of gross revenue instead of splitting it with an employer.
How Self-Employment Tax and Income Tax Work for Creators — overview diagram

What the “No Tax on Tips” Rule Actually Means for Creators

A temporary federal provision lets certain workers deduct a portion of reported tip income from their federal taxable income. It sounds like a windfall, but the fine print matters more than the headline.

  • Occupation matters. The rule applies to workers in jobs the IRS has officially classified as customarily and regularly tipped as of December 31, 2024. Not every creator who receives tips automatically qualifies.
  • It’s temporary. This is a time-limited provision, not a permanent rewrite of the tax code, according to the Bipartisan Policy Center’s explainer on the change.
  • Payroll taxes still apply. The deduction affects federal income tax, not Social Security or Medicare withholding, so self-employment tax still hits your tip income in full.
  • Reporting still comes first. You have to report the tip income before you can claim any deduction against it, so skipping documentation to “avoid taxes” backfires entirely.

For a creator, the practical question is whether tips received through a direct link or platform fall under an occupation the IRS recognizes on that list. Many streamers and creators won’t cleanly fit the traditional service categories the rule was built around, even though the payments function the same way a restaurant tip does. Until further Treasury guidance narrows the definition, treat every tip as fully taxable and document the source, platform, and date of each one. If you later qualify for the deduction, that paper trail is what lets you claim it.

New 1099 Reporting Thresholds and What to Do Without a Tax Form

Paperwork rules for creators shifted for the 2026 tax year, and the changes cut in your favor on the reporting side, even though your filing obligation stays the same either way.

  1. Know the new 1099-NEC threshold. Starting with 2026 payments, businesses only have to issue a 1099-NEC once they pay you $2,000 or more in a year, up from the old $600 threshold. That means smaller brand deals and one-off gigs may never generate a form at all.
  2. Understand how 1099-K differs. Payment platforms issue 1099-K forms based on gross transaction volume through that specific platform, not net profit, and thresholds vary by processor. A 1099-K reflects total dollars moved, which can look inflated next to your actual taxable profit after fees and refunds.
  3. Track every deposit yourself. When no form arrives, pull twelve months of bank and platform statements and total every creator-related deposit by source. This becomes your backup documentation if the IRS ever asks how you arrived at your reported total.
  4. Convert foreign payments correctly. If a sponsor overseas pays you in another currency, convert each payment to U.S. dollars using the exchange rate on the date you received it, not the date you filed.
  5. Reconcile against your own log. Cross-check every 1099 you do receive against your personal income tracker before filing. Discrepancies between what a platform reports and what you recorded are one of the most common triggers for an IRS notice.

The IRS Self-Employed Individuals Tax Center is the primary source for current Schedule C instructions and estimated tax vouchers if you want to confirm any of these thresholds directly.

Which Business Expenses Can Creators Actually Deduct?

Every dollar you spend to produce content is a potential deduction, but the IRS standard is “ordinary and necessary,” not “nice to have.” A ring light for filming is ordinary; a vacation you casually filmed for three minutes probably isn’t.

Common deductible categories for creators include:

  • Camera, lighting, and audio equipment used primarily for content
  • Editing software, subscriptions, and cloud storage tied to production
  • Advertising and promotion costs, including paid social boosts
  • Travel expenses directly tied to a shoot, brand trip, or conference
  • A home office, calculated by the percentage of square footage used exclusively for work
  • Props, supplies, and set materials that appear in your content

Free products create a documentation obligation, not a free pass. If a company sends you a $150 skincare set for a review, you owe income tax on that $150 fair market value, and you can typically deduct it right back out if you use it up producing the content, which often nets close to zero tax impact, but only if you tracked both sides of that transaction.

For bigger purchases, like a $3,000 camera setup, you generally have two paths: deduct the full cost in the year you buy it under Section 179, or depreciate it gradually over several years. Most creators with steady income take the full deduction upfront, since it reduces the current year’s tax bill when you need it most.

Pro Tip: Photograph every receipt the day you get it and drop it into a dedicated folder by month. Waiting until March to reconstruct a year of expenses from memory is how deductions quietly disappear.

Keep receipts, bank statements, and mileage logs for at least three years from your filing date, longer if you underreported income by more than 25%. A dedicated business checking account and credit card, reconciled monthly, eliminates most of the scrambling that turns tax season into a nightmare.

When Are Estimated Taxes Due, and How Much Should You Pay?

If you expect to owe $1,000 or more for the year after withholding and credits, the IRS requires quarterly estimated payments rather than one lump sum in April. Most full-time creators fall into this bucket immediately.

  1. Mark the four deadlines. Estimated payments are typically due in mid-April, mid-June, mid-September, and mid-January of the following year, covering income earned in the prior quarter.
  2. Use the safe harbor rule. Paying at least 100% of last year’s total tax liability (110% if your prior-year income exceeded $150,000) protects you from underpayment penalties even if this year’s income spikes.
  3. Consider the annualized method for lumpy income. If your income swings wildly month to month, brand deal one quarter, nothing the next, Form 2210’s annualized installment method lets you match payments to when you actually earned the money, rather than paying evenly across four quarters.

Treat that transfer like a bill, not a suggestion, and you’ll never face an April surprise that forces you to dip into rent money.

Should Creators Form an LLC or S-Corp for Tax Purposes?

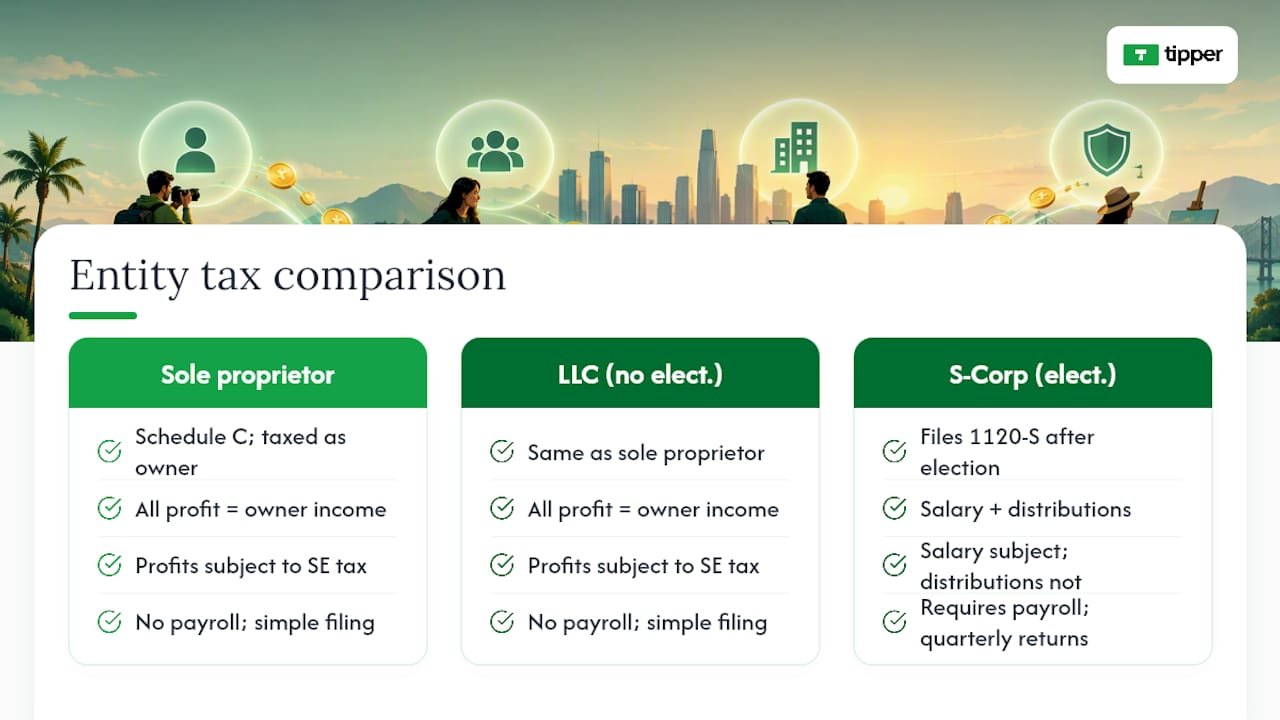
Most creators start as sole proprietors by default, reporting income and expenses directly on Schedule C with no extra paperwork.

An LLC on its own doesn’t change your federal tax treatment. It’s still taxed as a sole proprietorship (or partnership, if you have co-owners) unless you elect otherwise. The real tax shift comes with an S-Corp election, which lets you split your income into a “reasonable salary” (subject to payroll tax) and remaining profit distributions (not subject to self-employment tax). Creators who consistently clear somewhere in the neighborhood of $60,000 to $80,000 in net profit often find the payroll administration and extra filing (Form 1120-S) worth the savings.
Comparison of creator business tax structures

The catch: the IRS requires that salary to be genuinely reasonable for the work performed, not artificially low just to dodge payroll tax. Setting up payroll, filing quarterly payroll tax returns, and running a separate corporate return adds real complexity. This is the point where a conversation with a CPA stops being optional and starts paying for itself.

Do Creators Owe Taxes in Multiple States?

Your state of residence generally taxes all your income, no matter where a brand or fan who paid you happens to live. That part is straightforward for most creators working from a home studio.

It gets more complicated fast when you travel for content. Spend enough time filming, attending a conference, or working from another state, and you may trigger a filing obligation there too, depending on that state’s specific nexus rules, which vary widely. Selling physical merch adds another layer: shipping a hoodie to a fan in a state where you have sales tax nexus can require you to collect and remit sales tax on that transaction, and rules on digital products (courses, presets, ebooks) differ state by state.

If you split time across states or ship merch nationally, a quick multi-state review with a CPA before year-end usually costs far less than untangling a surprise notice later.

The Most Common Creator Tax Mistakes and a Pre-Filing Checklist

The same handful of errors show up year after year, and nearly all of them are preventable with better habits during the year, not smarter moves in April.

  • Failing to report tips, gifts, and small platform payments because “nobody sent a form”
  • Mixing personal and business spending in one account, making deductions impossible to substantiate
  • Missing quarterly estimated payments entirely and getting hit with penalties on top of the tax owed
  • Deducting personal expenses, like a phone plan used mostly for texting friends, as if they were 100% business
  • Waiting until tax season to reconstruct a year of income and expenses from memory

Before you file, reconcile every income source against your bank statements, confirm every 1099 you received matches your own records, and set aside your estimated tax payment before spending the rest. Document the business purpose behind every trip or meal you’re deducting while it’s still fresh. If your income has grown past a hobby-level side hustle, a CPA who works with creators typically pays for themselves in deductions found and penalties avoided.

Tipper: Practical Guidance for Tracking and Reporting Tipping Income

Every tip that lands through a payment link is taxable income the moment you receive it, whether it’s $2 or $200. That means your record for each tip needs a date, an amount, and a source you can match back to a bank deposit.

If you accept tips through a platform, request or export a payout report at least quarterly rather than waiting until January. Reconcile that report against your bank statement to confirm what actually cleared versus what’s still pending. Tools that generate clear payout histories make this dramatically easier than trying to add up individual notifications by hand; see how real-time tips get processed and recorded for a sense of that timing.

  • Save monthly payout summaries as PDFs, not just screenshots of a dashboard
  • Label each payout by month in your bookkeeping software the day it hits your account
  • Keep a simple spreadsheet noting large individual tips separately, since those are the ones most likely to draw a follow-up question later

Tax Implications of Using Creator Income for Investments or Purchases

Spending your creator income doesn’t erase the tax you owe on it. If you earned $40,000 in sponsorship and tip income this year and used it to buy a car, fund a retirement account, or invest in stocks, the income tax bill on that $40,000 exists independently of what you did with the money afterward.

That said, how you use creator income can open up legitimate tax advantages. Contributing to a Solo 401(k) or a SEP IRA, both available to self-employed creators, reduces your taxable income for the year while building retirement savings, sometimes allowing contributions well beyond what a traditional employer plan permits. Using income to buy equipment that qualifies as a business expense, a new laptop, camera gear, editing hardware, creates a deduction, while using the same income to buy a personal vehicle or vacation does not, even if you justify it as “content research.”

Investment income itself follows separate rules once it starts generating returns. Dividends, interest, and capital gains from investing your creator earnings get taxed under investment income rules, layered on top of the self-employment tax you already paid when you first earned that money. Keep the two income streams (creator earnings and investment returns) documented separately, since they show up on different parts of your tax return and get taxed differently.

Are There Tax Credits or Incentives Available for Creators?

Creators qualify for the same general tax credits available to any self-employed American, plus a few worth watching closely if your business is growing.

Retirement contributions to a SEP IRA or Solo 401(k) don’t just build savings, they directly lower your taxable income dollar for dollar in the year you contribute. If you’re paying for childcare while filming or editing, the Child and Dependent Care Credit may apply the same way it would for any working parent.

Home office deductions function more like an ongoing incentive than a one-time credit, since a legitimate home studio used exclusively for content creation lets you deduct a portion of your rent or mortgage interest, utilities, and internet every single year you qualify. Education expenses tied directly to improving your content business, a paid course on video editing or a conference registration, are typically deductible as ordinary business expenses rather than credits, but the effect on your bottom line is similar.

None of these show up automatically. You have to claim them on the right forms and keep the paperwork to back each one up if the IRS ever asks.

What Happens if You Owe Back Taxes or Face an IRS Audit?

If you realize you underreported creator income from a prior year, tips you forgot, a platform payment you never logged, the fastest way to limit damage is filing an amended return before the IRS finds the gap on its own. Interest and penalties on back taxes grow the longer they sit unaddressed, but they’re still smaller than what accumulates after an IRS notice arrives.

An audit of a creator’s return typically focuses on the same handful of areas every time: unreported income compared against 1099s and bank deposits, home office deductions that seem oversized relative to income, and travel or meal deductions without clear business purpose documentation. If you get a notice, don’t ignore it and don’t panic. Gather the specific records the letter requests, respond by the stated deadline, and consider bringing in a CPA or enrolled agent, especially once the dollar amount in question moves beyond what you’re comfortable handling directly.

The IRS also offers installment agreements for creators who owe more than they can pay immediately, letting you spread payments over time rather than facing collection action. Ignoring a balance due is far riskier than negotiating one, since penalties and interest keep compounding until the debt is resolved.

What Should Creators Prioritize This Filing Season?

If you take one thing from all of this, make it bookkeeping. A separate business account and a habit of logging income the day it arrives will save you more money than any deduction you’ll find scrambling in March.

Pay your quarterly estimates on time, even in small amounts, rather than skipping them because the math feels uncertain. DIY filing works fine for straightforward income under Schedule C; once you’re weighing an S-Corp election or juggling multiple states, bring in a CPA. And don’t dismiss small tips as pocket change. The IRS doesn’t, and neither should your books.

— Tipper

Get Paid Instantly and Keep Records Ready for Tax Time

There are platforms that offer ways to collect documented tip income similar to what this guide recommends.
Tipper

Every tip generates a record you can pull later, which matters far more than it sounds like once tax season hits and you’re trying to reconstruct a year of scattered payments. It is possible to attach thank-you notes, photos, or short videos to tips, turning transactions into connections with supporters. Pair that with the payout reporting habits covered in Tipper’s creator guide and you’ve got a workflow built for accurate filing, not just fast payments. If you’re setting up your tipping page for the first time, visit Tipper to create your link and start collecting tips you can actually account for at tax time.

Where to Verify These Rules Yourself

Confirm anything here against primary sources before filing. Start with the IRS Self-Employed Individuals Tax Center for forms, check the statutory text behind the tip deduction for its exact legal limits, and review TurboTax’s creator tax guide for practical filing walkthroughs. For anything beyond a straightforward Schedule C, a CPA familiar with creator income is worth the fee.

This article is general information, not a substitute for advice from a qualified financial advisor. Consult a qualified financial professional about your own circumstances before acting on anything here.

Sources

FAQ

Do You Have to Pay Taxes as a Content Creator?

Yes. Any income you earn from content, tips, sponsorships, ad revenue, affiliate commissions, or gifted products, is taxable and must be reported on your tax return, even without a 1099. The IRS treats consistent creator earnings as self-employment income subject to both income tax and self-employment tax.

Are Tips Taxed in the USA for Creators?

Yes, tips received through platforms or direct links count as taxable income regardless of size. A temporary federal provision allows a deduction for tips in certain IRS-recognized occupations, but most creators still owe full income and self-employment tax on tip income unless their work clearly fits that occupation list.

Do I Have to File My 1099 if I Made Less Than $10,000?

Yes. Self-employment income must be reported once your net earnings from self-employment reach $400 for the year, and that requirement applies whether or not you received a 1099 at all. The 2026 1099-NEC threshold moved to $2,000, but that only changes when a payer must send you paperwork, not whether you owe tax on the income.

Are Tips Still Taxable in 2026?

Yes, tips remain taxable income in 2026 for the vast majority of creators. The temporary “no tax on tips” provision only excludes a portion of tip income for workers in occupations the IRS has specifically classified as customarily tipped, and payroll taxes still apply even when that deduction does apply.

1099‑NEC $2,000 (2026): What U.S. Creators Owe and How to Track Tips2026-09-23T01:30:47+00:00

Collect Tips in 5 Minutes With Tipper: Tipping Link for Creators

The fastest way to collect an instant tip is a hosted tipping link or QR code that supports one-tap wallets like Apple Pay and Google Pay. Skip anything that forces a supporter to create an account first. Some tipping platforms work this way out of the box, so create a link and send yourself a $1 test tip right now to confirm the payout path before you share it anywhere.


TL;DR:

  • Using a hosted payment link or QR code with wallet support ensures tips are collected quickly and without forcing supporters to create accounts.
  • Setting up a tipping link involves verifying identity, creating the link, generating a QR code, and testing with a small payment before sharing live.
  • Minimizing data collection and offering Apple Pay or Google Pay options significantly increases the likelihood of tipping.
  • Tips usually update instantly in your platform balance, but bank transfer to your account can take one to three business days, with standard processing fees applying.
  • One-tap, no-account tips are most effective because each additional step can reduce support, making simple, privacy-focused options the best choice for most creators.

Tipper
Let Supporters Tip You Instantly
Tipper gives creators a personalized link for instant tips, with Apple Pay, Google Pay, no supporter account, and 100% of earnings kept.

Get your tipping link

Table of Contents

An instant tipping link is just a hosted checkout page with a single job: take a tip and get out of the way. No product catalog, no cart, no login wall. The sender taps a link or scans a QR code, picks or types an amount, pays with a card or a mobile wallet, and the transaction is done in under 30 seconds. That’s the whole model, and the fact that it works so well is exactly why it’s spreading from bartenders’ tip jars to newsletter footers.

But “tipping link” covers a few genuinely different setups, and picking the wrong one costs you either money, privacy, or speed.

Hosted payment links. Services built specifically for this, including Tipper, generate one URL that opens a checkout supporting cards plus Apple Pay and Google Pay. General-purpose tools work similarly: Stripe Payment Links let a seller accept payment without building a website at all, and the same link converts into a scannable QR code automatically. PayPal’s Payment Links do the same thing through a hosted checkout that skips coding entirely. The appeal is speed. The sender never leaves the page, and most wallet-based flows close in one tap.

  • Best for: creators, freelancers, and service workers who want one link they can drop anywhere.
  • Trade-off: you’re relying on the provider’s checkout design, so features like suggested amounts or thank-you notes vary by platform.

Tip pages with QR codes. This is the physical-world version, a printed or displayed code at a register, a tip jar, or a table tent. It works because it removes the last bit of friction for in-person tipping: no typing a URL, no searching an app store. A good tip page adds a photo, a short bio, suggested dollar amounts, and a thank-you message field. This format shines at events and counters where someone’s hands are full and their patience is short.

  • Best for: bartenders, delivery drivers, food trucks, and small venues.
  • Trade-off: print quality and placement matter more than people expect. A blurry or tiny QR code kills conversions before the payment screen ever loads.

Crypto tip jars. A small niche of tools, like Shieldz’s free tip jar generator, create a pay-what-you-want page that sends funds straight to a wallet address with no platform holding the money in between. There’s no custodial delay and no platform fee cut, but the sender needs a crypto wallet, network fees fluctuate, and volatility means the dollar value of a tip can shift before it’s even converted.

  • Best for: creators with an audience that’s already comfortable with crypto.
  • Trade-off: technical enough to shrink your potential tipper pool significantly.

BLE and proximity discovery. This is the newest and least proven method: Bluetooth-based discovery that lets a nearby phone detect a tipping option without scanning anything. It’s promising for venue staff who move around a room, but battery drain, inconsistent device support, and immature standards keep it more experimental than practical for 2026.

The real trade-off across all four methods comes down to four variables: friction, privacy, payout speed, and fees. Hosted links and QR pages win on friction and speed. Crypto wins on privacy and avoids platform fees but loses on accessibility. BLE promises the lowest friction of all, someday, but isn’t there yet. For most service workers and creators, a hosted link with wallet support is the practical middle ground, which is exactly why it dominates the market.

Getting a working tipping link live takes less time than making a pot of coffee. Here’s the real sequence, not the marketing version.

  1. Sign up and verify your identity. Expect to enter your name, email, and bank account details, either through an instant verification service like Plaid or a manual micro-deposit process for ACH. This step exists because payment processors are legally required to confirm who’s receiving money, not because the platform wants your data.
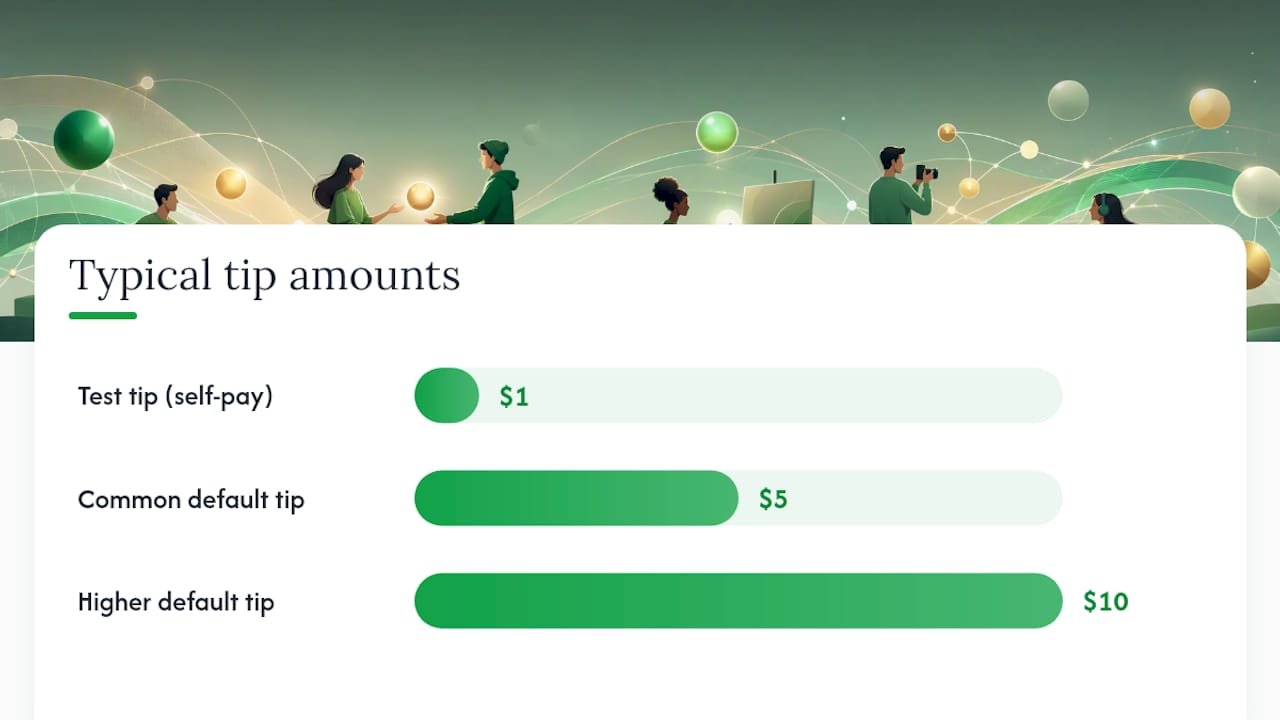
  2. Build your link. Set one or two suggested tip amounts (most creators land on something like $5 and $10 as defaults), upload a photo, and write a short line explaining what the tip supports. Choose your default currency and any branding options the platform offers.
  3. Generate your QR code. Many tipping platforms turn your link into a QR code automatically. Save it as an image you can print for a counter or table tent, or paste the raw link directly into a social bio, an invoice, or a text message.
  4. Send yourself a $1 test tip. This is the step people skip and regret. Pay your own link with a card or wallet, then check three things: did the notification arrive, does the amount match what you expected after fees, and how long did it take to hit your available balance? Event-based tipping setups benefit especially from this dry run since there’s no time to troubleshoot mid-shift.
  5. Set your payout cadence and confirm bank verification. Decide whether you want payouts daily, weekly, or on demand, and double check that your bank account passed verification. An unverified account is the single most common reason a payout gets held instead of delivered.

Pro Tip: Run your test tip using the same payment method your typical supporter would use, if you expect most tips through Apple Pay, test with Apple Pay, not a manually entered card number. Wallet checkouts and card checkouts sometimes route through slightly different verification paths.

Once that $1 test clears and lands in your balance on schedule, you’re not testing anymore. You’re live.

How Do You Set Up a Tipping Link Step by Step? — overview diagram

What Increases Tips Without Asking for Too Much Data

Every extra field you ask a supporter to fill out is a chance for them to close the tab instead. Research on tipping behavior backs this up directly: privacy-preserving, low-friction tipping flows increase the likelihood someone actually tips, while being observed or asked for unnecessary personal details reduces it. That’s not a marketing claim, it’s a documented behavioral pattern, and it should shape how you build your tip page.

  • Put Apple Pay and Google Pay front and center, not buried under a “more options” toggle. One-tap wallet completion consistently beats manual card entry for speed.
  • Offer two or three suggested amounts with one marked as the default. Too many choices slows people down; no suggestions at all leaves them guessing.
  • Only collect what you need to pay out: name, email, and bank details. Skip asking supporters for their own accounts or extra personal information, that friction has nothing to do with getting your money and everything to do with losing the tip.
  • Confirm every tip with a clear message, and if the platform allows it, add a short 5 to 10 second thank-you video or a personal note. That small gesture is what turns a one-time tipper into a repeat one.
  • If you’re using a printed QR code, make it large, well-lit, and paired with a short URL as backup text for anyone whose camera struggles to focus.

Statistic Callout: According to the same tipping privacy research, the feeling of being watched or asked for unneeded information measurably reduces whether someone tips at all, not just how much. Privacy isn’t a nice add on feature here, it’s a direct lever on your conversion rate.

How Fast Do You Actually Get Paid, and What Do Fees Look Like?

There’s a difference between your tip balance updating and the cash actually landing in your bank account, and mixing those two up is where most new users get confused. A tip usually shows up in your platform balance within seconds or minutes. Getting that balance into your checking account is a separate step, and it typically takes anywhere from same-day to one to three business days, depending on your bank and the payout method you’ve selected. Some platforms offer instant crediting to an internal balance, similar to what services like SnapTip describe, while the transfer to your actual bank account still runs on standard settlement timing.

Fees generally stack in two layers:

  • Payment processing fee — a percentage charged by the card network or wallet provider on every transaction, standard across virtually every payment link tool on the market.
  • Platform fee — what the tipping service itself charges to run the link, host the page, and manage payouts. Tipper’s own processing fee structure is disclosed at checkout so senders and recipients both see it clearly.

Tips are taxable income, full stop. Keep a simple record of transaction dates and amounts as they come in, don’t wait until tax season to reconstruct it from memory. The IRS newsroom publishes updated guidance on taxable income and deductions relevant to working Americans, and if your tip income becomes a meaningful part of your earnings, a conversation with an accountant is worth the hour it takes.

Why We Think One-Tap, No-Account Tipping Wins

Why We Think One-Tap, No-Account Tipping Wins — overview diagram

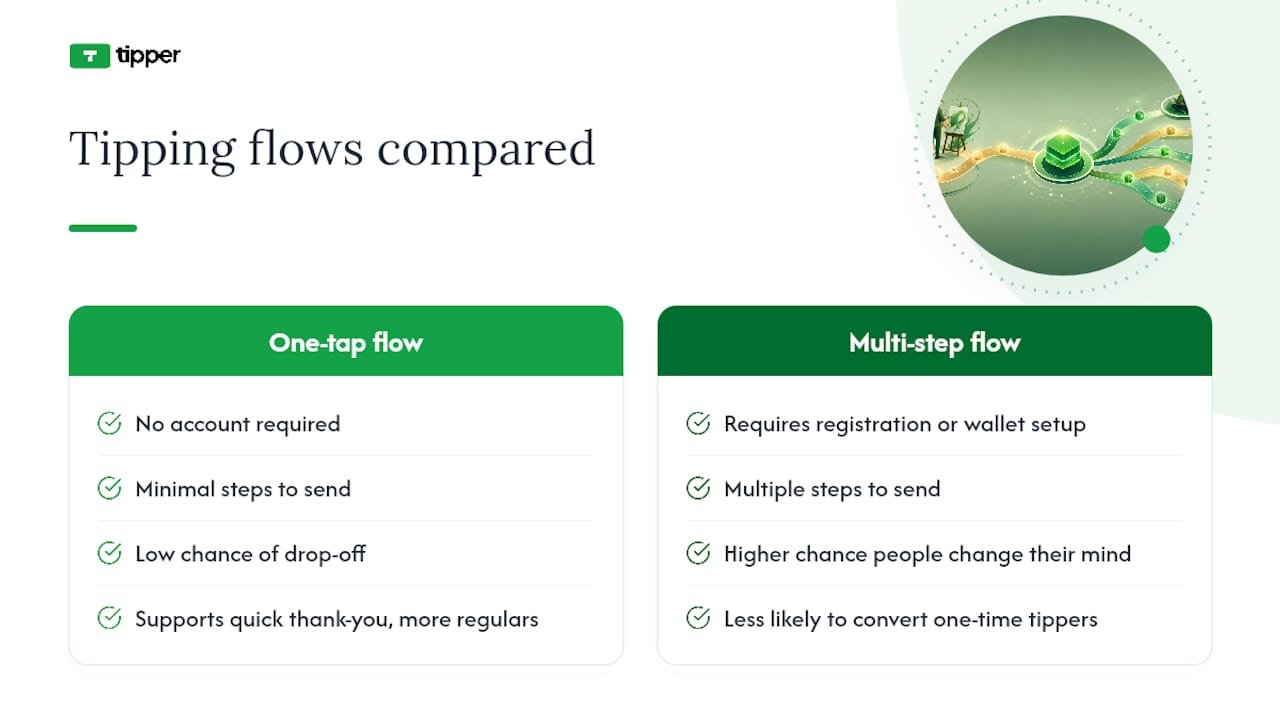
Every extra step between “someone wants to tip you” and “the tip is sent” is a step where they change their mind. That’s not a theory, it shows up in the research on tipping behavior, and it’s the entire reason Tipper builds around a no-account, wallet-first flow instead of asking senders to register anywhere.

The part people underestimate is the personal touch. A tip is rarely just a transaction, it’s a small “I see you” moment, and creators who send back a quick thank-you note or short video turn one-time tippers into regulars. Simplicity and connection aren’t opposite goals here. They reinforce each other.

— Tipper

Some platforms provide a personalized link and QR code that lets anyone tip you instantly with Apple Pay, Google Pay, or a card, no sender account, no app download, no friction.

Tipper

Getting started takes about five minutes. Sign up, build your link with a photo and a couple of suggested amounts, and run a $1 test tip to confirm your payout path works before you share it anywhere. Then drop the link in your social bio, print the QR code for your counter or invoice, or paste it straight into a text message. If you want a walkthrough of how other creators are placing these links in real setups, the contactless tip collection examples page is a good place to see it in practice. Head to Tipper to create your link and start collecting tips today.

Sources

For the technical side of hosted payment links, Stripe’s payment links documentation and PayPal’s payment links page both cover supported payment methods and checkout security in detail. For the tax side, the IRS newsroom is the authoritative source on how tip income is taxed. And for the behavioral research behind why privacy-first tipping flows convert better, the study on tipping privacy is worth reading in full.

FAQ

An instant tipping link is a hosted checkout page, usually paired with a QR code, that lets someone send you money in a few taps without creating an account. Tipper builds this specifically around one-tap wallet payments like Apple Pay and Google Pay so the sender never has to fill out a form.

How Long Does It Take to Get Paid After a Tip?

Your balance typically updates within seconds or minutes of the tip being sent. The transfer to your actual bank account depends on your payout settings and bank, generally landing same-day to within one to three business days.

Do I Need a Business Account to Accept Tips?

No. Most tipping link platforms only require you to verify your identity and bank details, not a registered business. Senders never need any account at all to send you a tip.

Yes. Tips are taxable income regardless of how they’re received, and the IRS treats digital tips the same as cash tips. Keep records of every transaction so reporting them at tax time is straightforward.

Expect a payment processing fee charged by the card or wallet network on each transaction, which is standard across nearly every payment link service. Some platforms add a separate platform fee for hosting and managing the tip page, and Tipper discloses its fee structure directly at checkout.

Collect Tips in 5 Minutes With Tipper: Tipping Link for Creators2026-09-22T01:02:10+00:00

No Login: Creators, Put Your YouTube Tip Link in Top Two Lines

A YouTube tip link is a personalized tipping URL, that you drop as the primary call to action in the top two lines of your video description or a pinned comment, so viewers can send money instantly with Apple Pay, Google Pay, or a card. No sign-up required on their end. Create the link, paste the full https:// address where viewers see it before hitting “Show more,” and click-test it on desktop and mobile before you publish. YouTube’s own tipping tools exist too, but they run on separate eligibility rules.


TL;DR:

  • Placing your tip link in the first two lines of the description ensures it remains visible before viewers click “Show more” on most devices.
  • Testing your complete, full https:// URL on both desktop and mobile after publishing is crucial to confirm it remains clickable and functional.
  • Limiting your description to three to five links, with the tip link at the top, prevents triggering spam detection and maintains viewer focus on your primary call to action.
  • Using UTM parameters on your tip URL helps track traffic sources and measure the effectiveness of each video or platform in driving tips.
  • Running both native YouTube tipping tools and external links allows you to maximize revenue control, payout timing, and viewer options based on your channel’s eligibility.

Tipper
Make Tipping Easier for Viewers
Tipper gives your audience a personalized link for instant tips without an account, using Apple Pay, Google Pay, or a card.

Create your tip link

Table of Contents

Placement decides whether your tip link gets clicked or gets buried. YouTube truncates descriptions after roughly the first two lines on most devices, so anything below that point disappears behind the “Show more” button until a viewer taps it. If your tip link sits on line five, most people will never see it.

Put your tip link in the first two lines of the description, right after a short hook sentence that tells viewers why they’d want to tip. This above-the-fold placement is standard advice from creators who structure descriptions around one clear ask instead of burying it in a wall of text.

Pinned comments are your backup channel — a tactic often highlighted in Effective Blog Promotion: Strategies to Increase Your Reach for catching viewers who skip the description entirely. A pinned comment shows up immediately when someone opens the comment section, so restating your tip link there catches viewers who skip the description entirely.

A few other placement options worth knowing:

  • Channel store and membership links work through /store or /join URLs, but these require channel eligibility tied to monetization status.
  • Cards and end screens can point to a store or membership page, not typically external tip links, and only for eligible channels.
  • New or under-review channels sometimes see description links render as plain, unlickable text, a known linkification limitation tied to account status or recent strikes.

A tip link that fails on half your viewers’ phones is worse than no link at all. Here’s how to build one that holds up.

  1. Create your tipping page. Sign up with a digital tipping platform, build your personalized page, and copy the complete URL, starting with https://, not a shortened fragment or a bare domain.
  2. Tag it with UTM parameters. Add source, medium, and campaign values to the URL so your analytics can tell you which video, or which platform, actually drove the tip. This is standard practice for tracing traffic sources back to specific content.
  3. Shorten it if it’s long. A managed slug keeps your description clean and lets you redirect the destination later without editing dozens of old videos.
  4. Run the test routine. Publish the video, expand the description, click the link on both desktop and mobile, and if possible, send yourself a small test tip to confirm the payment flow works end to end.
  5. Check your analytics after a few views. Confirm the UTM hits are showing up before you lean on that link for a big promotion push.

Pro Tip: Never paste a URL straight out of a word processor. Smart quotes and invisible formatting characters can quietly break YouTube’s link detection, even when the URL looks perfectly normal on screen.

Skip line breaks inside the URL itself, and always keep the https:// prefix. Drop it, and YouTube may not recognize the text as a clickable link at all.

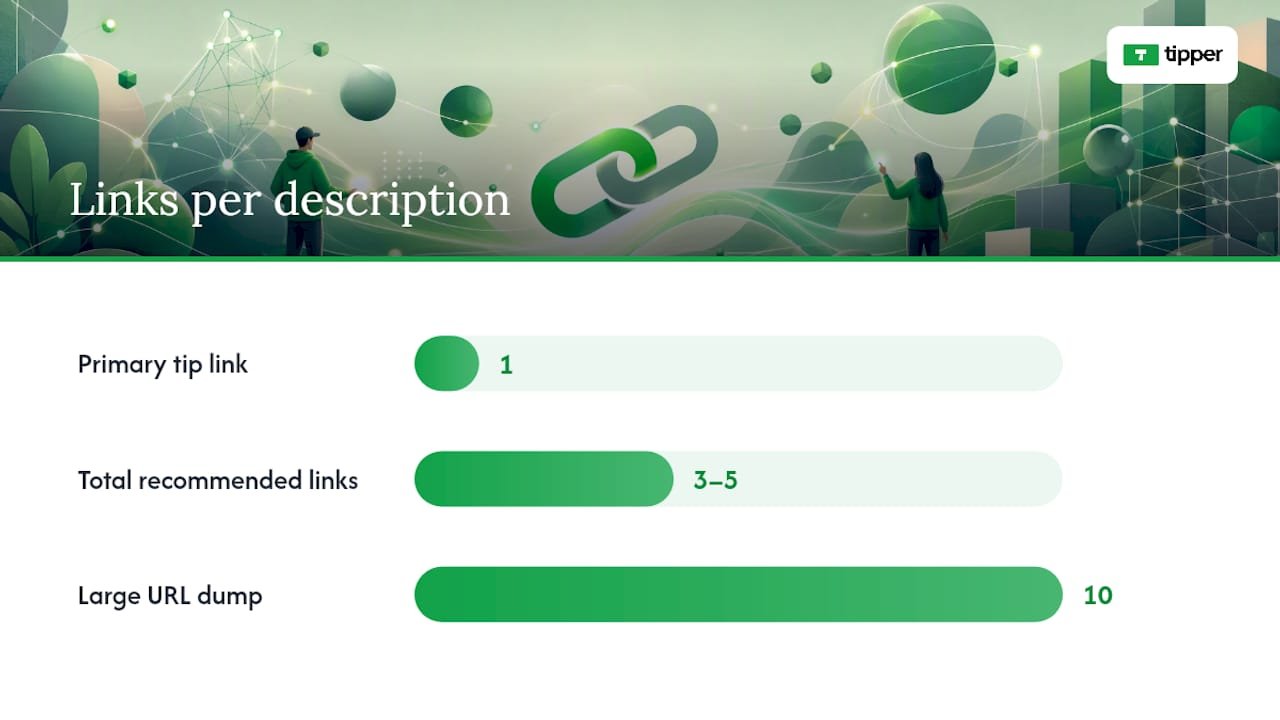
More links do not mean more tips. A description packed with ten different URLs actually works against you, both with viewers and with YouTube’s own systems.

Writing a Description That Doesn't Bury Your Link — overview diagram

Cap your total description links at 3 to 5 and give your tip link the top spot. Research into platform spam detection has found that an opening cluster of multiple URLs can read as a low-quality signal to automated moderation systems, which sometimes suppresses reach on the video. One clean, obvious CTA outperforms a link dump every time.

A quick structural template that works:

  • Line 1: A short hook. (“Enjoyed this? You can support the channel directly.”)
  • Line 2: Your tip link, full https:// URL, nothing else on that line.
  • Blank line.
  • Secondary links: social handles, merch, affiliate links, capped at 3 to 5 total.

If you run affiliate or sponsored links, place any required disclosure near those links, not buried at the bottom of the description. This matters for both platform policy and, depending on where you’re based, advertising law.

Save this structure as your default upload description. YouTube lets you set a template that autopopulates on every new video, which means you never have to remember to paste your tip link again. Consistency here compounds. A viewer who sees the same trustworthy layout on video after video is more likely to click without hesitating.

YouTube’s built-in tipping tools, Super Thanks, Super Chat, and channel memberships, sit in a different category from an external tip link. They appear directly inside the player or live chat, but they require eligibility enrollment through YouTube’s Commerce Product Module, and YouTube takes a revenue share.

An external tip link fills the gap when you don’t qualify yet, or when you want full control over payout timing and viewer privacy.

For live streams specifically:

  • Pin your tip link in the live chat at the start of the stream, not just once.
  • Mention it out loud every 15 to 20 minutes. Viewers scroll fast and miss pinned text constantly.
  • Overlay the URL on your stream graphics so it’s visible even to viewers with chat collapsed.
  • Label the link clearly. If your external tip link works differently from Super Chat, fees or payout timing, say so in one sentence, so viewers aren’t confused about what they’re using.

A broken link costs you tips silently. Nobody messages a creator to say “hey, your link didn’t work.” They just leave.

  1. Confirm the URL starts with https:// and contains no line breaks or smart quotes copied from a document.
  2. Test the link on both a desktop browser and a mobile device, since rendering issues sometimes show up on only one.
  3. If the link still shows as plain text, check whether your channel has a pending strike, a recent policy review, or incomplete verification. These are common causes.
  4. If the description link stays broken, move your tip link to a pinned comment or your channel banner as a temporary workaround while you resolve the account issue.

Be upfront in your description or a linked FAQ about how tips are used, what fees apply, and your refund policy. Viewers tip more when they trust exactly where the money goes.

External tip links give you something YouTube’s native tools don’t: full control over payout timing, higher retained revenue share, and ownership of your own supporter data instead of it living inside YouTube’s analytics dashboard. Native features like Super Thanks win on convenience. They appear right in the player, with zero friction for eligible viewers.

The smartest approach isn’t picking one and abandoning the other. Run both where you qualify, tag your external link with UTM parameters, and let a few weeks of data tell you which one your audience actually responds to. Keep your description hygiene consistent across every upload, because a tip link that shows up in a different spot every video trains viewers to stop looking for it.

— Tipper

Every step in this guide, the https:// link, the clean UTM structure, the short slug, the above-the-fold placement, can be provided by digital tipping platforms without the setup headache.

Tipper

Setup takes minutes. Create your account, build your personalized tip page, and copy the full link straight into the top two lines of your description or your pinned comment. You can also read Tipper’s creator tip link strategy guide for payout presets, or check how Tipper handles YouTube-specific setup if you want the platform-specific walkthrough. Supporters can also leave a thank-you note, photo, or short video with their tip, which turns a one-time payment into an actual moment between you and the person watching. Head to Tipper and get your link live before your next upload.

Sources

FAQ

A YouTube tip link is a personalized payment URL you place in your video description or pinned comment so viewers can send you money directly, without creating an account. Some platforms generate this link and support Apple Pay, Google Pay, and card payments at checkout.

You’ll find it on your tipping platform’s dashboard right after setup, ready to copy as a full https:// URL. Paste that exact URL into the top two lines of your description, since links placed above the fold get seen before viewers have to click “Show more.”

The most common cause is a missing https:// prefix, a smart quote or line break copied from a word processor, or a channel currently under policy review. YouTube’s linkifier fails silently on malformed URLs, so always test on both desktop and mobile after publishing.

Use both if you’re eligible. Super Thanks requires enrollment in YouTube’s Commerce Product Module and takes a revenue cut, while an external tip link like Tipper gives you direct payouts and keeps more of what viewers send.

Keep it to 3 to 5 total links, with your tip link as the single primary CTA at the top. Piling on more links dilutes clicks and can read as low-quality to YouTube’s own spam signals.

No Login: Creators, Put Your YouTube Tip Link in Top Two Lines2026-09-21T01:30:32+00:00

Get Paid Without a Login: TikTok Tip Link for Creators

A TikTok tip link is a personalized page or QR code that lets your followers send you money instantly through Apple Pay, Google Pay, or a card, with no account or sign-up required on their end. The move that actually works: build the tip page, connect a live payment processor, set three preset amounts, then drop the link in your TikTok bio and pinned comments and test it with a real payment before you promote it.


TL;DR:

  • Setting up a tip link requires verifying live mode status for your payment processor and ensuring your payout currency matches your intended receiving currency.
  • Placing the tip link on your TikTok profile, pinning it on high-engagement videos, or overlaying it in videos boosts click-through and tip collections.
  • Testing with a real payment before promotion uncovers most checkout issues, preventing lost tips and follower frustration.
  • Most creators overlook the importance of strategic placement, personalized messaging, and timing, which significantly increases tip revenue.
  • Using a flexible, account-free system like Tipper supports easy setup, multiple payment options, and keeps 100% of earnings without sign-up barriers.

Tipper
Let Your Audience Tip You Directly
Tipper gives creators a personalized link for instant tips through Apple Pay or Google Pay, with no supporter account required.

Start accepting tips

Table of Contents

Get these pieces lined up first, or you’ll be troubleshooting mid-launch instead of collecting tips.

  • An email address and login for your tip page account
  • A payout destination: a bank account or connected payout method where the money actually lands
  • A connected payment processor, either Stripe, PayPal, or an all-in-one built-in processor
  • Basic brand assets: a clear profile photo, a short display name, and a one-line description of what you do

Before you go live, confirm your processor account is switched to live mode, not test mode. This trips up more first-time creators than anything else. Also check that the currency on your payout settings matches the currency you expect to receive. A mismatch here means tips can process but land somewhere you didn’t intend, or fail outright. If you get stuck, Tipper’s internal setup walkthrough covers account creation and payout timing in more detail.

Step-by-Step: Build Your Tip Page and Connect Payments

Once your prerequisites are sorted, the actual build takes less time than editing a TikTok video.

  1. Create your tip page. Choose a short, memorable URL, upload a photo that matches your TikTok profile, and write one sentence explaining why someone might want to tip you. Specificity beats vagueness here. “Tips help me buy props for next week’s videos” outperforms “Support me.”
  2. Connect a payment processor. You can wire up Stripe payment links by selecting the “Donation” type and setting suggested amounts, connect PayPal directly, or use Tipper’s built-in processor flow, which skips the manual setup entirely. Whichever route you take, double-check the account is in live mode.
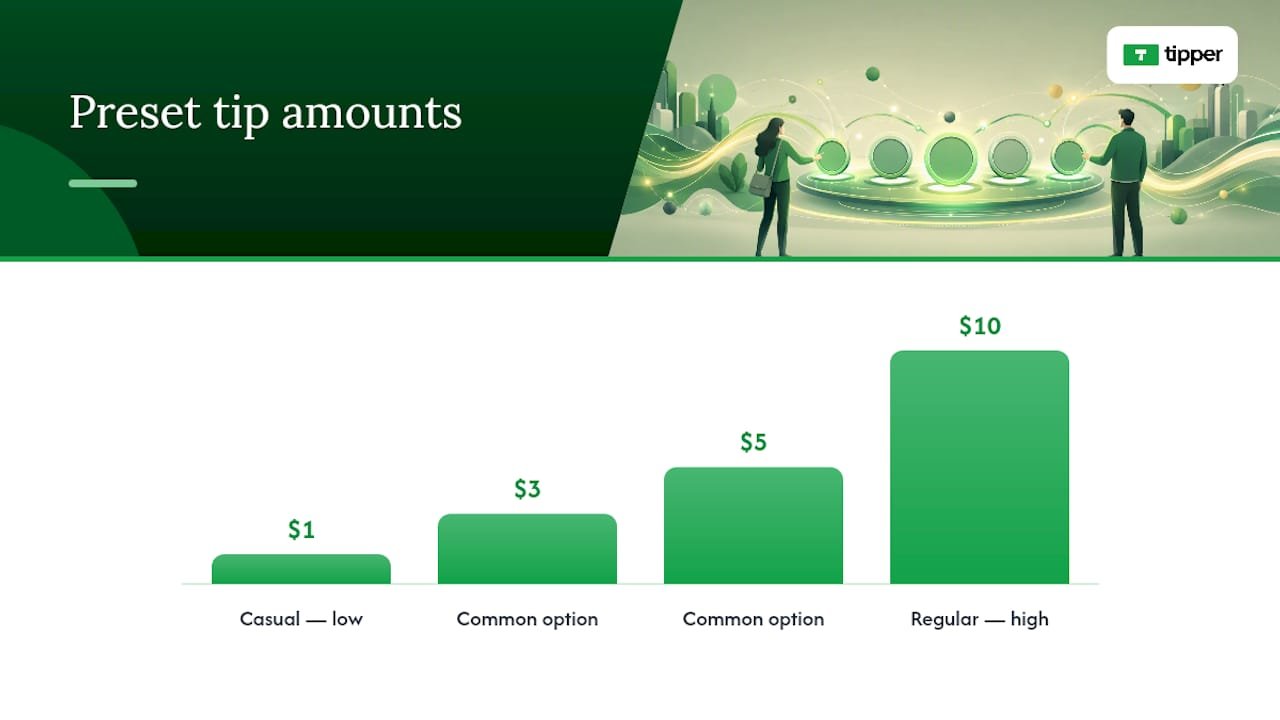
  3. Set your preset amounts. Three buttons is the standard: one impulse-tip amount, one default, and one for your biggest fans. Presets with a highlighted middle option tend to become the default choice for most tippers, so don’t bury your target amount at the end of the row. Decide whether you’ll allow custom amounts too, and write a genuine thank-you message that will show up after someone tips.
  4. Publish and test. Copy the public URL or generate a QR code, then send yourself a small, real payment. Not a test transaction. A live one. Confirm the thank-you screen displays correctly and that the receipt shows up where you expect it.

Pro Tip: Write your thank-you message like you’re texting a friend, not issuing a receipt. “Got your tip, means a lot, more content coming Friday” reads a hundred times warmer than “Thank you for your donation.”

A single payment link that accepts card, Apple Pay, Google Pay, and PayPal gives you flexibility if you plan to share the same link across platforms beyond TikTok, not just in your bio.

Placement determines whether your tip link gets clicked or ignored, and TikTok gives you exactly four real spots to use it.

  • Profile bio link. This is your baseline. Every visitor to your profile sees it.
  • Pinned comment on your best-performing posts. Pin it to videos that already have engagement, not your newest upload. People tip after they’ve already decided they like you.
  • Link-in-bio aggregator. If you’re juggling multiple links, put your tip link near the top, not buried under five other options.
  • QR code or short link overlay in the video itself. This works especially well on tutorial or behind-the-scenes content where the ask feels earned.

Keep your on-screen copy short: “Tip jar in bio if this helped” beats a paragraph explaining your monetization philosophy. Tell people specifically what tipping supports, whether that’s new equipment, more frequent uploads, or a personal thank-you video reply, because vague asks get vague results.

Tips tend to spike around these high-engagement moments rather than in response to constant, blanket requests, so save your asks for when they’ll actually land.

Pro Tip: Test your tip link on your own phone using both Apple Pay and Google Pay before you promote it. Mobile wallet behavior can differ from desktop, and you want to catch a broken checkout before a fan does.

Placing your tip option where people already have context, right after a helpful video or inside a pinned comment on proven content, converts noticeably better than sending cold traffic to a generic external page.

Test with real money before you tell a single follower the link exists. A $1 or $2 live payment to yourself will surface almost every problem a test-mode transaction hides.

If a payment doesn’t go through, work down this list:

  • Confirm your processor is actually in live mode. Test mode transactions look identical to real ones until the money never arrives.
  • Check for a currency mismatch between your tip page settings and your payout account.
  • Verify mobile wallet settings. Apple Pay and Google Pay sometimes need to be re-enabled after a processor update.
  • Double-check your payout account details are current, especially if you recently switched banks.

Once a test payment clears, confirm the funds actually reach your payout account and note the timing, since most processors settle within a few business days rather than instantly. If something still looks wrong, contact your platform or processor’s support team with the transaction ID, the exact time of the attempt, your device type, and a screenshot of the error. That level of detail gets a resolution faster than “my tip link isn’t working.”

Tipper’s Take on Account-Free Tipping and Audience Support

Tipper was built specifically to remove the account requirement on the tipper’s side.

Picture a creator who just posted a tutorial that took hours to film and edit. A fan sends a tip through the pinned comment link. Instead of a generic auto-reply, the creator records a fifteen-second thank-you video and sends it back. That small exchange, tip and personal response, is the entire mechanism that turns a one-time tipper into a repeat supporter. It’s not complicated. It’s just consistently rare, because most creators never build the reply into their routine.

For the technical side of connecting TikTok specifically, including how fees and backup links work, Tipper’s tipping breakdown for TikTok creators walks through the details step by step.

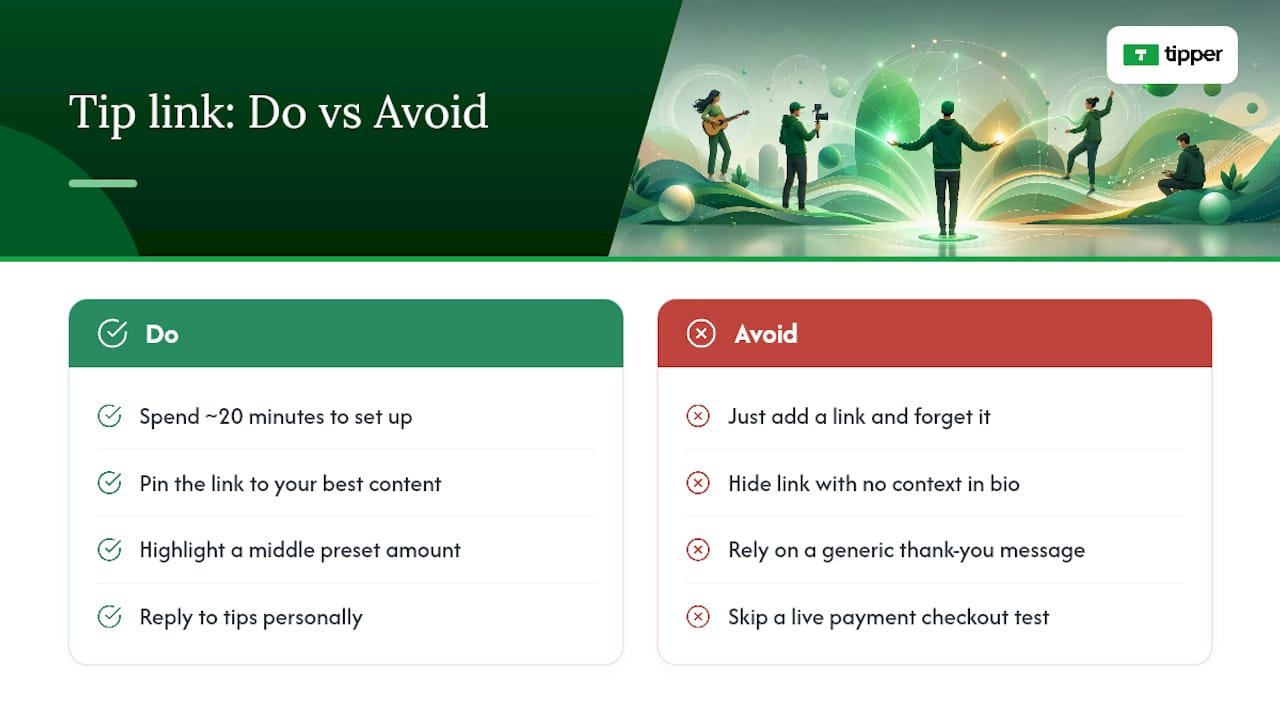
Most advice on this topic treats the tip link like a formality, something you slap in your bio once and forget. That’s backwards. The setup takes twenty minutes. The placement, timing, and follow-through are where almost everyone leaves money on the table.

The Part Most Creators Get Wrong About Tip Links — overview diagram

The conventional wisdom says “just add a link and ask for support.” But a link with no context, sitting in a bio nobody reads past the first line, converts at nearly nothing. The creators who actually collect meaningful tips are the ones who pin the link to their best content, highlight a middle preset amount so it becomes the default click, and reply to tips personally instead of letting a generic thank-you do the work.

If you’re setting this up for the first time, prioritize the live payment test over everything else. A broken checkout that nobody reports because nobody bothered trying is far more common, and far more costly, than a poorly worded bio line.

— Tipper

Ready to Start Collecting Tips With Tipper?

A direct route to an account-free tip link is built for exactly what this article covers: fast setup, no sign-up friction for the person sending the tip, and full ownership of your earnings.

Tipper

Here’s what that looks like in practice:

  • Fast setup. A tip page you can build and publish in minutes, not hours.
  • Privacy-first design. Supporters tip through mobile wallets or card without creating a login or handing over an account.
  • Direct payouts. Creators keep 100% of what they earn, with thank-you messages sent back as text, photo, or video for a personal touch.

If you run a physical business collecting in-person tips too, Tipper’s guide to point-of-sale tipping alternatives is worth a look. For creators ready to move now, set up your tip page on Tipper and have a working link before your next upload goes out.

Setup Guides Worth Bookmarking

For deeper technical steps matched to your specific payment processor, these resources cover the ground this article touched on:

Sources

FAQ

No. A personalized tip link works independently of TikTok’s account type since it lives outside the app entirely. You just need a place to paste the URL, whether that’s your bio, a pinned comment, or a video overlay.

Can Followers Tip Me Without Creating an Account?

Yes, that’s the entire point of an account-free tip link. Platforms like Tipper let supporters pay through Apple Pay, Google Pay, or a card in a few taps, with no login or sign-up step on their end.

Stripe and PayPal are the two most common choices, and both support payment links built specifically for tipping. Tipper also offers a built-in payment flow that skips the manual processor setup.

Send yourself a small, real payment rather than relying on test mode. Confirm the thank-you message displays, check that the receipt arrives, and verify the funds show up in your payout account within the processor’s normal settlement window.

Does Tipper Take a Cut of My Tips?

Current pricing details are listed on the Tipper website.

Get Paid Without a Login: TikTok Tip Link for Creators2026-09-20T01:01:48+00:00

Launch Designer Tipping Online Same Day, Preset Tips and No Account

The fastest way to run designer tipping online is a personalized tip link or QR code that takes Apple Pay, Google Pay, and cards without asking supporters to create an account. Set one up, put it on your bio, invoice, or checkout page, and you’re collecting instant appreciation payments the same day.


TL;DR:

  • Preset tip amounts, especially the middle value, significantly increase the average donation compared to freeform input, with recommended ranges depending on your audience.
  • Loading speed and minimal, focused design are crucial for high conversion, particularly on mobile data connections at in-person events or in busy environments.
  • Fees vary considerably, with native platform commissions reaching up to 30 percent, so using an external tip link can help maximize earnings.
  • Payouts typically arrive in your account within one to three business days, with standard processing fees applied per transaction.
  • Displaying trust signals such as a clear purpose statement, privacy reassurance, and optional receipts encourage support by establishing legitimacy and security.

Tipper
Keep 100% Of Your Tips
Tipper lets creators receive instant tips through a personalized link, with Apple Pay, Google Pay, and no account required for supporters.

Start receiving tips

Table of Contents

A tip link works in four steps: someone taps your link or scans your QR code, pays in seconds using a saved card or mobile wallet, optionally leaves a note, and the money lands in your account. No app download, no sign-up screen, no typed-in card number if the payer has Apple Pay or Google Pay already saved on their phone.

That no-account flow matters more than it sounds. Every extra field or login screen between a supporter’s impulse and their payment kills conversions. Dedicated tipping pages with tap-to-pay access capture that split-second decision before it fades.

Creators and small businesses typically place these links in:

  • Social media bios and creator profile links
  • Personal websites or portfolio contact pages
  • PDF invoices and email footers
  • Printed QR codes at a register, on a table tent, or on a delivery receipt

Adding a tip option to an existing site is common enough now that platforms like WooCommerce treat tips as standard order line items for bookkeeping purposes.

How Do You Set Up a Tipping Page or QR Code?

Getting a working tip page live takes less time than most people expect. Here’s the sequence:

  1. Create your tip page. Sign up, name your page, and add a profile photo or logo so supporters recognize you instantly.
  2. Connect payment methods. Turn on Apple Pay, Google Pay, and card processing so anyone can pay however they normally pay for things.
  3. Set your payout destination. Link a bank account or debit card, then send yourself a small test tip to confirm money actually moves through.
  4. Pick preset tip amounts. Choose two or three suggested values instead of leaving a blank field.
  5. Add a thank-you option. Decide whether you’ll respond with a text note, a photo, or a quick video message.
  6. Generate your URL and QR code. Drop the link into your bio and site, print the QR code if you work in person, and test the whole flow on your own phone before sharing it.

Pro Tip: Test your tip link on a phone that has never visited your page before, on both Wi-Fi and cellular data. First-time load speed is where most tip pages quietly lose money.

This entire setup rarely takes longer than the time it takes to order coffee. Tipper’s landing page walks through the same sequence, and most creators have a live link before they’ve finished their first cup.

What Makes Tipping Pages Convert Better?

The single biggest lever is preset amounts. Prompting a supporter with suggested values instead of a blank box increases the average tip. Research on anchoring found that prompted amounts lifted average tips by a significant margin compared to letting people type in whatever number they thought of.

A well-built tip page usually includes:

  • Three preset amounts with a sensible middle option, scaled to your audience (something like $1/$3/$5 for casual followers, $3/$5/$10 for regular supporters)
  • A clear, single call to action instead of competing buttons or offers
  • A visible profile photo so the person paying recognizes who they’re supporting
  • A short thank-you note or video option to close the loop
  • Minimal text and fast load time, especially on mobile data

That last point deserves attention. A tip page loaded on a shaky connection at a farmers market table has maybe three seconds to load before someone gives up. Mobile-first, one-tap experiences tend to convert better than anything requiring an app install or new account, and every extra image or widget adds load time you don’t need.

One detail people skip: limit the choices on the page. A tip page crowded with merchandise links, membership tiers, and social buttons splits attention away from the one action you actually want, which is the tip itself. Keep the page narrow in purpose. If you want to promote your merch store too, do that somewhere else.

Placement changes results as much as design does. A link buried in a bio performs differently than a QR code sitting on a counter or printed at the bottom of an invoice, so it’s worth testing more than one spot rather than assuming your first placement is the right one.

What Makes Tipping Pages Convert Better? — overview diagram

What Fees Should You Expect, and When Do You Get Paid?

Card and mobile wallet payments carry standard processing costs, which is normal across the payments industry and not unique to any one platform. What varies a lot more is the platform fee layered on top, and that’s where the math changes fast.

Here’s why that distinction matters: native tipping tools on major social platforms have been reported charging commissions up to roughly 30% on top of standard processing. On a $20 tip, that’s $6 gone before you see a dime.

  • Processing fees apply per transaction, the same as any card payment
  • Payouts typically land in your account within one to three business days
  • Most platforms give you a running log or export for tracking income

What Trust Signals Should Your Tip Page Show?

A page that looks legitimate gets tipped more. State plainly what the tip supports, mention that receipts are available, and reassure people their payment information stays private. None of this needs a paragraph. A single line under your headline does the job.

  • A one-sentence purpose statement (“Tips help fund new tutorial videos”)
  • A note that receipts are available on request
  • Privacy reassurance that payment details aren’t shared or displayed publicly
  • A private inbox for thank-you replies rather than exposing personal phone numbers or emails

Keep your own records separate from the platform, too. Export your tip history periodically so you have it for tax season, since tip income is generally reportable earnings, not a gift.

Pro Tip: If a tip arrives with a suspicious note, an unusually large amount from a new visitor, or a payment that gets reversed shortly after, treat it like any other flagged transaction. Contact your payment processor’s support line rather than refunding it yourself outside the platform.

The same basic tip page adapts to wildly different jobs. A freelance designer might drop the link on an invoice footer right under the total due. A streamer puts it in a bio and mentions it during a live broadcast. A coffee shop owner tapes a QR code by the register for people who want to tip but never carry cash.

  • Portfolio designers and consultants: add the link to your contact page and every invoice you send
  • Freelancers with in-person work: print a QR code on delivered work, business cards, or in a meeting room
  • Streamers and short-form creators: put the link in your bio and mention it during live sessions
  • Small service businesses: place a QR code at the counter and on printed receipts

Each of these placements gets a different kind of supporter, at a different moment of intent, which is exactly why testing more than one spot pays off.

Tipping links win for spontaneous, low-friction appreciation. Someone loved a specific post, invoice, or interaction and wants to say so right then. Memberships are a different tool entirely. They work once you’ve already proven recurring demand and want predictable monthly revenue instead of one-off gestures.

Most creators eventually run both. Combining a platform’s native features with an external tip link you control means you own the supporter relationship even if the platform changes its rules tomorrow. Instant, no-account tipping and keeping every dollar of the tip itself is what makes the external link worth having in the first place.

— Tipper

Some tipping platforms take a significant commission on every gift your supporters send you. Supporters tip through your personalized link or QR code without creating an account, paying with Apple Pay, Google Pay, or a card in a few taps.

Tipper

Setting one up follows the same short sequence covered above: build your page, turn on your payment methods, and share your link or QR code wherever supporters already find you, from a bio to an invoice to a printed sign at your counter. If you’re weighing this against a card-reader tip jar at checkout, point-of-sale alternatives worth knowing are worth a look too. When you’re ready, create your tip page and get a working link live before your next post goes out.

Sources

A few sources back the specific claims made throughout this guide, worth a look if you want the fuller picture.

FAQ

What Is Designer Tipping Online?

It refers to collecting tips or appreciation payments through a personalized link or QR code instead of a platform’s built-in tipping feature. Senders pay with Apple Pay, Google Pay, or a card, often without creating an account, and the money goes directly to the creator or business.

Do Supporters Need an Account to Send a Tip?

No. A well-built tip link lets anyone pay in a few taps using a saved mobile wallet or card, with no sign-up screen in the way. That no-account flow is a big part of why tap-to-pay tip pages convert better than tools requiring an app download.

How Much Does Tipper Charge to Use?

Tipper’s platform fee structure and current processing rates are listed on the Tipper website. Creators keep the tip itself with only standard processing applied. Check the site for the exact current numbers before you launch.

How Fast Do Tip Payouts Arrive?

Most tip page payouts land in a connected bank account within one to three business days after the transaction clears. Timing can vary slightly depending on your bank and the payment method the supporter used.

Use both if your platform allows it, but keep an external tip link for ownership over the relationship and to avoid high native tipping commissions. Owning the tip page directly also means your setup survives even if a platform changes its monetization rules.

Launch Designer Tipping Online Same Day, Preset Tips and No Account2026-09-19T01:30:26+00:00

Get 40% Higher Completion With Tip Goals and Milestones for Creators

Tip goals and milestones are dollar targets tied to specific rewards that turn casual tipping into a game your supporters want to win. Tipper lets you build that first goal on a personalized tip page in minutes, no separate account needed for anyone sending you money.


TL;DR:

  • Setting a first tip goal 20 to 40% above your recent average encourages supporters to contribute more without feeling overwhelmed.
  • Using 3 to 6 spaced milestones and revealing them progressively maintains momentum and engagement throughout the campaign.
  • Digital and community rewards, such as exclusive content or shout-outs, are the most cost-effective incentives for scaling support.
  • Real-time progress bars and immediate goal announcements significantly boost tip velocity and supporter participation.
  • Never promise physical rewards without verifying costs and lead times, as uncosted promises harm supporter relationships.

Tipper
Turn Support Into Direct Appreciation
Tipper gives creators a personalized link for instant tips, with no account required and 100% of earnings kept.

Create your tip link

Table of Contents

Why Public Tip Goals and Milestones Drive More Contributions

People tip more when they can see exactly what their money accomplishes. A vague “support my work” link asks for charity. A visible goal with a specific reward asks for partnership, and that reframing changes behavior fast.

Structured goals with clear rewards produce roughly 40% higher completion rates than vague requests, according to practitioner reports tracking creator campaigns. The mechanism is simple: social proof. When a supporter sees a progress bar sitting at 80%, they don’t want to be the one who let it stall. When it just hit a milestone, they want to be part of what unlocks next.

A few behavioral shifts show up consistently once creators add visible milestones:

  • Repeat tippers increase because the reward, not the request, becomes the reason to come back.
  • Average tip size often rises as supporters round up to help close a gap.
  • Lurkers convert into first-time tippers when a countdown creates urgency.
  • Comments and shares increase around unlock moments, extending reach for free.

None of this requires a huge audience. It requires a number, a deadline, and something worth unlocking.

How to Build a Goal Ladder for Your Tip Page

Designing a goal ladder is less about ambition and more about arithmetic. Here’s the sequence that keeps supporters engaged instead of overwhelmed.

  1. Measure your baseline. Pull your last four to eight weeks of tips and calculate an average per session or per week. This is the number everything else gets built on.
  2. Set your first goal 20 to 40% above baseline. Crowdfunding practitioners recommend the first stretch goal land around 25 to 40% above the starting point, which is close enough to feel achievable but far enough to require real effort from your supporters.
  3. Plan 3 to 6 milestones total, spacing each one meaningfully higher than the last so momentum doesn’t flatten halfway through.
  4. Keep each window short. Goals framed around a week or less tend to outperform long, open-ended campaigns because urgency fades once a deadline stretches past a few days.
  5. Cost every reward before you announce it. Know your unit cost, any setup cost, and shipping or processing if it’s physical. Confirm you can actually deliver on the timeline you’re about to promise.
  6. Reveal goals progressively. Show milestone one. Once it unlocks, reveal milestone two. Don’t dump your whole roadmap on day one.
  7. Hold back one surprise unlock. Reserve at least one milestone you never announced in advance, and drop it during a lull to reboot momentum when contributions slow down.

Pro Tip: Write your unlock announcement and thank-you message before you launch the goal, not after. Scrambling to record a thank-you video the moment a milestone hits is how creators delay rewards and lose trust.

Breaking a big target into smaller wins matters more than the size of the target itself. Smaller, frequent wins sustain momentum far better than one distant, all-or-nothing number.

What Kinds of Milestone Rewards Actually Scale?

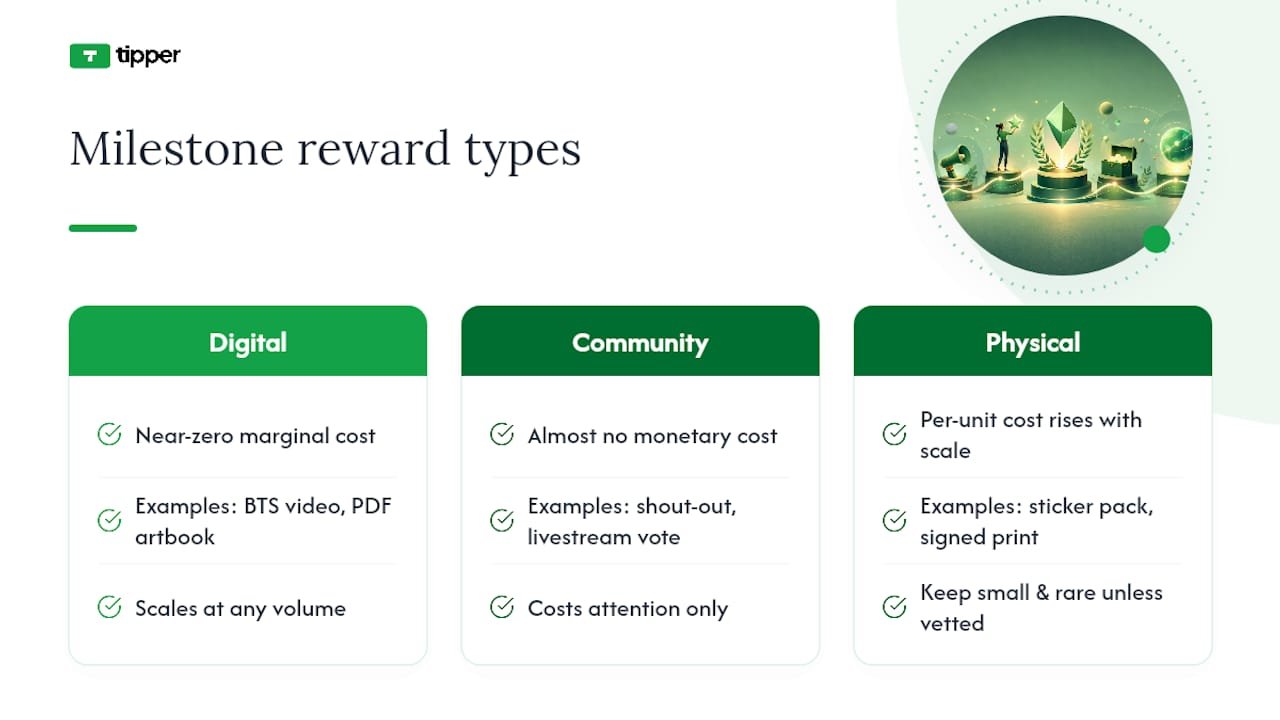
The best rewards cost you almost nothing to deliver at any volume. Digital and community rewards carry near-zero marginal cost, which is exactly why they dominate successful goal ladders over physical merchandise.

Digital rewards work well for almost any creator: an exclusive behind-the-scenes video, a downloadable wallpaper pack, an early-access chapter, or a full art book delivered as a PDF. Digital-product platforms like BananaSpace exist specifically to handle this kind of delivery cleanly.

Community rewards cost nothing but attention: a shout-out on your next post, a backer-only livestream, a vote on your next topic, or a name in the credits of your next release.

Physical rewards should stay small and rare unless you’ve already vetted a supplier and shipping cost. A sticker pack is fine. A hand-signed print run of fifty is a logistics project.

By niche: podcasters often unlock ad-free bonus episodes, visual artists unlock process breakdowns or high-res files, and musicians in an independent artist playbook frequently use early single access or a personalized shout-out track as their top-tier unlock, usually costing under an hour of extra work.

What Kinds of Milestone Rewards Actually Scale? — overview diagram

How Do You Track and Display Progress on a Tip Page?

Your progress bar is doing half the persuasion work, so it needs to update in real time and show a metric supporters instantly understand, like dollars raised against dollars needed. Visible progress widgets correlate with higher participation and tip velocity across platform and streamer reports, which is reason enough to keep it front and center rather than buried in a bio link.

When a goal unlocks, announce it immediately, post the final number, and reveal the next goal in the same breath. Waiting even a day to reveal what’s next lets momentum cool.

Behind the scenes, a simple spreadsheet keeps you organized without any special software:

Field Purpose
Tip amount Tracks progress toward the current goal
Date and time Identifies patterns in when supporters give
Supporter identifier Enables personal thank-yous and repeat recognition
Reward assigned Prevents double-promising or missed fulfillment
Fulfillment status Flags what’s still owed

Payment friction kills momentum faster than a bad reward does. Instant payment options like Apple Pay and Google Pay, built into Tipper’s tipping links, let a supporter act the second they see a progress bar move, instead of digging for a card number and abandoning the tip halfway through.

What Mistakes Wreck Tip Goals and How Do You Avoid Them?

The fastest way to damage a supporter relationship is promising a reward you haven’t priced out. Uncosted promises turn into expensive apologies, and once a creator misses a delivery date, supporters remember it longer than they remember the milestone itself.

A few rules keep your ladder safe:

  • Never promise a physical or time-intensive reward without confirming supplier cost and lead time first.
  • Don’t publish every milestone on day one. Progressive reveals keep supporters checking back.
  • Keep at least one milestone unannounced, ready to deploy when contributions stall midweek.
  • Set a realistic delivery timeline for every reward, and communicate any delay before someone has to ask.
  • Decide your refund or make-good policy before you need it, not after a supporter complains.

Pro Tip: Treat every physical reward like a small product SKU: unit cost, packaging, and shipping all need a number attached before the reward goes live, not a guess.

What We’ve Learned Watching Creators Build Their Own Ladders

Tipper exists because supporters wanted to give money without friction and creators wanted to keep every dollar of it, so instant tips through a personalized link with no account required for the sender became the whole point of the product. What we hear back from creators most often isn’t about the dollar targets. It’s about the thank-you.

A personal note or a short video acknowledging a specific supporter by name tends to bring that person back sooner than any progress bar does. Milestone recognition, especially tied to a supporter’s anniversary or their fifth or tenth tip, turns a one-time giver into someone who checks your page on purpose.

The goal ladder gets people to the page. The personal moment is what gets them to come back.

— Tipper

Set Up Your First Tip Goal on Tipper Today

This service turns everything in this playbook into a page you can build in one sitting: a personalized tipping link, a customizable goal display, Apple Pay and Google Pay support, and thank-you messages you can send as text, photo, or video.

Tipper

Here’s the quick-start version. Because creators keep 100% of what they earn on Tipper, every dollar toward your first milestone actually reaches you. If you want the fuller picture on frictionless collection before you launch, frictionless tipping practices walks through the setup details. Start your first goal now at Tipper.

Sources

FAQ

What Is a Realistic First Tip Goal to Set?

Aim for 20 to 40% above your average weekly tip total, since that range feels achievable to supporters while still requiring genuine effort to reach.

How Many Milestones Should a Goal Ladder Have?

Most creators do well with 3 to 6 milestones, spaced far enough apart to preserve momentum without making the ladder feel endless.

Should I Announce All My Milestones at Once?

No. Reveal each goal only after the previous one unlocks, and hold back at least one surprise milestone for a mid-campaign lull.

Does Tipper Support Progress Bars and Goal Tracking?

Yes, Tipper supports customizable tip pages where creators can display goal progress alongside instant payment options like Apple Pay and Google Pay.

What Rewards Work Best for Low-Budget Creators?

Digital and community rewards, such as exclusive videos, shout-outs, or early access, cost almost nothing to deliver and scale cleanly regardless of how many supporters contribute.

Get 40% Higher Completion With Tip Goals and Milestones for Creators2026-09-18T02:00:37+00:00

Open MPP Files in Under 5 Minutes: Steps for Windows, Mac, Browser

If you have Microsoft Project installed, click File > Open, browse to the file, and select it. If you don’t, upload the .mpp file to a trusted web viewer, install a free desktop viewer like ProjectLibre, or just ask whoever sent it to export a PDF or XML version instead. All three routes get you looking at the schedule in under five minutes.


TL;DR:

  • Most web-based viewers support uploading files up to a certain size, but large project files may stall or reject uploads due to resource limits.
  • Desktop viewers like ProjectLibre are free and work across platforms, with ProjectLibre being the best option for Mac users without Project.
  • Opening in Microsoft Project guarantees full functionality, but for quick viewing, web viewers or exported PDFs are often sufficient and quicker.
  • If files are corrupted or version mismatched, requesting an older format or an XML export can help avoid compatibility issues.
  • For files with sensitive information, offline desktop viewers or exporting to PDF/XPS offers the safest way to review project data without risking data leaks.

Tipper
Turn Audience Support Into Tips
Tipper helps creators receive instant tips through a personalized link, with no account required for supporters and 100% of earnings kept.

Table of Contents

Quick Options for How to Open MPP Files by Situation

The right method depends on what you already have installed and whether you need to edit the file or just look at it. Here’s the fast breakdown:

  • You already have Microsoft Project: Use File > Open. This is the only path that guarantees full editing, macros, and resource leveling.
  • You need a view-only look right now: A web-based MPP viewer works without installing anything, and most support drag-and-drop uploads.
  • You’re on a Mac with no Project license: ProjectLibre runs on macOS through Java and can open most .mpp files for free.
  • You get .mpp files regularly but don’t own Project: Install a dedicated desktop viewer once instead of relying on browser uploads every time.

Keep in mind that almost every non-Microsoft option is read-only or has limited editing, and some desktop viewers require a license after a trial period.

How Do You Open an MPP File in Microsoft Project?

Opening an .mpp file in the actual Microsoft Project application is the most reliable method, and it’s also the only one that preserves every feature the file was built with. The steps are the same whether you’re on Project Standard, Project Professional, or accessing files through Project Web App.

  1. Open Microsoft Project and go to File > Open.
  2. Choose This PC, then click Browse.
  3. Navigate to the .mpp file and select it.
  4. Instead of clicking Open directly, click the small arrow next to the Open button.
  5. Choose Open Read-Only if you just want to review the file, or Open as Copy if you plan to make changes without touching the original.

If your file was created in a different program or an older Project format, use the file name dropdown in the Open dialog to select the correct format before loading it, according to Microsoft’s official support documentation.

For anyone working through Project Web App or Project Professional connected to a server, log in, select File > Open, then browse either the server or your local cache to find the plan.

Pro Tip: If you’re only sharing a status update with people who don’t have Project, skip sending the .mpp entirely. Export to PDF or XPS instead so nobody has to hunt for software just to see a Gantt chart.

Can You Open MPP Files in a Web Browser?

Yes, and this is often the fastest option when you don’t have Project installed and just need a quick look. Web-based MPP viewers let you upload the file directly in your browser without downloading anything.

The typical flow looks like this:

  • Go to the viewer’s website.
  • Click Import or Open File.
  • Upload your .mpp file from your computer.
  • Wait a few seconds while it renders the Gantt chart, task list, and dependencies.

Some viewers let you view a project completely free with no account, while others require a sign-up or a trial period if you want to save your work or revisit the file later. Behavior varies a lot from one tool to the next, so check what happens to your data before you commit to uploading anything sensitive.

That last point matters more than most people realize. Project files frequently contain budget figures, client names, internal deadlines, and staffing details that have no business sitting on a server you’ve never heard of. If a project touches sensitive financial or personnel information, an offline desktop viewer or a direct request for a PDF export is the safer move, a point Microsoft itself makes when discussing alternatives to installing the full application.

There’s also a practical size limit to watch for. Large, resource-heavy project files with hundreds of tasks and dependencies can be slow to upload or may get rejected outright by browser-based tools that cap file sizes for free users. If a web viewer stalls or throws an error on upload, that’s often the reason, not a corrupted file.

When in doubt about a source you don’t recognize, the safest question to ask is simple: “Can you just send me a PDF?”

Which Desktop Apps Open MPP Files for Free?

Several third-party tools exist specifically because Microsoft Project itself has no free standalone viewer. The four names that come up constantly across support forums and product comparisons are Project Plan 365 (also marketed as Project Viewer 365), ProjectLibre, Seavus Project Viewer, and MOOS Project Viewer.

The install-and-open flow is nearly identical across all of them:

  • Download the installer from the developer’s site.
  • Run the installer and launch the application.
  • Select File > Open.
  • Browse to your .mpp file and open it.

ProjectLibre stands out because it’s open source, free, and runs on macOS through Java, which makes it the go-to pick for Mac users who don’t want to mess with a virtual machine. Seavus Project Viewer and Project Plan 365 both offer free trials but typically shift to paid licensing for continued use, and some editions lean read-only rather than full editing, according to a product comparison from Seavus. MOOS Project Viewer follows a similar pattern with a free tier for basic viewing.

Pro Tip: If a project file contains anything sensitive, choose a desktop viewer over a browser upload. Nothing leaves your machine, and you’re not trusting an unknown server with your data.

Offline viewer contrasted with browser upload

Ask the Sender: Export Options That Skip the Software Problem Entirely

Sometimes the fastest fix isn’t opening the .mpp yourself at all. It’s asking whoever built the file to send it in a format you can already open.

  • PDF or XPS export: Gives you a clean, static view of the schedule and Gantt chart, perfect for meetings where nobody needs to edit anything.
  • Copy Picture: Lets the sender grab a snapshot image of the project view, ideal for dropping into an email or slide deck.
  • MSPDI (XML) export: A more portable file format that many viewers and older Project versions handle better than a native .mpp.
  • Save As an older Project version: Fixes compatibility issues when the sender’s Project version is newer than whatever you or your viewer supports.

For a status check before a meeting starts, a screenshot or exported PDF beats installing anything. It takes the sender thirty seconds and saves you the entire troubleshooting process.

Why Won’t My MPP File Open, and How Do You Fix It?

Most opening failures come down to one of three causes: version mismatch, file corruption, or a simple mistake like a wrong extension. Work through them in this order:

  1. Check the basics first. Confirm the file actually ends in .mpp, that it’s not a renamed .mpt template, and that it isn’t sitting above a web viewer’s upload size limit.
  2. Rule out a version conflict. A newer .mpp saved in a recent Project version may not open in an older copy of Project or in some viewers. Ask the sender to use Save As to export an older format, or request an MSPDI/XML export instead, since XML travels across versions more reliably than the native format.
  3. Suspect corruption. Try a different viewer entirely. If nothing opens it, a Microsoft Project trial can sometimes repair or export a partially damaged file that third-party viewers simply reject.
  4. Check for a password. Project files can be protected, and a locked file will fail silently in some viewers instead of showing a clear error message.

If the file references external resources or links to a Project Server, a viewer might show blank placeholders instead of real data. In that case, ask the file’s owner for a published PDF or XPS snapshot rather than the raw .mpp, which sidesteps the server dependency entirely.

When a Viewer Is Enough, and When You Need the Real Thing

Where they fall apart is anything involving macros, custom fields, or resource leveling. Those features live inside Microsoft Project itself and don’t translate to third-party tools.

When a Viewer Is Enough, and When You Need the Real Thing — overview diagram

If your job involves regularly editing project files rather than just glancing at them, build a habit of asking for MSPDI (XML) exports instead of raw .mpp files whenever version mismatches are a recurring problem. It’s a small workflow change that saves a surprising amount of back-and-forth over “which version of Project do you have.”

Sources

FAQ

Can I Open an MPP File in Excel?

Not directly. Excel can’t natively read the .mpp format, though you can sometimes import specific task data if the sender first exports the project to a CSV or Excel-compatible file from Project.

Can I Open MPP Files Online Without Installing Anything?

Yes. Web-based MPP viewers let you upload the file in a browser and see the Gantt chart and task list without installing software, though most offer read-only access rather than full editing.

How Can I Open an MPP File Without Microsoft Project?

Use a free desktop viewer like ProjectLibre, a web-based viewer, or ask the sender to export the file to PDF, XPS, or XML so you can view it in a program you already have.

Which Apps Open MPP Files Besides Microsoft Project?

Project Plan 365 (also called Project Viewer 365), ProjectLibre, Seavus Project Viewer, and MOOS Project Viewer all open .mpp files, with ProjectLibre being the main free, open-source, cross-platform option.

Open MPP Files in Under 5 Minutes: Steps for Windows, Mac, Browser2026-09-17T00:01:49+00:00

RPI Admissions: Apply by Jan 15, Deadlines, RINs, and Submission Steps

RPI is considered moderately selective, reflecting its focus as an engineering and technology school rather than a reach-only bet. It’s test-optional for nearly every program except the combined B.S./M.D. track. Your immediate move: pick an application plan (Early Decision I, Early Action, Early Decision II, or Regular Decision), confirm its deadline, and start building your Common App or RPI application file now.


TL;DR:

  • Reporting test scores is optional for most programs, but submitting strong scores can still enhance an application if available.
  • The application deadlines are November 1 for Early Decision I, December 1 for Early Action, January 6 for Early Decision II, and January 15 for Regular Decision.
  • Transfer applicants need a minimum of 12 college credits and a roughly 3.0 GPA, with rolling review and specific portfolio requirements for architecture.
  • Optional materials like Glimpse videos or InitialView interviews should focus on specific projects or leadership examples to leave a stronger impression.
  • Demonstrating initiative through recommendations, resumes, or optional content can significantly strengthen an otherwise solid application.

Tipper
Share Your Work, Your Way
Tipper helps creators receive instant tips through a personalized link, with no supporter account required and creators keeping 100% of earnings.

Table of Contents

RPI Admissions at a Glance: Stats, Test Policy, and Deadlines

Acceptance rates shift a bit year to year, and RPI doesn’t publish a single locked-in number for the upcoming cycle. What’s consistent is the pattern: the school reviews each applicant’s full record rather than sorting by a single cutoff score. Among admitted students who choose to report scores, mid-range SAT and ACT figures tend to land in competitive territory for a technical university, but plenty of accepted students submit no scores at all.

Rensselaer Polytechnic Institute stays test-optional for essentially every undergraduate program in the current cycle, with one notable exception: the Physician-Scientist B.S./M.D. program generally expects standardized scores given its accelerated medical track.

Here’s the plan structure that matters most for your timeline:

  • Early Decision I: apply by November 1, hear back by mid-December.
  • Early Action: apply by December 1, hear back by late January.
  • Early Decision II: apply by January 6, hear back by mid-February.
  • Regular Decision: apply by January 15, hear back by early March.

These dates come straight from RPI’s own apply page, and they’re firm. Notification timing can move a few days depending on volume, but the submission deadlines don’t budge.

Application Requirements: Platforms, Documents, and Fees

Most first-year applicants apply through the Common App, but RPI also runs its own application portal for certain programs. Architecture applicants and those applying to the Physician-Scientist B.S./M.D. program follow separate submission routes with their own supplemental steps, so check your intended major before you start filling anything out. RPI also enforces a single-program-per-term rule: you pick one major track per admission cycle rather than hedging across several.

On the academic side, RPI wants to see four years of math (through pre-calculus or beyond, ideally calculus for engineering-bound applicants), three to four years of lab science, and a solid run of English and social studies. Course rigor matters more than a padded transcript with easy electives.

Here’s the practical submission sequence:

  1. Choose your platform. Common App for most majors; RPI’s own application for architecture and select programs.
  2. Request transcripts and recommendations early. Counselors can use a free Slate.org account to send documents regardless of which platform you’re applying through.
  3. Submit your essay and pay the fee (or file for a fee waiver if you qualify based on documented financial need).
  4. Watch for your Rensselaer ID (RIN). It typically arrives within a few days of submission and unlocks your applicant portal.
  5. Treat the portal as your source of truth. Notifications, missing-document alerts, and decision releases all route through it first.

Pro Tip: Recommendations and transcripts don’t have to land on the deadline itself. RPI expects supplemental materials to trickle in for about two weeks after your submission date, so use that window instead of panicking if a counselor is running behind.

If something looks off in your file after submission, RPI’s own FAQ page is the best reference, and you can reach the admissions office directly at adm_updates@rpi.edu for status questions the portal doesn’t answer.

Optional Materials: Glimpse Videos, InitialView, and Portfolios

RPI gives U.S. applicants the option to submit a Glimpse video, a 60 to 90 second clip that lets you show personality and context a transcript can’t capture. Deadlines shift slightly by plan, so match your video submission to whichever round you’re applying under.

International applicants get a parallel option called InitialView, a recorded interview that serves a similar purpose to Glimpse for students outside the U.S. school system.

  • Glimpse videos: optional, 60 to 90 seconds, timed to your application round’s deadline.
  • InitialView: optional interview format built for international applicants.
  • Architecture portfolios: submitted through Slideroom, with RPI recommending you finish at least ten days ahead of your deadline to avoid upload issues.
  • An additional resume helps when your activities list doesn’t capture leadership depth or a specialized project.

Pro Tip: Skip the highlight reel approach. One focused Glimpse video about a robotics build, a research project, or a leadership role you actually drove beats three generic clips about “why I love STEM.”

Transfer Admissions: Eligibility, GPA, and Deadlines

Transfer applicants need at least 12 transferable college credits to be considered, and RPI generally looks for a GPA around 3.0, though the admissions team weighs context rather than applying a hard cutoff.

Transfer review runs on a rolling basis rather than fixed notification dates, which means earlier applications inside the window tend to get faster answers. Deadlines are June 1 for fall enrollment and November 1 for spring.

  • Minimum 12 transferable credits required for consideration.
  • Rolling review, so apply as early in the window as your transcript allows.
  • Architecture transfer applicants still need a Slideroom portfolio.
  • Confirm prerequisite coursework, especially pre-calculus and physics, before applying to protect credit transferability.

How RPI Evaluates Applicants and What Strengthens Your File

RPI’s admissions team reviews every application holistically, looking specifically for what they describe as creative, collaborative risk-takers. That phrase isn’t filler. It signals they’re reading for initiative, not just grade point averages: the student who started a maker-space club, the one who taught themselves CAD software over a summer, the one who pushed a research project further than the assignment required.

Early grades carry real weight for Early Decision and Early Action applicants specifically, since first-quarter or first-trimester senior grades often arrive during the review window and get folded into the file.

Concrete ways to strengthen what you submit:

  1. Choose recommenders who can speak to specific classroom moments, not just “she’s a great student.”
  2. Use your resume to surface leadership and initiative your activities list compresses into one line.
  3. If your Early Decision or Early Action grades come in strong, send an optional update through the portal rather than assuming the file is closed.
  4. Make your Glimpse video or essay demonstrate a specific project or problem you solved, not a general interest statement.

Strong optional content sounds like: “I redesigned our robotics team’s drivetrain after our first competition loss, cutting turn time by half.” Weak optional content sounds like: “I’ve always loved building things and solving problems.” One shows evidence. The other just states enthusiasm.

Application Checklist and Timeline: What to Do Before and After You Hit Submit

Before submission, lock down four things: finalized essays, recommendation requests sent with enough lead time, a clear decision on whether you’re submitting test scores, and a fee waiver request filed early if you qualify.

After you submit, the sequence looks like this:

  1. Watch your email (including spam) for your RIN. It usually arrives within a few days and is your key to the applicant portal.
  2. Check the portal regularly, not just your inbox. Missing-document flags and decision releases show up there first.
  3. Submit first-quarter or first-trimester grades if you applied Early Decision or Early Action and your school issues them during the review period.
  4. Confirm your recommenders and school submitted documents within roughly two weeks of your deadline, since that’s the window RPI expects supplemental materials to settle in.
  5. Email adm_updates@rpi.edu directly if something looks stalled in the portal for more than a couple of weeks.

Pro Tip: Bookmark your portal login instead of relying on the confirmation email. RIN based logins are the fastest way to check status once your RIN is issued, and re-finding an old email is the most common reason applicants think their file is “missing” something.

Financial Aid Basics and Priority Filing Dates

Financial aid at RPI runs on the same clock as your admission plan, so treat it as part of the application, not an afterthought. Filing your FAFSA and CSS Profile close to when you submit your application, rather than waiting for an admission decision, protects your priority filing status for need-based aid.

RPI’s admissions hub outlines how aid timing lines up with each plan: Early Decision and Early Action applicants generally benefit from filing financial forms earlier, since aid offers get packaged alongside admission decisions on a tighter calendar. Regular Decision applicants have a bit more breathing room but shouldn’t wait until March to start the paperwork.

A few practical habits make a real difference here. File the FAFSA as soon as it opens for the cycle rather than waiting for a specific deadline reminder. Keep copies of every financial document you submit, since aid offices occasionally request clarification on income or dependency status. If your family’s financial situation changed significantly since your last tax filing, contact the financial aid office directly rather than assuming the standard forms will capture it.

Merit scholarships at RPI are typically evaluated as part of the same admission review, meaning a strong application file does double duty. There’s no separate merit scholarship application to track down and submit on a different schedule.

Financial Aid Basics and Priority Filing Dates — overview diagram

Campus Tours and Open House Events for Prospective Applicants

Visiting campus, even virtually, changes how you write your essays and how confidently you answer “why RPI” if an interview opportunity comes up. RPI runs regular guided tours led by current students, along with larger open house events timed around fall and spring admission cycles that pack in department sessions, financial aid presentations, and campus life previews.

If a trip to Troy isn’t realistic, virtual tour options and information sessions cover most of the same ground: academic building walkthroughs, residence hall previews, and Q&A blocks with admissions staff. Attending one of these isn’t required and won’t move the needle on your admission decision by itself, but it does help you write a more specific, less generic application, especially in supplemental materials where “I visited the biomedical engineering labs and talked with a current student about their capstone project” reads a lot stronger than a vague interest statement.

Sign-ups for tours and open houses run through the admissions office’s event calendar, and spots during peak fall visiting season fill up faster than most applicants expect. If you’re weighing RPI against other technical schools, scheduling a visit early in your senior fall, before Early Decision or Early Action deadlines, gives you real material to reference in your application rather than adding it after the fact.

Honors Programs and Diversity Initiatives Worth Knowing About

High-achieving applicants have a specific track worth investigating: RPI’s honors and scholars programs offer smaller seminar classes, research opportunities earlier in your undergraduate career, and closer faculty mentorship than the standard course load provides. These programs typically factor into the same holistic review as your general application, so there’s no separate high-stakes application gate to clear on top of admissions itself, though some tracks do ask for a brief supplemental statement.

RPI also runs diversity and access initiatives aimed at broadening who ends up in its engineering and science programs, including outreach for underrepresented students in STEM and support programs that kick in once you’re enrolled, from mentorship pairings to identity-based student organizations. If financial access is part of what’s holding you back from applying, these programs are worth researching directly through the admissions office rather than assuming cost alone rules RPI out.

For students weighing whether they’re a fit for a research-heavy engineering school, these programs often matter more than the general acceptance rate. A strong honors or scholars track record signals that even within a selective applicant pool, there’s real support built for students who want to go deeper than the standard curriculum.

International Applicants: Credentials and English Proficiency

International applicants follow the same core Common App or RPI application process as domestic students, with two additional layers: credential evaluation and English proficiency documentation.

Because international transcripts don’t always translate cleanly into the U.S. grading and credit system, RPI reviews international academic records in the context of the country’s own grading conventions rather than forcing a direct GPA conversion. That’s part of why the holistic review model matters even more for applicants outside the U.S. system: context replaces a simple numeric comparison.

English proficiency documentation is required unless your coursework has been primarily in English for a sustained period, typically several years. Standard tests like TOEFL or IELTS satisfy this requirement, and RPI’s admissions office can clarify current minimum score expectations directly if you’re unsure whether your background qualifies for a waiver.

International applicants who can’t easily arrange an in-person or Common App interview should look at InitialView, the recorded interview option mentioned earlier for the optional materials section. It’s specifically built to give international applicants the same kind of personal, unscripted moment that Glimpse videos give domestic applicants, and it doubles as informal proof of spoken English fluency for admissions readers weighing a file where written English and spoken English might not match up perfectly.

International Applicants: Credentials and English Proficiency — overview diagram

A Straight-Talk Perspective on Getting Into RPI

Don’t treat test-optional as a free pass to skip strategy. If your scores are strong, submit them, since a good number still helps a file that’s otherwise solid but unremarkable. If they’re not, lean harder into your Glimpse video, your resume, and a recommender who can describe a specific moment of initiative. The RIN and portal aren’t administrative footnotes. They’re where your actual status lives, so check that before you assume silence means a problem.

FAQ

What is RPI’s acceptance rate?

RPI’s acceptance rate varies by cycle and isn’t fixed at one published figure, but it consistently sits in moderately selective territory for a technical university, with holistic review weighing course rigor and demonstrated initiative alongside grades.

What GPA do you need to get into RPI?

RPI doesn’t publish a strict minimum GPA cutoff for first-year applicants, since review is holistic, but competitive applicants typically show strong performance in math and science coursework specifically. Transfer applicants get a general guideline of around a 3.0 GPA.

Why is RPI ranked lower than some peer engineering schools?

Rankings depend heavily on the specific methodology used, including factors like class size, research funding, and selectivity metrics, and different ranking systems weigh those factors differently. A lower position in one ranking system doesn’t reflect program quality across the board, especially in specialized engineering and computer science tracks where RPI has particular strength.

Is RPI considered a “New Ivy”?

“New Ivy” is an informal media label, not an official designation, and it’s been applied inconsistently across different lists and publications over the years. RPI’s reputation rests more concretely on its engineering, computer science, and applied science programs than on any unofficial prestige label.

RPI Admissions: Apply by Jan 15, Deadlines, RINs, and Submission Steps2026-09-16T00:02:51+00:00

Earn Steady Pay in 4–12 Months: Tips vs Subscriptions for Creators

For most creators, a recurring subscription builds a more reliable income base, while tips deliver flexible, immediate rewards that spike around big moments. Subscriptions win on predictability. Tips win on speed and spontaneity. The exceptions matter: viral clips, one-off appreciation, and platforms that restrict recurring billing all tilt the math back toward tips. The KPIs, math examples, and a decision checklist below will tell you which one fits your situation right now.


TL;DR:

  • Creating regular income from subscriptions depends heavily on maintaining low churn and a consistent streaming schedule, especially for scheduled streamers.
  • Tipping produces short-term spikes but often lacks the long-term stability that subscriptions offer, making it less predictable over extended periods.
  • Supporters can maximize their impact by tipping during viral moments or milestones, while subscribing is better for ongoing engagement with creators.
  • Reducing payment friction with quick, no-account methods like Apple Pay or Google Pay significantly increases support frequency and average tip size.
  • Combining both options allows creators to benefit from stable recurring revenue and moment-based income spikes, optimizing overall monetization.

Tipper
Let Your Audience Tip Instantly
Tipper lets supporters send tips without an account through Apple Pay or Google Pay, while creators keep 100% of their earnings.

Table of Contents

Tips vs Subscriptions: How the Mechanics Actually Differ

A subscription is a recurring charge, typically monthly, that renews automatically until someone cancels. A tip is a single, voluntary payment sent once, for any amount, with no future obligation attached. That structural difference explains almost everything else in this comparison.

Subscriptions generate what’s called Monthly Recurring Revenue, or MRR. Creators track MRR against churn, the rate at which subscribers cancel each month. Low churn means the subscriber base keeps compounding. High churn means a creator has to keep replacing subscribers just to stay flat. This is the core mechanic behind why subscription revenue tends to outperform tips over time: subscribers don’t have to actively decide to pay again. The charge just happens.

Tips work on impulse. A viewer watches a clutch play, a funny bit, or a genuinely moving moment, and sends money right then. There’s no commitment, no perk tier, no monthly reminder. That’s the appeal and the limitation in one package: tips spike hard around specific triggers and go quiet the rest of the time.

Platform visibility changes viewer behavior on both sides. Gifted subs and on-screen tip alerts create social proof. When one person tips $20 during a stream and everyone sees the alert, it primes others to do the same. Anonymous tips or private subscription upgrades don’t get that visibility boost, which is one reason platforms lean so heavily on public alerts.

Payment friction is where a lot of potential support quietly disappears. A supporter who has to create an account, enter a card number, and confirm an email is far more likely to abandon the tip than someone who taps Apple Pay or Google Pay and confirms with Face ID. Lower friction doesn’t just make tipping more pleasant. It changes whether the tip happens at all.

Here’s where the numbers get interesting. Say a creator has 500 monthly viewers.

  • Subscription path: a small percentage convert to a subscription at a modest monthly rate. Month one generates predictable revenue that typically grows with retention over months.
  • Tip path: a portion of viewers send average-sized tips during big moments, creating one-time spikes of income followed by quiet periods.

Modeling from creator income analysis shows this compounding effect typically causes memberships to overtake tip income somewhere between month four and month twelve, assuming retention stays reasonable. Tips can still win in a single explosive month. They rarely win over a quarter.

Pros and Cons for Supporters and for Creators

Neither model is universally better. The right one depends on what the creator needs and what the supporter is willing to commit to.

For creators, subscriptions offer:

  • Predictable income you can budget around, which matters if content creation is your primary job.
  • Lower daily pressure to perform for one-off rewards.
  • A built-in reason to plan perks, tiers, and community features.

The tradeoff: subscriptions require ongoing content commitments. Cancel a few weeks of streams and churn creeps up fast. There’s also more administrative overhead: managing tiers, fulfilling perks, and handling cancellations.

For creators, tips offer:

  • Zero pressure to maintain a fixed schedule or deliver recurring perks.
  • Immediate cash for one-off wins, whether that’s a viral clip or a single great stream.
  • A lower barrier for brand-new creators who don’t yet have an audience large enough to justify subscription tiers.

The tradeoff: income volatility. A creator relying only on tips has to stay “always on,” because a quiet week often means a quiet bank account.

For supporters, subscriptions feel like membership. You get a badge, maybe a Discord role, maybe early access, and a sense of ongoing belonging. The cost is a recurring commitment you have to remember to cancel if your interest fades. Tips feel more like a spontaneous thank you. There’s no guilt about missing a payment because there was never an obligation. The tradeoff is that a one-time tip often produces less lasting connection with the creator than a subscription badge that shows up every stream.

Pro Tip: If you’re a new viewer who just discovered a creator and want to say thanks without commitment, tip first. Save the subscription decision for after you’ve watched a few sessions and know you’ll keep coming back.

Small or brand-new creators tend to benefit more from tips early on, since they haven’t built the trust needed for recurring commitments. Schedule-driven creators, the ones who stream three nights a week like clockwork, do better pushing subscriptions, because consistency is exactly what subscribers pay for. Event-driven streamers, like those who only go live for major releases or tournaments, often lean on tips because their audience shows up in bursts, not on a schedule.

What the Numbers Tell Creators About Tips vs Subscriptions

Guesswork doesn’t hold up here. A handful of KPIs separate creators who understand their income from creators who are just hoping the next stream does well.

  • MRR (Monthly Recurring Revenue): total subscription income for the month, the clearest signal of financial stability.
  • Churn rate: the percentage of subscribers who cancel each month. Anything above 10% monthly churn usually signals a perks or engagement problem.
  • Average tip size: total tip revenue divided by number of tips, useful for spotting whether a payment method change moved the needle.
  • Donation frequency: how often tips arrive relative to stream count, a good proxy for audience engagement outside of subscription hours.
  • Tipper-to-subscriber conversion rate: the percentage of one-time tippers who eventually convert to a recurring subscription, arguably the most useful number for growth.

Analysis of livestream monetization confirms that gifts and tips drive the spikes, while subscriptions carry the stability, and platform format determines which one deserves more attention. A creator with a tight, ritual-based schedule (same three nights a week) has the ingredients subscriptions need. A creator who goes viral unpredictably has the ingredients tips reward.

The compounding argument keeps showing up in creator finance data for a reason. Creators with similar audience sizes often earn more from memberships after six to twelve months even when tips generated more cash in the first month. Subscriptions reduce the churn risk baked into relying on people’s mood on any given night.

Friction also directly affects the tip side of these numbers. When a supporter can send money through a personalized link with Apple Pay or Google Pay and no account creation, more of those impulse moments turn into completed tips instead of abandoned carts. This is one of the areas where a tool like Tipper changes the equation: reducing the steps between “I want to tip” and “the tip is sent” tends to raise both tip conversion and average tip size, since supporters are less likely to second-guess a payment that only takes two taps.

Illustration of a shorter tip payment flow

When Should You Tip vs Subscribe? A Quick Decision Guide

Run through this checklist before deciding where your money goes.

  1. How often do you watch this creator? If it’s a first-time viewer situation, tip. If you’re a regular who shows up every week, a subscription makes more sense.
  2. What outcome do you want for the creator? A one-off reward for a specific moment calls for a tip. Long-term support for someone whose content you rely on calls for a subscription.
  3. Do the perks matter to you? If badges, Discord access, or exclusive content genuinely add value to your experience, subscribe. If you just want to say thanks without extras, tip.
  4. What does the platform allow? Some platforms cap subscription tiers or restrict outside payment tools; check what’s actually available before committing to a plan.
  5. How much friction are you willing to deal with? If you want to give money in under ten seconds with no account setup, tipping through Apple Pay or Google Pay is the faster path.

Three quick scenarios show how this plays out. A viewer who just discovered a creator through a clipped highlight should tip a small amount, maybe $2 to $5, as a low-commitment way to signal interest. A longtime viewer who’s watched every stream for six months and genuinely values the community should move to a subscription, ideally at a tier that matches what they’d naturally spend on entertainment in a month anyway. A regular subscriber who witnesses an exceptional moment, a personal milestone, a charity stream, a big win, should tip on top of their existing subscription rather than upgrading tiers, since a one-time tip captures that moment without changing their ongoing commitment.

Pro Tip: A reasonable starting tip is $2 to $10 for casual appreciation. A reasonable subscription tier is whatever you’d spend on a single coffee per month, since that’s the price point most viewers sustain without resentment.

Combining Tips and Subscriptions the Smart Way

The strongest creator income strategies don’t pick one model. They layer both, using subscriptions as the stable spine and tips as the flexible bonus on top. This layered structure shows up repeatedly in creator income analysis for a simple reason: subscriptions cover baseline costs, and tips capture upside from big moments that a flat subscription tier can’t account for.

This avoids subscription fatigue, where a viewer signs up for five different $10 tiers and quietly resents the total.

For creators, presenting both options without pressuring the audience matters more than most people think. The creators who do this well mention subscriptions occasionally, usually tied to a specific perk announcement, and let tips stay purely optional and low-pressure in the moment. Hammering the audience with “subscribe now” messaging every five minutes creates the opposite effect: viewers disengage rather than convert. A quieter approach, where the value of subscribing is obvious from the perks themselves, tends to convert better than repeated asks.

  • Treat subscriptions as your predictable floor, not your only income source.
  • Treat tips as bonus revenue tied to specific moments, not a replacement for stable income.
  • Mention subscription perks sparingly; let the perks sell themselves.
  • Never make tipping feel obligatory during a stream. Optional support stays optional in tone, too.

Why We Think Layering Beats Picking One

Treating this as an either/or choice misses the point. The data on compounding subscriptions is real, but so is the data on tip-driven spikes carrying moments a flat monthly fee can’t capture. The healthiest creator income mixes both, and the healthiest viewer habit does too.

What changes the math for tips specifically is friction. A platform built around personalized links and instant payment methods removes the excuses that usually kill an impulse tip. That doesn’t replace subscriptions. It just makes tips do their job better: fast, occasional, and frictionless.

Test both approaches with your own habits or your own audience. The numbers will tell you more than any general rule.

— Tipper

Send a Tip in Seconds With Tipper

Tipper strips out the one thing that kills most impulse tips: friction. There’s no account to create, no app to download, and no waiting for a payout request to process.

Tipper

That speed matters most in the exact moments this article covers: the highlight clip, the milestone stream, the spontaneous thank you that would otherwise never happen because the payment process got in the way. Creators can also add a personal thank you back, whether that’s a short note or a quick video, which turns a one-off tip into something closer to a real connection. If you want to see how a personalized tipping link works in practice, or you’re a creator ready to set one up for your own audience, visit Tipper’s tipping page and send or start collecting your first tip today.

Sources

FAQ

What are the three main types of subscriptions?

Most creator subscriptions fall into flat-rate, tiered, or hybrid models, where hybrid combines a base fee with add-on perks or usage-based extras. Tiered and hybrid structures are the most common choice among creators because they let supporters pick a price point that matches their budget.

Are bits or tips better than subscriptions?

Neither is universally better. Bits and tips work best for immediate, one-off rewards and viral moments, while subscriptions build the predictable income base that lets creators plan ahead.

What is the subscription trap?

The subscription trap refers to supporters accumulating multiple recurring charges they forget to cancel, leading to spending that quietly outpaces what they intended. Reviewing your active subscriptions every few months and reallocating unused ones toward tips or a single favorite creator avoids this.

Are subscriptions really worth it for supporting creators?

For creators you watch consistently, yes. Subscriptions give creators the predictable revenue that reduces the pressure to chase viral moments every week, and they typically overtake one-off tip income within four to twelve months for the same audience size.

Should I tip a creator I just discovered?

Yes. A small tip, sent through a low-friction option like a personalized link with Apple Pay or Google Pay, is the lowest-commitment way to show appreciation before deciding whether a subscription makes sense.

Earn Steady Pay in 4–12 Months: Tips vs Subscriptions for Creators2026-09-15T01:01:11+00:00

2–4× More Tips: Tip Link Analytics for Creators

Tip link analytics means measuring clicks, visit-to-tip conversion rate, average tip size, and revenue by traffic source for your personalized tip link or QR code. The one thing to do today: attach UTM parameters to every link you share and start watching which source actually converts into paid tips, not just clicks.


TL;DR:

  • Attaching UTM parameters to each tip link allows tracking of traffic sources and helps identify which platform and placement generate the most revenue.
  • Conversion rates of 15 to 25 percent indicate strong performance, but issues like slow load times and in-app browser restrictions often cause drop-offs before payment.
  • Fixing wallet support, simplifying payment flows, and avoiding in-app browser traps can significantly increase completed tips, often more than design or copy changes.
  • Segmenting supporters by behavior, timing, device, and source helps optimize strategies for high-value tippers and improves overall revenue visibility.
  • Using basic event tracking with tools like GA4 or spreadsheets, combined with regular analysis, ensures creators catch checkout issues early and maximize tip conversion.

Tipper
Turn Audience Appreciation Into Tips
Tipper lets creators receive instant tips through a personalized link, with supporters paying by Apple Pay or Google Pay without an account.

Start receiving tips

Table of Contents

Clicks tell you almost nothing on their own. A link with 500 clicks and a 2% conversion rate earns less than one with 80 clicks and a 20% conversion rate, so the real work starts with connecting traffic to revenue.

Here’s what actually deserves a spot on your dashboard:

  • Clicks and unique visits by source — Instagram bio, TikTok caption, YouTube description, and in-person QR code all behave differently and need separate tracking.
  • Visit-to-tip conversion rate — divide completed tips by unique visits to your tip page. This is the single number that tells you whether your page, not your audience, is the problem.
  • Average tip amount and revenue per visitor (RPV) — multiply conversion rate by average tip to get a rough RPV, then compare it across sources to find your highest-value traffic.
  • Payment-method conversion — Apple Pay and Google Pay typically close faster than manual card entry because they skip form fields entirely.

A rough benchmark worth knowing: dedicated tipping pages that convert 15 to 25% of visitors into tippers are considered strong performers among creator monetization platforms. It’s friction somewhere between the click and the payment button.

Check clicks and conversion rate weekly. Save average tip amount and revenue-by-source comparisons for a monthly review, since those numbers need more volume to mean anything.

Every tip link you share should carry a UTM tag that identifies where it came from. This is the difference between guessing which platform pays and knowing for certain.

The standard scheme uses three parameters, and you can set them up in a few minutes:

  1. utm_source identifies the platform: instagram, tiktok, youtube, qr_flyer.
  2. utm_medium identifies the placement: bio, story, caption, email_signature.
  3. utm_campaign identifies the specific push: spring_merch, livestream_march, poster_v2.

A finished link might read tipper.app/yourname?utm_source=tiktok&utm_medium=bio&utm_campaign=march_launch. Standard UTM tagging like this lets you monitor unique clicks, click-through rate, and conversion by source in real time rather than relying on a single lump total, according to Ohio University’s marketing communications guidance.

If you run your link through a shortener or a link-in-bio tool, test it before publishing. Some shorteners strip query parameters or redirect through a webview that drops the tag entirely. Paste the shortened link into a private browser tab and confirm the full UTM string survives the redirect.

For QR codes, encode the complete UTM-tagged URL, not the bare link, then scan it yourself on both an iPhone and an Android phone before printing it anywhere.

Pro Tip: Print a small batch of QR codes first and scan-test them under real lighting conditions. A code that looks fine on screen can fail on a coffee shop poster if it’s too small or the contrast is off.

Why Are Visitors Clicking but Not Tipping?

A checkout funnel has three stages: page view, payment started, payment completed. Most creators lose people between the second and third step, and the reasons are almost always fixable.

The usual suspects, in order of impact:

  • Missing one-tap wallet support. If someone has to manually type a card number on their phone, you’ve added ten seconds of friction that kills momentum.
  • Form complexity. Every extra required field (name, email, a note) is a chance for someone to abandon before paying.
  • Slow page loads. A tip page that takes more than two or three seconds to load on mobile data loses visitors before they see a payment button.
  • In-app browser trapping. Links opened inside Instagram, TikTok, or Facebook’s built-in browser often can’t access saved wallet credentials the way Safari or Chrome can.

That last one deserves attention because it’s easy to miss. Forcing a link to open in the visitor’s native browser rather than an app’s webview can produce 2 to 4 times more completed tips, since most mobile users are already logged into Apple Pay or Google Pay in their default browser but not inside a third-party app’s embedded window, according to Inc.’s reporting on friction costs. This single fix often outperforms redesigning your entire page.

Segment your funnel data by device and payment method before you change anything. If Android users convert fine but iPhone users drop off at payment, that’s a wallet-support problem, not a design problem. Fixing the wrong thing wastes weeks.

Building a Simple Analytics Setup That Actually Works

You don’t need enterprise software to get this right. You need a short list of events captured consistently, every time, across every link you share.

Track these six events at minimum:

  • Link click, with the full UTM payload attached
  • Tip page view
  • Payment started
  • Payment completed, with the final amount recorded
  • Payment method used (Apple Pay, Google Pay, or card)
  • Referrer or source, pulled from the UTM tag

A minimal setup like this connects the entire path from arrival to revenue instead of leaving you guessing at the middle, a structure recommended in Scrile’s analytics guidance for creators. Build four dashboard panels around it: a conversion funnel showing drop-off at each stage, revenue broken out by source, average tip size over time, and payment-method success rate.

For tools, GA4 event tracking works if you’re comfortable setting up custom events, and a spreadsheet export from your tipping platform covers the basics if you’re not. Either way, check your numbers weekly. A sudden drop in payment-completed events, with clicks holding steady, almost always means something broke in your checkout flow.

Which Experiments Actually Move the Needle

Run one variable at a time, over a short window, so you know exactly what caused the change. Guessing at multiple fixes simultaneously just wastes traffic.

  1. Test your CTA copy first. “Buy me a coffee” and “Support my work” pull differently depending on your audience.
  2. Test preset tip amounts. Three to five suggested amounts tend to outperform a blank field, since donation page research shows structured choices raise both conversion and average gift size.
  3. Test one-step versus two-step payment forms. Fewer screens between intent and payment usually wins.

Wallet support and escape-flow fixes tend to deliver the largest single jump, often outperforming weeks of copy testing.

Pro Tip: Run each test for at least a full week to smooth out day-of-week traffic swings before you declare a winner.

How Tipper’s Design Maps to These Fixes

Tipper builds around the exact friction points that kill tip conversion. Senders pay through Apple Pay, Google Pay, or card without creating an account, which removes the biggest drop-off point in any checkout funnel.

  • No-sender-account flows mean fewer form fields between click and payment.
  • Creators keep all of what they earn, which simplifies revenue reconciliation for reporting purposes.
  • Thank-you notes, photos, or videos give you a natural reason to track repeat tips from the same supporter over time.

For deeper setup walkthroughs, Tipper’s own blog covers how tipping links work for creators and practical tip link strategy for setup and payouts.

Finding Your Highest-Value Tippers

Not every visitor who tips is equally valuable, and lumping them together hides your best opportunities. Segment by behavior first: one-time tippers, repeat supporters, and high-value single tips each deserve a different read.

Repeat tippers are worth tracking separately because they usually respond to relationship signals, not discounts. If someone has tipped three times in two months, a personalized thank-you video costs you nothing and often earns a fourth tip faster than any promotional push would.

Time-of-day and day-of-week patterns matter too. If your audience skews toward evening tips on weekdays but weekend afternoons on Saturdays, that’s useful for timing your posts and QR placements, not just your content calendar. Platform source matters as much as timing. A supporter who arrives from a YouTube video description often behaves differently than one clicking a link in an Instagram story, even if both are the same demographic on paper. Video-sourced traffic tends to arrive with more context about who you are, which often shows up as a higher average tip.

Geographic and device data round this out. If most of your high-value tips come from desktop visitors during a livestream, but your QR code traffic skews mobile with smaller average amounts, you’re looking at two different audiences with two different jobs: one converts better with a live ask, the other with a fast, frictionless mobile checkout. Building separate tracking for each lets you tailor your CTA and preset amounts instead of running one generic setup for both.

None of this requires expensive software. A basic spreadsheet that logs source, device, amount, and timestamp for each tip gets you 90% of the way to spotting your best audience segment.

Finding Your Highest-Value Tippers — overview diagram

For small businesses and freelancers who also run point-of-sale systems or customer relationship management tools, tip link data sitting in isolation is a missed opportunity. A tip is still revenue, and it should show up next to your other income sources when you’re reviewing monthly totals.

Most POS systems allow manual entry or CSV import for outside revenue streams, which is the simplest way to fold tip data in without custom development. Export your tip link revenue by source and date, then import it alongside your regular sales data so your monthly reports reflect your full income, not just card-swipe transactions.

CRM integration matters more for freelancers and creators with repeat clients or patrons. If a client tips you after a project wraps, tagging that tip with their name or a client-specific UTM campaign lets you see lifetime value per client instead of treating tips as anonymous, one-off events. Platforms that centralize payouts and provide clean reporting reduce the reconciliation work this normally takes, a point Tipper’s own guide to personalized tip links addresses directly.

If you’re comparing traffic-analysis tools to go deeper on source performance, options like the alternatives covered in this roundup of traffic and source-analysis platforms can help creators understand referral patterns beyond what a basic tip link dashboard shows. For freelancers building out a fuller revenue picture, a dedicated personal finance dashboard can pull tips, invoices, and other income into one view rather than checking three separate tools.

The goal isn’t complexity. It’s making sure a tip doesn’t disappear into a separate silo where it never gets counted toward your actual earnings.

Connecting Tip Link Data to Your Broader Revenue Picture — overview diagram

What to Know About Privacy When Tracking Tip Data

Tracking clicks and conversions means collecting data, and that comes with responsibilities you can’t skip, even as a small creator. UTM parameters and event data typically don’t include personally identifiable information on their own, but once you start tying tips to specific supporter names or email addresses for CRM purposes, you’ve entered territory that requires more care.

Keep collection minimal. You don’t need a supporter’s full browsing history to know their tip converted from a TikTok bio link. Stick to source, timestamp, amount, and payment method, and avoid storing anything more personal unless a supporter has explicitly given it to you, such as through a thank-you note reply or a client relationship.

If you’re using analytics platforms like GA4, review their data retention settings and make sure you’re not defaulting to indefinite storage of visitor-level data you don’t actually need. Most creators only need aggregate trends, not individual visitor profiles.

Be transparent about what you collect if you’re running a small business with recurring customers rather than anonymous one-time tippers. A simple line in your tip page footer noting that anonymized usage data helps you improve the page goes a long way toward building trust without requiring a full legal disclosure. When in doubt about specific regulatory requirements for your location or customer base, a quick consultation with someone who handles data compliance professionally beats guessing, especially if you’re storing any tipper contact information for CRM use.

Tipper checks conversion rate and payment-method split first every week, because those two numbers expose problems fastest. Clicks can look healthy while revenue quietly stalls.

The first experiments worth running are always wallet support, simplified CTA presets, and escape-flow fixes for in-app browsers, since they touch the widest share of traffic.

For creators with small but loyal audiences, chasing volume matters less than protecting conversion rate on the visitors already showing up.

— Tipper

Start Collecting Tips Without the Checkout Friction

Tipper removes the exact obstacles this guide just walked through. Senders pay through Apple Pay, Google Pay, or card with no account required, which means fewer abandoned checkouts and cleaner attribution when you tag each link with a UTM campaign.

Tipper

Setup takes minutes: create your personalized tip link, add source and campaign tags before sharing it anywhere, and generate a QR code for in-person tipping. If you’re weighing no-fee tipping structures for a small business, this breakdown of no-fee tipping systems is worth a look alongside your setup.

Ready to see it in action? Create your tip link on Tipper and start tracking conversion from your very first share.

Sources

FAQ

Tip link analytics track clicks, visit-to-tip conversion rate, average tip amount, and revenue by traffic source for a personalized tipping link or QR code, so you know which channels actually drive revenue.

What’s a Good Conversion Rate for a Tip Page?

A conversion rate between 15 and 25% of visitors completing a tip is considered strong for dedicated tipping pages. Below that, check for payment friction or in-app browser issues first.

Why Do In-App Browsers Hurt Tip Conversion?

In-app webviews often can’t access saved wallet credentials, so visitors can’t complete Apple Pay or Google Pay payments as easily as they could in their default browser, cutting completed tips significantly compared to native-browser flows, per Inc.’s reporting.

How Do I Track Which Platform Sends the Most Tips?

Add UTM parameters to every link you share, using a consistent source, medium, and campaign naming scheme, then compare conversion rate and revenue across sources in your analytics dashboard.

Tipper supports wallet-native, no-account payment flows and analytics-ready links that let creators tag sources with UTM parameters and track which platforms convert best.

2–4× More Tips: Tip Link Analytics for Creators2026-09-14T01:31:01+00:00
Go to Top