

Add a Button block and link it to your personalized tip URL from a tipping platform, and you’re done. No plugin, no code. That single change gives readers a fast, obvious way to send you appreciation, and a no-signup destination behind the button removes the biggest reason people abandon a tip halfway through.
TL;DR:
- Using a native WordPress Button block to link to a personalized tip URL simplifies setup and minimizes plugin overhead.
- A fixed, always-visible tip button or pop-up can increase tips but may be overkill for short posts, so placement and timing matter.
- No-signup tip links that directly support Apple Pay, Google Pay, or cards improve conversion rates and protect supporter privacy.
- Testing on both desktop and mobile ensures your tip button works correctly, with attention to pop-up triggers and shortcode rendering.
- Adding clear, specific copy and suggested amounts enhances conversion, while transparent privacy messaging fosters trust with supporters.
Table of Contents
- Step-by-step: add a tip button using the Gutenberg Button block
- Add a persistent pop-up tips button for higher visibility
- Why a no-signup tip link improves conversion and privacy
- Advanced setups: shortcodes, embeds, and WooCommerce tip jars
- Design, copy, and placement tips that increase tip conversion
- Payment processing, privacy, and what to tell supporters
- Test and troubleshoot your tip button before you publish
- Publisher perspective: why we recommend a no-signup tip link first
- Tipper: get a personalized tip link and add it to your WordPress site
- Sources
- FAQ
Step-by-step: add a tip button using the Gutenberg Button block
The fastest route uses a block that’s already built into WordPress, which helps keep pages lightweight and reduces plugin overhead, a benefit explained in detail in SEO for WordPress Developers: A Complete Guide. There’s no plugin to install and nothing to configure beyond text and a link, according to WordPress’s own editor documentation.
- Open the post, page, or template where you want the button and click the block inserter (the plus icon).
- Search for “Buttons” and insert the block; it adds one button by default, with the option to add more.
- Click the button text and replace it with your CTA, something like “Send a Tip” or “Buy Me a Coffee.”
- Select the button, click the link icon, and paste your personalized tip URL.
- Choose whether the link opens in a new tab so readers do not lose their place on your site.
- Adjust alignment, width, and color from the block’s sidebar settings to match your theme.
- Preview on both desktop and mobile before publishing.
Placement matters as much as the link itself. The end of a post catches readers right after they’ve gotten value from your content. An author bio box works for repeat visitors. A footer or sidebar widget area, added through the block-based widget editor, keeps the button visible on every page without repeating it manually.
Check that the button text is descriptive enough for screen readers (“Send a Tip” beats “Click Here”) and that the tap target is large enough for a thumb on mobile.
Pro Tip: Keep your first tip button test simple: one button, one link, one placement. Add pop-ups or secondary placements only after you confirm the basic version works on mobile.
Add a persistent pop-up tips button for higher visibility
A single button at the end of a post only reaches readers who scroll that far. When you want your tip option visible the entire time someone’s on your site, a persistent or pop-up format does more work. WordPress’s built-in Donations block, despite the name, functions as a tips block and supports both inline and pop-up display, according to WordPress’s donations documentation.
- Insert the Donations block from the block inserter and choose whether the form displays inline or as a pop-up triggered by a button.
- Set the trigger button’s text and icon, then decide whether it stays fixed to the screen as visitors scroll.
- If you’d rather link straight to an external tip page instead of using an embedded form, swap the block’s internal payment setup for a plain link to your personalized tip URL.
- Test the pop-up trigger on mobile separately, since fixed-position elements sometimes behave differently on small screens.
A fixed, always-visible tip button works well for creators who publish long-form content or host newsletters where readers spend real time. It’s overkill for a five-paragraph blog post, where a fixed button can feel like it is competing with your content. Use pop-ups sparingly and never trigger them automatically on page load. A button a reader chooses to click converts better than one that interrupts them.
Why a no-signup tip link improves conversion and privacy
The button itself is only half the equation. Where it sends people matters just as much, and that’s where a personalized tip link changes the outcome. When a supporter has to create an account before sending a small amount, many simply give up. A link that accepts a tip directly, through Apple Pay, Google Pay, or a card, without requiring the sender to register, removes that friction entirely.
- Fewer steps between click and payment means more completed tips, especially for smaller, impulse-driven amounts.
- Apple Pay and Google Pay support lets supporters check out with a saved payment method in a couple of taps.
- A dedicated tip link separates casual appreciation from your main storefront or donation page, which keeps the ask simple and clear.
Getting your own link set up takes a few minutes: create an account on a tipping platform, personalize your tip page with a short bio and suggested amounts, then copy the URL it generates. Paste that URL into your Button block’s link field, or into the pop-up trigger from the previous section, and the connection is complete.
Add a short privacy line to your tip page so supporters know what happens with their information. Something like: “Your payment is processed securely; we don’t store your card details, and tips typically arrive in your account within a few business days” sets expectations without over-explaining.
Pro Tip: Mention when tips typically post to your account. Supporters who know what to expect are more likely to tip again.
For a longer walkthrough with copy examples, see this guide to collecting tips with no signup required.
Advanced setups: shortcodes, embeds, and WooCommerce tip jars
Some creators want more than a link out. If you run a store already or want fixed tip tiers displayed right on the page, a few setups go beyond the basic button.
- Use a shortcode or embed block from a plugin to place an inline tip form directly in a post or sidebar, rather than linking offsite.
- Create a “Tip” product inside WooCommerce with a few preset prices ($3, $5, $10) so supporters pick a tier instead of typing an amount.
- Add a “name your price” extension to that same product if you’d rather let supporters choose their own figure.
- For creators who accept cryptocurrency, a common pattern pairs WooCommerce with a crypto payment plugin like Aurpay to publish a tip product that settles on-chain, a setup that involves more configuration than a standard card processor, according to Aurpay’s setup guide.
Embedding a form keeps the entire experience on your site, which can feel more polished, but it also means you’re responsible for more of the checkout flow and its upkeep. A simple link to an external tip page hands that complexity to the platform behind it, at the cost of sending the visitor away from your site for a few seconds. For most creators starting out, the simplicity of a link outweighs the marginal polish of an embedded form.
Design, copy, and placement tips that increase tip conversion
The words on your button and the amounts you suggest shape whether someone actually clicks through. A vague label like “Support” converts worse than a specific, warm one.
- Lead with gratitude, not obligation: “Thanks for reading, tips welcome” beats “Please donate.”
- Offer two or three suggested amounts rather than a blank field; fewer choices reduce hesitation.
- Test one placement change at a time, such as moving the button from the sidebar to the end of the post, so you can tell what actually moved the needle.
- On mobile, keep the button full-width or large enough to tap without zooming.
- Add a short reassurance line near the button, like “Secure checkout, no account needed.”
Removing sign-up requirements from a payment flow is widely considered one of the more effective ways to reduce checkout friction for small, spontaneous payments, a principle that applies directly to tip buttons where the amount is often too small to justify the effort of creating an account.
Accessibility matters here too. Make sure the button has enough color contrast against its background, that its label describes the action rather than just saying “click here,” and that it’s reachable by keyboard navigation, not just a mouse.
Payment processing, privacy, and what to tell supporters
Once someone clicks your tip button, a payment processor, not your WordPress site, handles the actual transaction. Your site’s only job is to host the link. The processor collects card or wallet details, runs fraud checks, and moves the money, which is also why most “no-signup” tip flows for the sender still rely on the creator having a verified payment gateway account behind the scenes, according to TermsFeed’s guidance on WordPress privacy policies.
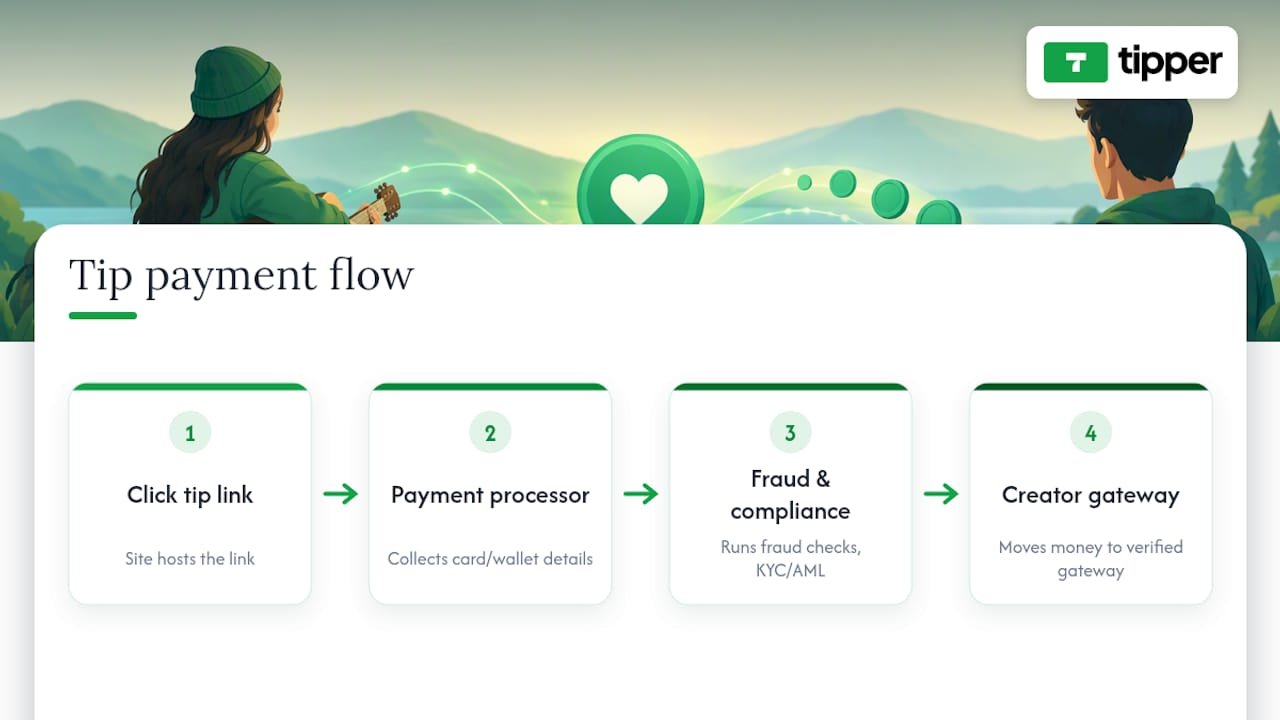
A short line on your tip page covers what supporters need to know: “Payments are processed securely by our payment partner; we never see or store your card information.” That single sentence answers the two questions most people have before tipping a stranger online.
It’s also worth noting that payment processors are required to run know-your-customer and anti-money-laundering checks on the accounts receiving funds, which is standard across the industry and not something creators need to configure themselves. Read your specific processor’s terms so you understand payout timing and any fees taken before funds reach your account. For more on structuring this kind of privacy language, see this guide to privacy-first payment collection.
Test and troubleshoot your tip button before you publish
Before calling it done, run through a short checklist.
- Click the button on desktop and confirm it lands on the correct tip page.
- Repeat the same test on a phone, since mobile browsers sometimes render fixed or pop-up elements differently.
- If you’re using a pop-up trigger, confirm it opens and closes correctly and doesn’t fire automatically on page load.
- Check that shortcodes render as a form rather than raw text, which usually means a plugin conflict or an incompatible theme.
- Set up basic click tracking, either through Google Analytics event tracking on the button link or a plugin’s built-in click reporting, so you know how often it’s used.
Common culprits when something breaks: a theme’s CSS overriding button styling, an ad blocker hiding pop-up scripts, or a shortcode pasted into a block that doesn’t render shortcodes at all.
Publisher perspective: why we recommend a no-signup tip link first
We favor no-signup tip links because every extra step between a reader’s impulse and their payment loses tips, and privacy-conscious supporters are more likely to follow through when they know an account isn’t required. For copy examples and deeper setup walkthroughs, our tutorials cover the details this guide only summarizes.
— Tipper
Tipper: get a personalized tip link and add it to your WordPress site
A tipping platform gives you a personalized tip link that supporters can pay through instantly, using Apple Pay, Google Pay, or a card, without creating an account.
Getting set up takes three steps:
- Create an account on a tipping platform and personalize your tip page with a bio and suggested amounts.
- Copy the unique tip URL Tipper generates for you.
- Paste that URL into a Button block, a pop-up trigger, or your email signature wherever you want supporters to find it.
Start at Tipper and have your link ready to paste into WordPress in a few minutes. For a quick-start walkthrough with templates, see collect tips in an hour.
Sources
- WordPress
- Privacy policy guidance for WordPress plugins — TermsFeed
- How to set up a crypto tip jar — Aurpay (2026)
FAQ
How do I add a clickable button in WordPress?
Insert a Button or Buttons block from the block inserter, type your call-to-action text, then click the link icon and paste the URL you want it to open, such as your personalized tip link. This works natively in the WordPress editor with no plugin required, as covered in WordPress’s own Buttons block documentation.
What is CF7 in WordPress?
CF7 refers to Contact Form 7, a popular plugin for building contact and inquiry forms on a WordPress site. It’s built for gathering form submissions rather than processing payments, so it isn’t the right tool for a tip button, which needs a payment link or embedded checkout instead.
Is WordPress outdated in 2026?
No. WordPress remains a widely used platform for blogs, small businesses, and creator sites, and its block editor continues to add native features like the Buttons and Donations blocks used in this guide. Whether it fits your needs depends on your goals, not on the platform being out of date.
Why are people moving away from WordPress?
Some creators move to hosted, all-in-one platforms for simplicity, while others stay with WordPress specifically for its flexibility and the control it gives over plugins, design, and monetization tools like tip buttons. Neither direction is universally better; it depends on how much customization you want versus how much setup you’re willing to do.
How do I add a pop-up tip button to my site?
Use the built-in Donations/Tips block and choose the pop-up display option, which lets you set button text, an icon, and whether it stays fixed to the screen, according to WordPress’s donations block documentation. Alternatively, link a regular button to an external tip page if you’d rather keep the checkout off your site entirely.




Leave A Comment