
About Tipper

This author has not yet filled in any details.
So far Tipper has created 134 blog entries.

5 Minutes to a Working Facebook Tip Link That Lets You Keep 100%

Yes, you can share a tip link on Facebook, and the fastest path takes about five minutes: create the link, set your post’s audience to Public, then place it in your Page’s About section or a pinned post. A tool like Tipper generates that link instantly, no bank paperwork or app download required from the person sending the tip.


TL;DR:

  • Creating a shareable tip link on Facebook can be done in about five minutes using tools like Tipper, without needing bank paperwork or app downloads.
  • Placing the tip link in your About section or as a pinned post ensures maximum visibility and discoverability for supporters.
  • Setting your Facebook post audience to Public is necessary to enable sharing options and prevent the Share button from remaining hidden.
  • Frequent promotion with tip links can reduce reach; instead, post regular native content and only occasionally include promotional links to maintain visibility.
  • Testing your tip link with a small payment ensures it functions correctly and provides a clear preview of what your supporters will see.

Table of Contents

Building a tip link doesn’t require a developer or a merchant account with a bank. Most creators can go from zero to a working, shareable URL in under ten minutes.

The generic process looks like this:

  1. Choose a payment method your supporters already use, such as Apple Pay, Google Pay, or a debit card.
  2. Create the payment or donation link through whichever platform you’re using, making sure it points to a page that accepts one-time payments.
  3. Set your payout details (bank account, email, or linked card) so money actually lands somewhere.
  4. Test the link with a low-value payment, a dollar or two, before you post it publicly.

With Tipper, those four steps compress into three: create an account, customize your tip page with your name, photo, and a short thank-you note, then save and copy the link. Senders don’t need an account of their own. They can tip through Apple Pay or Google Pay directly from the link, and because Tipper doesn’t take a cut of your earnings, creators keep 100% of what comes in.

Before you share anything, run a quick checklist: does the link open on both mobile and desktop, does your payout method match your legal name or business name, and is your profile photo or page name recognizable to the people you’re asking to support you?

Pro Tip: Send the link to yourself first and complete a $1 test tip. It confirms the checkout works and shows you exactly what your supporters will see before you put it in front of an audience.

Placement matters almost as much as the link itself. A tip link buried three scrolls down your feed gets a fraction of the clicks one sitting in your About section gets.

  • About section on a Page: this is the most persistent option. Once it’s there, it’s discoverable any time someone visits your Page, not just when they happen to scroll past a specific post.
  • Pinned post: pin a post with your tip link to the top of your Page or profile so it’s the first thing visitors see, useful during a launch or a specific ask.
  • Profile or bio: works well for personal profiles where an About section edit is quicker than managing a Page.
  • Stories: good for short-lived, timely asks tied to a specific moment, like a live event or a single piece of content.
  • Post text vs. comments: putting the link directly in the post body is more discoverable, but dropping it in the first comment keeps your caption cleaner. If discoverability matters more than aesthetics, the post body wins.

How Do You Make a Facebook Post Shareable?

The Share button isn’t a separate switch you flip. It’s tied directly to who can see the post. If a post’s audience is set to Friends or something narrower, Facebook hides the Share button automatically because sharing publicly a post that’s meant to stay private would defeat the purpose of that privacy setting.

Here’s the fix, step by step:

  1. Open the post and click the three dots in the top right corner.
  2. Select Edit audience.
  3. Change the setting to Public, which Facebook defines as visible to anyone on or off the platform.
  4. Save, then check that the Share button has reappeared beneath the post.

To copy a post’s link for reuse elsewhere, click the same three-dot menu and select Copy link, available on both mobile and desktop.

One catch: if a post lives inside a private or closed group, the Share option often stays unavailable no matter what audience setting you choose, since group privacy rules override individual post settings. In that case, repost the same content on your Page or personal profile set to Public instead.

Posting tip links too frequently trains Facebook’s algorithm to treat your account as promotional, and promotional accounts generally get shown to fewer people. The fix isn’t to stop asking. It’s to change the ratio.

  • Post native content, videos, images, behind-the-scenes clips, most of the time, and treat the tip-link post as the exception, not the rule.
  • Keep experts’ general guidance in mind: prioritize educational, entertaining, or inspiring content and hold promotional posts to a smaller slice of your overall feed.
  • Write CTAs that give the sharer a reason, not just an instruction. “Share this if you know someone starting out” works better than “please share.”
  • Post consistently, twice a week is a reasonable baseline, rather than in bursts, and check Meta Insights to find when your specific audience is actually online.
  • Reply to comments fast, pin a supporter’s kind message as social proof, and send a quick thank-you video when someone tips. That loop is what turns a one-time tip into a repeat one.

Pro Tip: A post that earns comments and watch time before you ever mention money performs better than a cold ask, because Facebook’s algorithm rewards the retention signal first.

Most tip link problems trace back to one of four causes, and all four have quick fixes.

  • No Share button showing up: check the post’s audience setting first. If it’s anything other than Public, or the post lives in a private group, that’s almost always the reason.
  • Link preview looks broken or blank: the page’s Open Graph tags may not be loading correctly. Run the URL through Facebook’s Sharing Debugger, then delete and repaste the link so Facebook refreshes its cached preview.
  • Facebook won’t let you add a donate button to your Page: this happens with some account types. Adding the giving link to your About section and reinforcing it with pinned posts works as a reliable substitute.
  • Unsure if the link actually works: send yourself a small test payment before promoting it, and confirm the payout lands where you expect.

Tip links work because they remove the two biggest obstacles to spontaneous generosity: friction and formality. A supporter who has to sign up, download an app, or hunt for a “donate” button often just closes the tab. A link that opens straight to Apple Pay does not give them time to reconsider.

What we see repeatedly is that tipping behaves less like fundraising and more like a tip jar. Amounts tend to be small, frequency matters more than size, and the creators who thank people personally, a short note or video, build the kind of repeat support a one-off donation drive never does. Read more on how creators build tip link strategy around this pattern, and how payment links can boost engagement rather than just collect money passively.

— Tipper

Tipper turns the multi-step process above into something you can finish before your coffee gets cold. There’s no waiting on a bank to approve a merchant account and no cut taken from what people send you.
Tipper

Here’s what you get: an instant, personalized tip link, support for Apple Pay and Google Pay so senders skip the account creation step entirely, and 100% of every tip since Tipper doesn’t take a percentage. Getting started takes three moves: sign up, build your tip page with a photo and short bio, and copy your link into your Page’s About section or a pinned post. Most creators see their first tip within a day of posting, often smaller amounts sent by people who wanted to say thanks without leaving a comment.

If you run a storefront or take payments in person too, point-of-sale tipping works the same way, one link, no app required from the customer. Set up your tip page now and have a link ready to paste into Facebook within minutes.

Sources

FAQ

How do I get my Facebook post link?

Click the three dots in the top right corner of the post, then select Copy link. This works the same way on mobile and desktop.

How do I post a clickable link on Facebook?

Paste the URL directly into your post text, About section, or comment. Facebook automatically generates a preview and makes it clickable once the post is set to Public.

No. TP-Link is a networking equipment company that makes routers and Wi-Fi devices, unrelated to tipping or donation links on Facebook.

What are some quick tips and tricks for using Facebook effectively?

Set posts to Public before expecting shares, mix native content with occasional links, and post consistently rather than in bursts, twice a week is a solid starting cadence to build around.

Yes. Add the link to your Page’s About section and reinforce it with a pinned post. A platform like Tipper makes the link itself take seconds to generate.

5 Minutes to a Working Facebook Tip Link That Lets You Keep 100%2026-09-03T01:31:00+00:00

Creators: Make Your Email Signature Tip Link Work in Gmail and Outlook

The quickest reliable fix is to skip raw pasted URLs and use your email client’s built-in link tool: highlight your text, click “insert link,” and type the full address starting with https:// (or mailto:/tel: for contact info). Images can carry a link too, but text is more reliable across Gmail, Outlook, and Apple Mail. Whatever you build, send a test email to a second account before trusting it.


TL;DR:

  • Using your email client’s link tool with a full https:// prefix ensures your signature links remain clickable across Gmail, Outlook, and Apple Mail.
  • Place your primary call to action at the top of your signature, with clear hierarchy and only one focused link to avoid confusing recipients.
  • Inline text links with descriptive anchor text outperform social icon rows in visibility and engagement, especially on mobile devices.
  • Properly formatted image icons need individual anchor tags and should be hosted over https:// to prevent broken icons or blocked content.
  • Testing your signature by forwarding emails or checking in dark mode and on mobile devices helps ensure links work reliably for all recipients.

Table of Contents

Before you touch the link tool, decide what your signature is actually for. A signature crammed with five competing calls to action confuses readers and none of them get clicked. Get the basics locked down first. Then give the link a clear home.

Your name, title, and company go at the top, in that order of visual weight, because that’s what a recipient scans for first to confirm who’s emailing them. Below that, list one or two direct contact methods, phone or email, not both plus a fax line nobody uses anymore. HubSpot’s guidance on professional email signatures makes a point worth repeating here: brevity and hierarchy matter more than cramming in every possible detail.

Then comes the decision that actually matters for this article: your one primary call to action. That might be a website, a booking page, or an email signature tip link if you’re a creator or freelancer who wants supporters to send appreciation directly. Pick one. A signature with a “Book a call,” a “Follow me,” and a “Buy my course” link all fighting for attention performs worse than a signature with just one clear ask.

A few things to settle before you build anything:

  • Decide if your CTA is inline text (“Schedule a 15-minute call”) or an icon row for social links, not both competing for the same visual space.
  • If you email both clients and coworkers, consider a stripped-down internal signature and a fuller external one with your CTA link.
  • Keep your primary link visually separate from social icons so it doesn’t get lost in a row of logos.
  • Reserve icon-only rows for secondary links; your main CTA deserves its own line of text.

Each major client handles this differently, and the button labeled “insert link” isn’t always where you’d expect it. Here’s what actually works in each one.

  1. Gmail: Open Settings (the gear icon), go to “See all settings,” and scroll to the Signature section. Type your text, highlight the words you want linked, click the link icon in the small toolbar above the signature box, and paste the destination. Always include the https:// prefix, since Gmail sometimes won’t auto-detect a bare domain as clickable.
  2. Outlook (web and desktop): In Outlook on the web, go to Settings > Mail > Compose and reply > Signatures. Highlight your CTA text, click the link icon in the toolbar, and enter the URL. Desktop Outlook works almost identically through File > Options > Mail > Signatures, though older versions sometimes show a plain “Hyperlink” button instead of an icon. Some versions also let you insert a styled button image if you want something more visual than underlined text.
  3. Apple Mail: Open Mail > Settings > Signatures, write your text, select it, and choose Edit > Add Link (or right-click and pick the same option) to paste your URL. Apple Mail is notoriously picky about formatting carried over from other apps, so if you’re pasting in a signature built elsewhere, strip the formatting first and rebuild the link natively.

The single biggest reason links fail across every client is a missing or malformed protocol. Typing “tipperapp.com” without https:// often gets treated as plain text, not a hyperlink, and the same rule applies to mailto: for email addresses and tel: for phone numbers, according to Stripo’s breakdown of clickable signature links.

Pro Tip: Send yourself a test email, then forward it to a completely different email address and check the link again. Forwarding sometimes strips formatting or converts hyperlinks to plain text, and that’s a failure mode you won’t catch by just sending to yourself.

Hand-Coded HTML Signatures That Actually Survive Client Quirks

If you’ve outgrown the built-in editors, hand-coding gives you more control, but only if you respect how email clients render HTML, which is nothing like how a browser does. Outlook in particular still renders parts of your signature using Microsoft Word’s HTML engine, which breaks modern CSS in ways that would surprise most web developers.

A few non-negotiable rules for this approach:

  • Use absolute URLs everywhere: https://yoursite.com, never a relative path, and use mailto: and tel: schemes for contact links.
  • Build your layout with HTML tables instead of CSS flexbox or grid; tables are the one layout method nearly every client renders consistently.
  • Apply styling with inline CSS attributes on each element rather than a <style> block, since many clients strip embedded stylesheets entirely.
  • Keep your signature under roughly 10KB of HTML; some clients silently drop parts of oversized signatures.

For actual patterns, think in three types: a simple text link (“Tip my work” underlined and colored), a button-style link (a colored table cell wrapping an anchor tag to mimic a real button), and a linked logo or headshot placed as its own image with its own <a> tag. Never combine all your information into one giant linked image. Image-only signatures break the moment a recipient’s client blocks images by default, which happens often enough that MailerLite’s signature guidance recommends staying text-first rather than image-first.

Pro Tip: Keep a plain-text version of your CTA link directly under any image-based button. If the image doesn’t load, the reader still sees a working link instead of a blank space.

Linking Images and Social Icons the Right Way

Every icon needs its own individual link, not a shared one. Image maps, where a single image has multiple clickable regions, aren’t reliably supported by email clients, so an icon row should always be built as separate images sitting side by side, each wrapped in its own anchor tag, as Stripo notes in its clickable-links guidance.

A few practical details make the difference between icons that work and icons that quietly fail:

  • Host every image over https://, never http://, since mixed content gets blocked or flagged by some clients and corporate mail filters.
  • Add descriptive alt text to each icon (“LinkedIn profile,” not just “icon”), so the link still makes sense if images don’t render.
  • Place a small text link near your main image CTA as a fallback, since text links survive forwarding and reply chains far better than images do.
  • Keep icons small, roughly 20 to 24 pixels square, and compress image files so the whole signature loads fast even on a slow connection.

A link that only certain readers can find isn’t doing its job. Color alone should never be the only signal that text is clickable, because that fails for color-blind readers and disappears entirely in dark mode, where blue links can render as a color barely distinguishable from body text. Pair color with an underline and slightly bolder weight so the link is obvious regardless of display settings, a combination Stripo recommends specifically for signature links.

Anchor text matters just as much as styling. “Click here” tells a screen reader user nothing about where the link goes; “Schedule a call” or “Tip my work” does. This lines up with basic WCAG link-purpose guidance on writing descriptive alt text and maintaining sufficient contrast so signatures work for people using screen readers or low-vision settings.

Accessibility and Mobile Considerations for Clickable Links — overview diagram

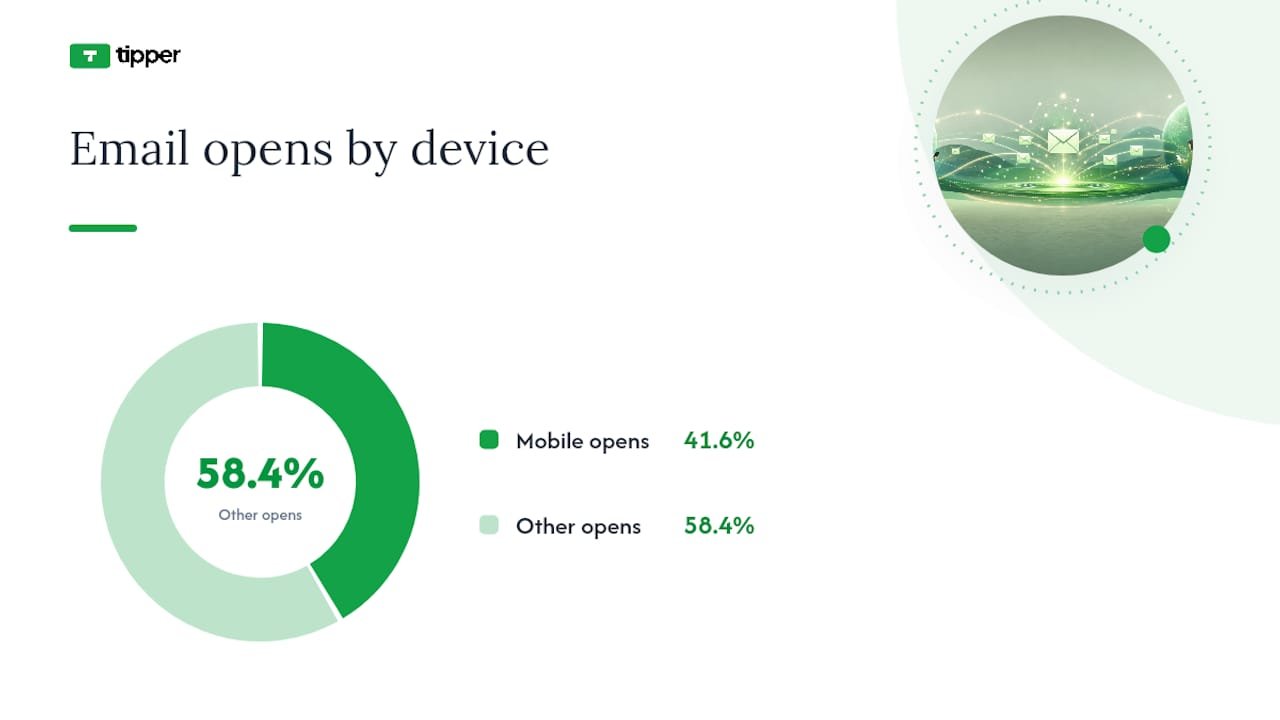
Mobile clients account for roughly 41.6% of email opens, according to MailerLite’s data, which means a signature that only looks good on a desktop screen is failing a huge share of your recipients. On mobile, keep link text large enough to tap accurately and give tappable elements enough surrounding space that a thumb doesn’t accidentally hit the wrong link.

Before you consider a signature finished:

  • Test in both light and dark mode, since underlines and color contrast behave differently in each.
  • Check on an actual phone, not just a resized browser window.
  • Run through a screen reader if you can, or at minimum confirm every link has real anchor text, not a bare URL or “click here.”

If you’re running a business signature or a marketing campaign through email, a basic UTM tag on your signature link lets you see how much traffic actually comes from it. A minimal pattern looks like ?utm_source=signature&utm_medium=email, added once to your CTA link, nothing more elaborate needed for most individual or small business use. HubSpot’s guidance on professional signatures treats trackable links as a standard part of measuring signature performance, not an advanced move reserved for marketing teams.

Personal signatures, on the other hand, usually don’t need tracking parameters at all. A creator sharing a tip link with friends and followers gains little from UTM clutter, and a long tagged URL looks worse than a clean one.

  • Use UTMs on business or marketing signatures where results get reported; skip them on personal or creator signatures unless you specifically want the data.
  • A branded short link or a simple redirect page keeps the visible URL clean even if tracking happens behind it.
  • For payment or tip links specifically, avoid stuffing query strings with anything beyond basic source tracking. Payment pages should collect exactly what’s needed to process a tip, nothing extra riding along in the URL.

Ready-to-Use Signature Templates by Goal

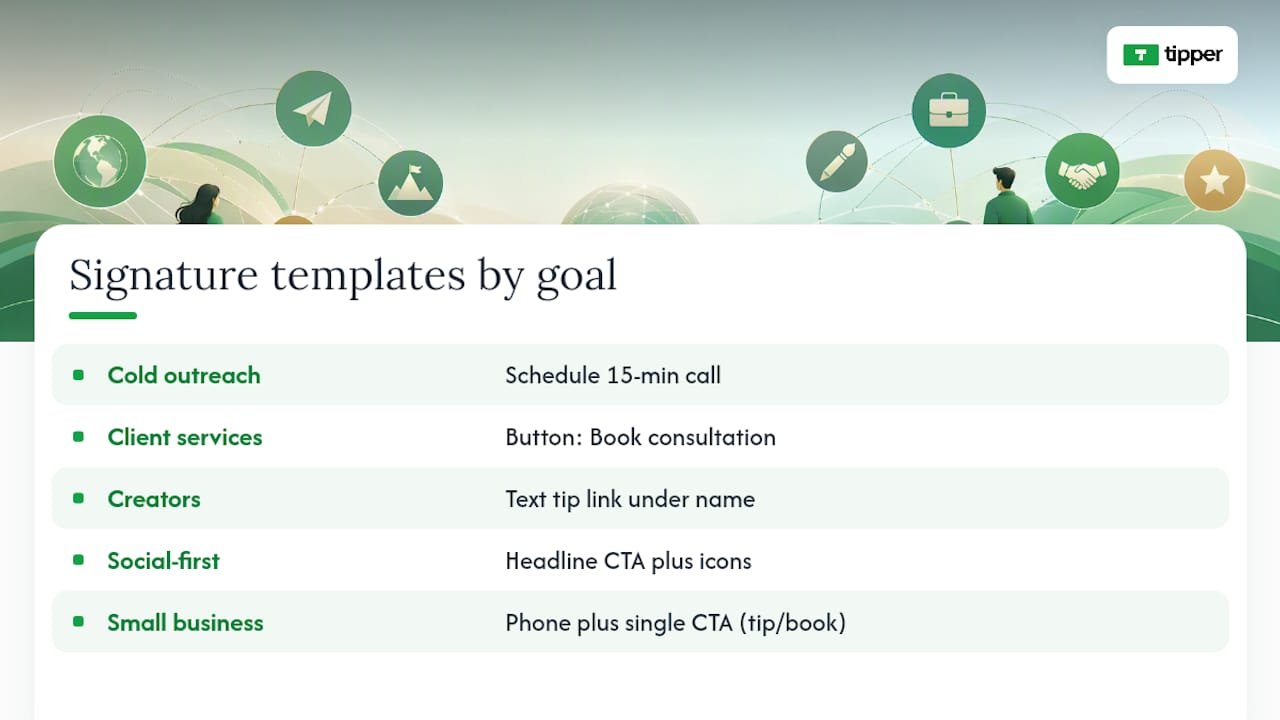
Different goals call for different phrasing, and the anchor text you choose should tell the reader exactly what happens when they click.

For cold outreach, keep it low-friction: “Jordan Reyes, Account Manager, Acme Co. / [Schedule a 15-minute call]” works better than a generic “Contact me,” because it names the exact ask and the exact time commitment.

For client-facing service providers, a booking-first signature reads cleaner: name and title, then a single line, “[Book a consultation],” styled as a button rather than plain text, since a visual button reads as more official in a client relationship.

For creators and freelancers, this is where a tip link earns its place. Something like “Maya Chen, Illustrator / [Tip my work]” placed directly under your name performs better than burying it in a social icon row, since a labeled text link gets noticed in a way an icon rarely does.

For social-first creators, an icon row still has a place, but pair it with one dominant text link above it: “[Support my work]” as the headline CTA, then Instagram, YouTube, and X icons below as secondary options.

For small business owners, a mix works well: name, business name, phone with tel: link, and a single CTA like “[Leave a tip]” or “[Book an appointment],” depending on which action matters more to that business.

If you’re deploying signatures across a team, hosting one shared asset with per-user insertion links prevents the slow drift where everyone’s signature quietly diverges over time, a pattern SigFinch outlines for keeping organizational signatures consistent without re-editing each person’s HTML by hand.

Ready-to-Use Signature Templates by Goal — overview diagram

Start with the boring explanations before assuming something’s fundamentally broken.

  1. Check the protocol first. A link missing https://, mailto:, or tel: is the single most common cause of a “link” that’s actually just plain text.
  2. If you’re on Gmail and your signature has a lot of formatting or images, check whether you’ve hit Gmail’s signature size limit, since oversized or overly complex HTML can get silently truncated, taking your link with it.
  3. Confirm you haven’t built an image-only signature with no underlying text link. If the image doesn’t load, there’s nothing left to click.
  4. Send test emails to Gmail, Outlook, and Apple Mail addresses, then forward and reply to each to see if the link survives.
  5. If nothing else works, fall back to a plain-text URL on its own line. It’s not elegant, but a visible, copyable link beats an invisible broken one every time.

A tip link sitting quietly under your name doesn’t ask anything of the reader, and that’s exactly why it works. Nobody has to remember to visit your page later or dig up a payment app; the option is just there, every time you email someone who already trusts your work enough to be corresponding with you.

The engagement is usually modest per email, but it compounds across every message you send for the rest of the year without you doing anything else. Tipper builds its tip links specifically so creators can drop one into a signature without asking senders to create an account first, which removes the exact friction point that kills most passive monetization attempts.

— Tipper

Turn Your Signature Into a One-Click Way to Get Tipped

Tipper is the fastest way to turn that signature line into money in your account, without asking a single sender to sign up for anything. You create a personalized tip link in a few minutes, drop it into your signature with anchor text like “Tip my work” or “Support my work,” and every sender can pay instantly with Apple Pay, Google Pay, or a card, no account required on their end.

Tipper

Supporters can even leave a text, photo, or video thank-you note back to you, which turns a one-off tip into an actual moment of connection rather than a silent transaction. If you want a head start on wording, Tipper’s guide to why payment links boost engagement and its walkthrough on building a working tip link fast both give templates you can adapt directly into your signature. Set up your link now and add it to your next outgoing email.

Sources

FAQ

Open your email client’s signature settings, highlight the text you want linked, click the insert link icon, and paste your URL starting with https://. Always send a test email to a second account to confirm it works before relying on it.

Short, direct phrases work best: “Tip my work,” “Support my work,” or “Buy me a coffee” all tell the reader exactly what happens when they click, which outperforms vague phrasing like “Click here.”

What Are the Best Practices for Email Signatures in 2026?

Keep the signature text-based rather than image-only, use one clear primary call to action instead of several competing links, and make sure every link uses a full protocol like https:// so it stays clickable across Gmail, Outlook, and Apple Mail.

Select the image in your signature editor and use the same insert-link tool you’d use for text, pasting the full URL with https://. Add descriptive alt text and a nearby text link as backup in case the image doesn’t load for the recipient.

Forwarding and replying sometimes strip formatting or convert hyperlinks into plain text, which is why text-based links with full protocols tend to survive better than image-based ones. If a link consistently breaks on forward, fall back to a plain visible URL on its own line.

Creators: Make Your Email Signature Tip Link Work in Gmail and Outlook2026-09-02T02:00:51+00:00

Accept Tips With One Link, Photographers, Keep More and Stay Tax Aware

The fastest way to start collecting tips as a photographer is to create a personalized tip link or QR code, turn on Apple Pay, Google Pay, and card payments, set three preset amounts, and put that link everywhere clients already look: your bio, your gallery, and your delivery email. Do those two things first, then refine placement and copy later.


TL;DR:

  • Using a personalized tip link or QR code placed in social bios, gallery footers, and emails offers a quick, frictionless way to start collecting tips without requiring support account creation.
  • Setting three preset tip amounts—low around $3, middle around $7, and high near $15—improves conversion by guiding supporters with visually emphasized options.
  • Testing the full payment process with a small transaction from a non-logged-in device ensures smooth payout flow before promoting your tip link widely.
  • Platforms like Stripe or PayPal typically take around 3% plus $0.30 per tip, with direct payment rails generally retaining more of the supporter’s intended amount.
  • Record and reconcile tips monthly, noting gross, platform fees, and net amounts to stay compliant with IRS guidelines on reporting business income.

Table of Contents

What’s the Fastest Way to Accept Tips Online?

You have four real options, and they’re not mutually exclusive. Most photographers should stack them in order of effort.

A tip link page is the fastest to launch. You create one page, drop in your name and a short note about what tips fund, and share the URL anywhere text fits: an Instagram bio, a website footer, a text message after a shoot. No app download required on the sender’s end, which matters because friction kills tips faster than almost anything else.

QR codes solve the in-person problem a link can’t. Print one on a business card, tape it to your camera bag, or add it to the last page of a printed proof sheet. A QR code tip page turns a physical moment, the handoff of prints, the end of a session, into an instant payment opportunity without you saying a word.

Embedded tip buttons live inside your online gallery delivery, right next to the download button where a happy client is already primed to act. Stream overlays matter far less for photographers than for live-streamers, but if you do behind-the-scenes livestreams or Instagram Lives during shoots, an overlay works the same way a tip jar sign does at a coffee shop.

Add embedded buttons once you have a gallery delivery workflow. Overlays are a nice-to-have, not a priority.

How Do You Set Up a Tip Page Step by Step?

Here’s the exact sequence, and none of it should take more than half an hour.

  1. Create your account and tip page. Tipper is built specifically for this: no sender account needed, personalized link, and a QR code generated automatically.
  2. Connect a payout rail. Link a bank account and complete basic identity verification. This is standard KYC (know your customer), the same process any payment processor requires, and it usually takes a few minutes.
  3. Set three preset amounts. A low option for casual support, a highlighted middle default, and a higher option for your biggest fans. Creator playbooks consistently recommend this exact structure, low, highlighted middle, high, because a lone “enter custom amount” box depresses conversion compared to presets.
  4. Enable Apple Pay, Google Pay, and card payments, then run a small test transaction, something in the $1 to $5 range, and confirm when the payout lands in your bank account. Testing the full loop before you promote the link is a step creator payment guides specifically call out, because a broken link discovered after launch costs you trust you don’t get back easily.
  5. Turn on thank-you messages (text, photo, or video) and set up a simple bookkeeping sheet with three columns: gross tip, platform fee, net received.

Pro Tip: Do the test transaction from a phone that isn’t logged into your own accounts. That’s the actual experience a client has, and it’s the only way you’ll catch a confusing checkout screen before a real supporter does.

Placement decides whether your tip link gets seen at all, and copy decides whether it gets clicked. Get both wrong and even the best payment setup goes nowhere.

Put your link or QR in five spots, roughly in this order of impact:

  • Your social bio and website header, where anyone curious about you lands first.
  • The footer of every gallery you deliver.
  • The final page of a delivered gallery or the closing line of a delivery email.
  • A printed QR card handed off at in-person sessions.
  • An occasional, sparing mention in a social caption tied to a specific moment, not every post.

Copy matters more than most photographers assume. “Tip me” is abstract and easy to scroll past. “Help fund my next lens” or “Buy me coffee for the late-night edit sessions” gives the tip a purpose, and creator UX research shows outcome-specific asks outperform vague ones. Say what the money does, not just that you want it.

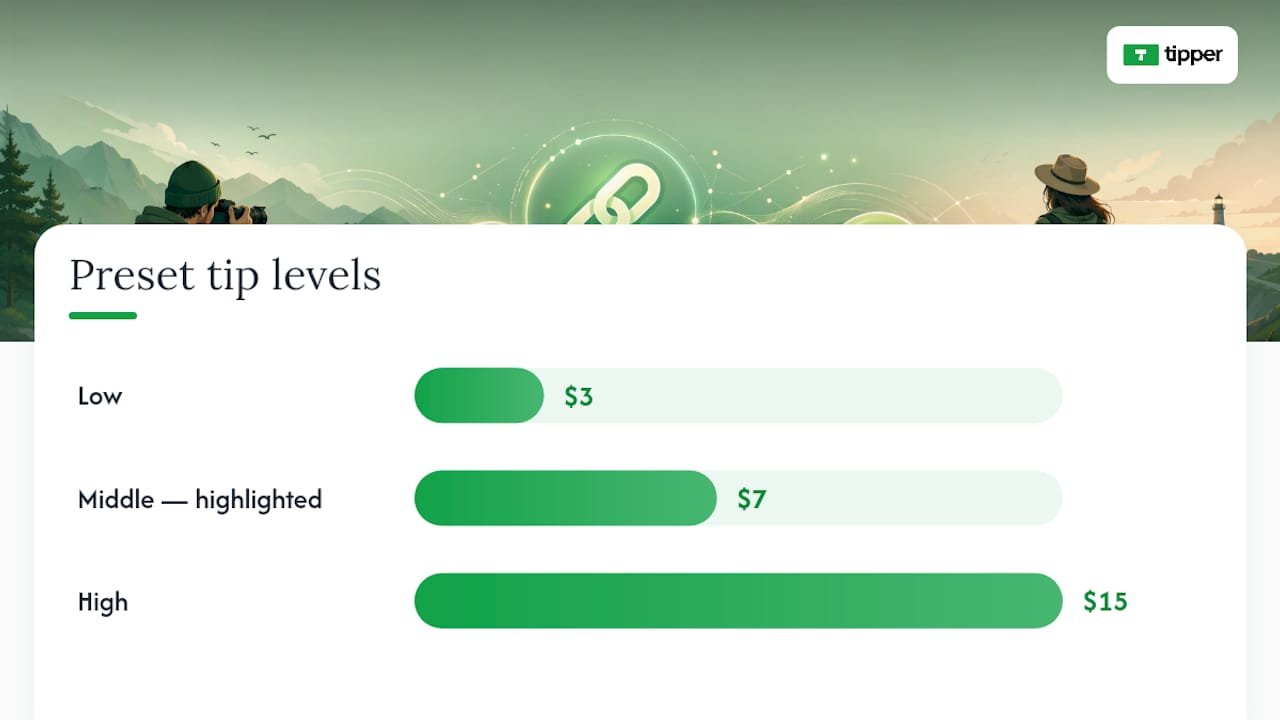
On preset pricing, round numbers convert better than odd ones. A common structure is $3 low, $7 highlighted middle, $15 high, with the middle option visually emphasized so it becomes the path of least resistance.

Three preset tip levels with middle option highlighted

One freelance creator who added a tipping option reported an earnings increase within three months of launch, a reminder that a well-placed link isn’t a gimmick, it’s measurable revenue. Track three numbers going forward: your tip conversion rate, your repeat-tipper rate, and your net receipts after fees. Repeat tippers are the real signal that your work and your thank-you follow-through are landing.

How Do Fees and Taxes Work for Photography Tips?

How Do Fees and Taxes Work for Photography Tips? — overview diagram

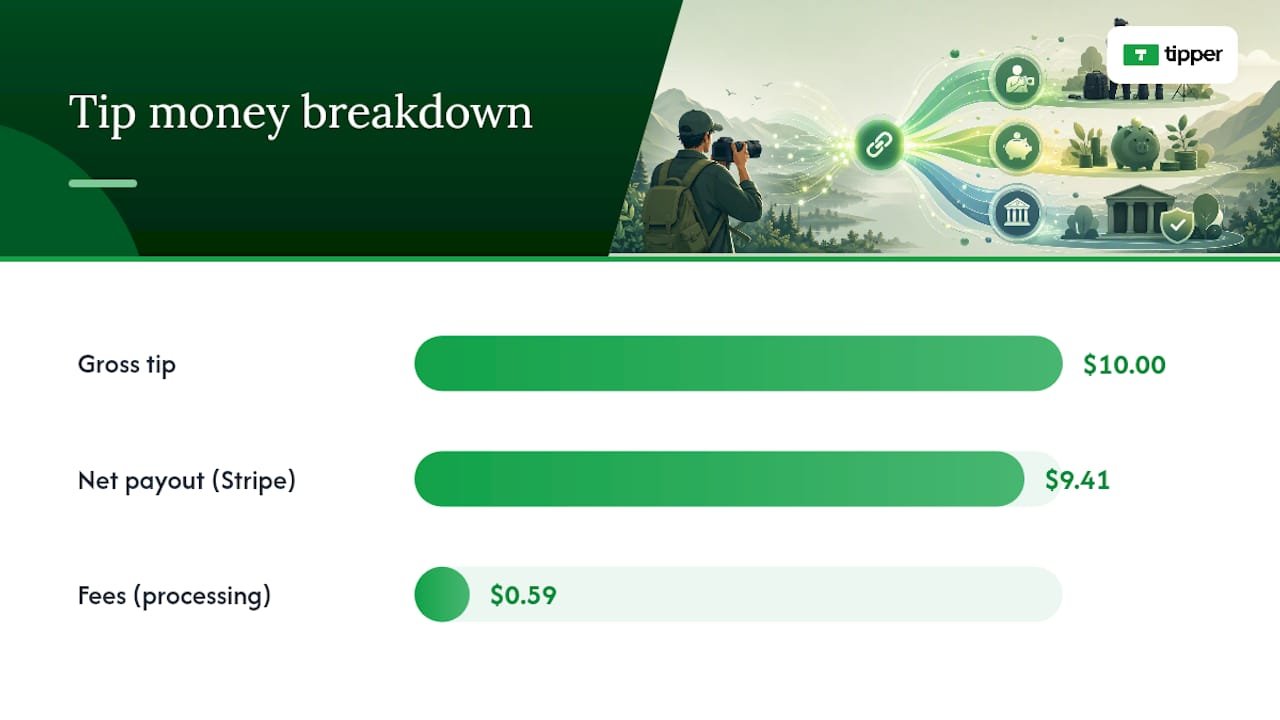
Money moves through one of two rails: a platform that takes a cut on top of processing costs, or a more direct rail like Stripe or PayPal that charges only standard processing. On a $10 tip, a typical Stripe-style structure (2.9% plus $0.30) nets a creator around $9.41. Platforms that layer an additional fee on top eat further into that number, so a direct-rail structure generally preserves more of what a supporter actually intended to give you.

On the tax side, the IRS draws a real line: a payment required to unlock content is compensation, but a voluntary payment given after access is a tip. Keep your copy voluntary. “Support my work if you’d like” holds up; “pay $5 to view this gallery” does not.

  • Record gross tip amount, platform fee retained, and net payout for every transaction.
  • Reconcile monthly rather than waiting until tax season.
  • Watch your 1099 thresholds since tipping income counts as business income.
  • Talk to a tax professional about your specific filing situation before you scale up.

Tipper’s Perspective: Tipping Belongs in Every Photographer’s Income Mix

Tipping works because it’s low-friction income layered on top of work you’re already doing. It doesn’t require a new product, a new client pitch, or a new invoice. It requires a link that’s easy to find and a thank-you that feels personal.

The photographers who get the most out of it aren’t the ones who tip-jar every post. They’re the ones who treat repeat tippers as relationships worth nurturing, a quick video thank-you goes further than most people expect. Most mistakes we see are fixable in five minutes: a link buried three taps deep in a bio, a payout never tested before launch, or copy so vague nobody understands what the tip is for. Fix the placement, test the payout, name the purpose. That’s most of the job.

— Tipper

Start Collecting Tips With Tipper

Tipper gives you a personalized link and QR code, Apple Pay and Google Pay support, and no requirement for the sender to create an account, which removes the single biggest reason a supporter abandons a tip halfway through. You set your own preset amounts, add thank-you messages in text, photo, or video, and route payouts directly to your bank.

Tipper

Check the product page for current processing specifics.

Here’s your next step. Create your tip page, copy the link and QR code, run a small test tip to confirm the payout lands, then add that QR to your next client packet or delivered gallery. If you run a storefront or in-person sessions alongside your photography work, point-of-sale tipping options extend the same idea to walk-in clients.

Sources

For deeper reading on the tax side, see the IRS guidance on digital creator tips and LegalClarity’s breakdown of reporting rules. For UX and placement tactics, the creator tips playbook covers preset amounts and copy in more depth, and Tipper’s guide on contactless tip collection has more setup examples. Photographers exploring other monetization channels can also read about photo licensing royalties.

This article is general information, not a substitute for advice from a qualified financial advisor. Consult a qualified financial professional about your own circumstances before acting on anything here.

FAQ

What Is the Best Way to Start Accepting Tips Online as a Photographer?

Create a personalized tip link or QR code, connect a payout rail, and share it in your bio, gallery footer, and delivery emails. Tipper lets senders tip you without creating an account, which removes a common source of drop-off.

Do I Need a Business Account to Receive Tips?

You need a payout account (like a linked bank account through your tipping platform) and basic identity verification, but this is separate from needing a formal business entity. Check with a tax professional about your specific setup.

Are Photography Tips Taxable Income?

Yes, tips are business income and should be tracked monthly, recording gross amount, platform fee, and net payout. The IRS treats voluntary post-access payments as tips, distinct from required payments, which count as compensation.

How Much Should I Set as Preset Tip Amounts?

A common structure is a low option around $3, a highlighted middle default around $7, and a high option around $15, with the middle amount visually emphasized to guide the click.

Does Tipper Charge Photographers a Subscription Fee?

No. Tipper is free to create and maintain an account, with a small transaction-based fee applied per tip rather than a recurring subscription cost.

Accept Tips With One Link, Photographers, Keep More and Stay Tax Aware2026-09-01T02:01:56+00:00

Beat 20% Tip Tolerance Chargebacks with POS Fixes for Restaurants

Yes, tips can trigger chargebacks, and it usually happens when the final settled amount runs past what the customer’s card was authorized for, typically beyond the card network’s tip tolerance of around 20%. The immediate move: pull your authorization and capture logs plus the receipt before you do anything else, and for small-dollar disputes with thin evidence, a quick refund often costs less than fighting. The rest of this guide covers exactly what triggers these disputes, what evidence wins them, and how to stop them before they start.


TL;DR:

  • Maintaining a tip amount within the card network’s 20% tolerance threshold prevents automatic flags for amount mismatches during settlement.
  • Clearly disclosing mandatory service charges separately from tips on menus and receipts reduces misrepresentation claims and dispute risks.
  • Using in-transaction tip capture, digital receipts, and instant electronic confirmation significantly lowers post-authorization tip disputes.
  • Gathering comprehensive evidence such as signed receipts, audit logs, and authorization records is crucial before contesting a chargeback.
  • Implementing digital tipping methods with timestamped confirmations streamlines dispute defense and minimizes amount-mismatch conflicts.

Table of Contents

How Card Networks Treat Tip Chargebacks and the 20% Tolerance Rule

Card networks built a buffer into how they handle restaurant and hospitality transactions, because tips get added after the initial swipe or tap. That buffer is commonly known as the tip tolerance, and it typically runs around 20% above the original authorized amount. Stay under that ceiling and the settled charge usually clears without a second look. Go over it, and you’ve created an amount mismatch between what the cardholder approved and what actually posted.

That mismatch is exactly what issuers watch for. Here’s the mechanical sequence that creates risk:

  • A card gets pre-authorized for the bill total (say $100).
  • The customer adds a tip after the fact, either on a receipt or through a POS prompt, pushing the final charge to an amount that can exceed the usual tip tolerance threshold, which is commonly near 20%.
  • The issuer’s system can flag this automatically, sometimes without ever asking the cardholder first.

The reason codes attached to these disputes usually point to “amount exceeds authorization,” which shows up under different labels depending on the network. Some processors reference it by code (Amex uses A01), but the underlying issue is the same across networks: the settled amount doesn’t match what was approved. This is also why post-authorization tip adjustments carry more scrutiny than tips collected in the original transaction. The longer the gap between authorization and final capture, the more room there is for a mismatch to slip through unnoticed until the cardholder’s statement arrives.

Tips vs. Service Charges: Why the Distinction Matters for Disputes

A voluntary tip and a mandatory service charge are not the same thing, and treating them interchangeably is one of the fastest ways to lose a chargeback you should have won. A tip is optional, chosen by the customer, and typically goes straight to staff. A service charge (an 18% gratuity added automatically for parties of six or more, for example) is a business-set fee, and depending on your state, it may be taxed differently and processed through payroll rather than tip pooling.

Networks and issuers expect clear, prominent disclosure whenever a mandatory fee gets added to a bill. Skip that disclosure, or bury it in fine print, and you’re inviting a misrepresentation claim on top of the standard amount dispute, weakening your position on both fronts.

A few places disclosure has to be unmistakable:

  • On the physical or digital menu, near the item or party-size threshold that triggers the charge.
  • On the payment screen or receipt, before the customer signs or taps to confirm.
  • On the final printed or emailed receipt, itemized separately from the tip line.

Pro Tip: Never label a mandatory service charge as a “suggested tip” on your receipt. That single word choice can shift how a chargeback gets categorized and can create payroll tax exposure you didn’t intend.

Preventing Tip Chargebacks: POS Setup and Staff Workflow

Most tip disputes trace back to operational gaps, not fraud. Confusing receipts, delayed batch closings, and tip amounts entered after the original authorization account for a large share of avoidable cases. Fixing this is mostly about tightening your workflow, not buying new hardware.

  1. Close batches daily. The longer a transaction sits open, the more likely a tip adjustment slips outside the tolerance window unnoticed.
  2. Require verification on unusually high tips. A manager sign-off on tips well above your typical range catches entry errors before they become disputes.
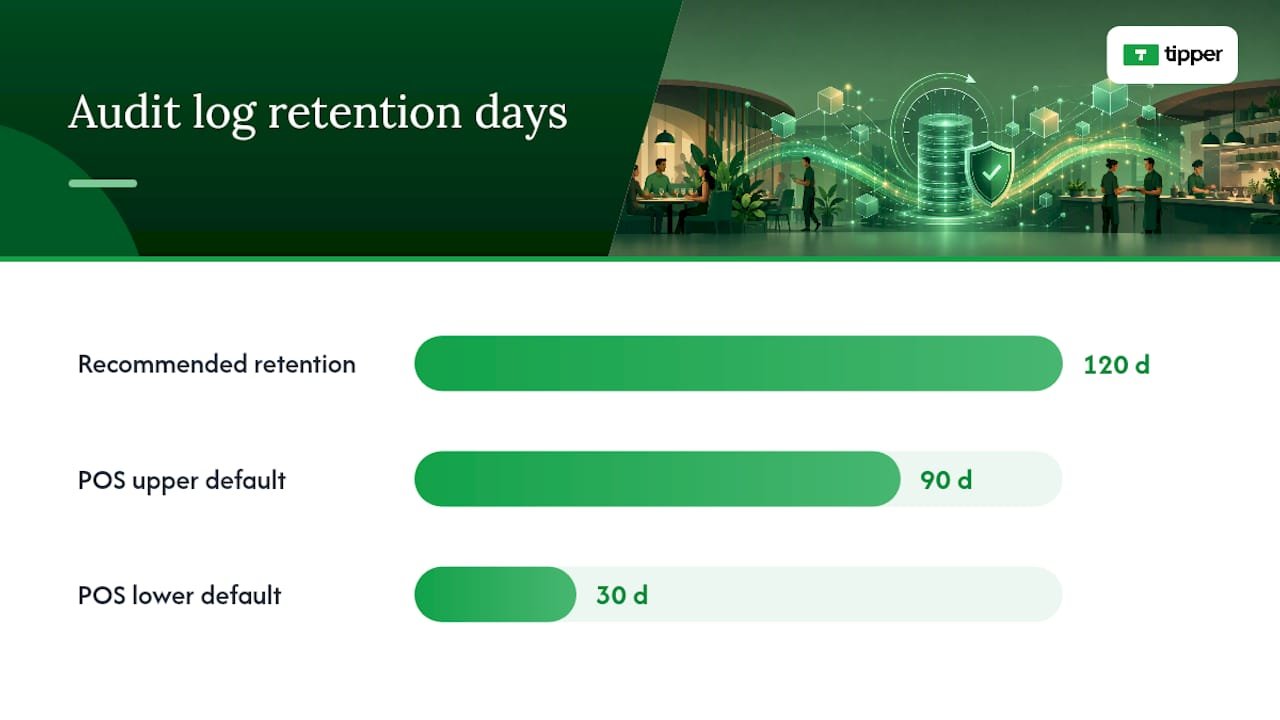
  3. Retain your tip-adjustment audit logs for at least 120 days. Many POS systems only keep detailed logs for 30 to 90 days by default, which can fall short of network representment windows.
  4. Collect tips in-transaction where your POS allows it. Pre-authorizing with an estimated tip, or capturing the tip before the card is released, eliminates the entire category of post-authorization mismatch disputes.
  5. Turn on customer-facing confirmation screens. A visible final total before the customer walks away removes the “I didn’t agree to that amount” argument before it starts.
  6. Send digital receipts immediately. An instant text or email receipt lets the customer reconcile the charge while it’s still fresh, which cuts down on “I don’t recognize this” claims.

For businesses handling prepaid cards or gift cards, partial-authorization behavior deserves extra attention. A gift card partial auth that doesn’t fully cover a tipped total can trigger a decline or a split transaction that confuses both your POS and your customer, so test that flow specifically if you accept prepaid payment methods.

Pro Tip: If your POS lets you choose between “tip on receipt” and “tip in app before final capture,” pick the in-app option every time you have a choice. It’s the single biggest lever for cutting post-authorization disputes.

Preventing Tip Chargebacks: POS Setup and Staff Workflow — overview diagram

Responding to a Tip Chargeback: Evidence and Representment Steps

The moment a chargeback notice arrives, you’re on a clock, and what you gather in the first 24 hours often decides the outcome. Start by pulling four things: the original POS receipt, the tip-adjustment audit trail, the auth-and-capture record, and any guest communication or timestamped footage that confirms presence and service.

Issuers and networks weigh objective transaction records far more heavily than subjective claims, as explained in this guide on how payment disputes are evaluated. A signed receipt or electronic tip confirmation paired with authorization and capture logs tends to carry a dispute; a staff statement about good service on its own rarely does.

That evidence gap is also why a decision framework helps before you commit time to fighting a claim:

  • Refund it when the dollar amount is small and your evidence trail is incomplete or missing.
  • Represent it when you have a full package: signed or electronic receipt, complete auth-to-capture record, and a clean audit log showing when and how the tip was added.
  • Escalate internally when you notice a pattern of disputes from the same terminal or shift, since that usually points to a training or workflow issue rather than isolated customer disputes.

Timing matters on both sides. Cardholders generally have 60 days from the statement date to file written notice of a disputed charge, and once a dispute is opened, your representment window is typically measured in days, not weeks. Some processors also note that even a small overage above the tip tolerance can trigger a dispute, and the chargeback fee alone can exceed the disputed tip amount, which is another reason quick refunds sometimes make more financial sense than a fight over a few dollars.

How Digital Tipping Cuts Down on “I Don’t Recognize This” Disputes

A tip collected through a link or QR code with instant electronic confirmation creates a timestamped record the moment the payment clears, which is exactly the kind of evidence issuers want to see. Instant digital receipts sent by text or email let the customer reconcile the final amount right away, cutting off the “no recognition” dispute before it forms.

Practical steps for building this into your operation:

  • Send an electronic tip confirmation the moment payment processes, not at the end of the shift.
  • Keep confirmation records tied to the transaction ID so they surface instantly during representment.
  • Support the payment methods customers already trust and use daily, including Apple Pay and Google Pay.
  • Use a checkout-integrated tip prompt so the tip amount is locked in before authorization closes, not adjusted afterward.

Merchants who shift to digital tip capture generally see fewer amount-mismatch disputes simply because there’s less time between the tip decision and the record of it.

The Real Tension Between Protecting Tips and Avoiding Disputes

Staff depend on tips to make a living wage in a lot of hospitality jobs, and that reality shouldn’t get lost in a conversation about chargeback prevention. The goal isn’t to make tipping harder or slower for the customer. It’s to close the gap between when a tip gets decided and when it gets recorded, because that gap is where nearly every dispute originates.

The businesses that handle this well aren’t the ones with the most complicated fraud rules. They’re the ones with a simple, written playbook everyone on staff actually follows, and a monthly habit of checking their POS logs before a problem becomes a pattern.

— Tipper

Cut Tip Disputes With Electronic Confirmation at the Source

Tipper gives merchants a direct way to close the evidence gap that causes most tip chargebacks: every tip sent through a personalized link or QR code comes with an instant electronic confirmation, timestamped and tied to the transaction the moment it clears.

Tipper

That confirmation record is exactly what networks ask for during representment, alongside your existing receipt and authorization data. Pairing this with the frictionless tipping practices outlined for 2026 gives you a workflow that’s faster for guests and better documented for you. Set up your Tipper and start generating confirmed, auditable records on your very next transaction.

Sources

FAQ

Can I Dispute a Tip Charge on My Card?

Yes, cardholders can dispute a tip charge, generally by sending written notice within 60 days of the statement that includes the charge, most commonly when the final amount exceeds what they believe they authorized.

Can a Business Legally Take Back a Tip?

A business generally can’t simply reclaim a tip a customer voluntarily gave once it’s processed, though a merchant can refund or adjust a charge to resolve a billing error or a documented dispute.

Is a 10% Tip Disrespectful?

Tipping norms vary by region and service type and aren’t governed by card network rules; what matters for chargeback risk isn’t the tip percentage but whether the final charged amount matches what the customer actually authorized.

Can You Go to Jail for Disputing a Chargeback?

Filing a legitimate chargeback dispute isn’t a criminal matter, but knowingly filing a false dispute to reverse a valid charge (friendly fraud) can expose someone to civil liability and, in serious or repeated cases, fraud-related legal consequences.

What Evidence Do I Need to Fight a Tip Chargeback?

You need objective transaction records: the signed or electronic receipt, tip-adjustment audit log, and authorization-to-capture record, since issuers weigh these far more heavily than staff testimony about service quality.

Beat 20% Tip Tolerance Chargebacks with POS Fixes for Restaurants2026-08-31T02:00:30+00:00

Set Up Credit Card Tipping in 20 Minutes for Creators

Yes, you can accept tips by credit card and mobile wallet today, and you don’t need a merchant account to do it. The three practical routes are a shareable payment link, an embedded tips block on your own page, or a QR code that points to a hosted checkout. Each one, once connected to a processor, takes cards, Apple Pay, and Google Pay, lets you set preset or custom amounts, and sends payouts straight to your bank.


TL;DR:

  • Using a hosted payment link, embedded tips block, or QR code allows quick acceptance of credit card and mobile wallet tips without a merchant account.
  • Setting up involves linking a processor like Stripe or PayPal, configuring preset amounts, enabling wallets, and testing with a small tip before sharing publicly.
  • In-person tips benefit more from QR codes for instant mobile payments, while online or remote tips favor links or embedded options for broader reach.
  • Tips are taxable income, and you should keep records and consult a tax professional to ensure proper reporting and reconciliation.

Table of Contents

Quick options: the real ways to accept card tips

Every card tipping setup boils down to three shapes, and picking the right one depends on where your audience already is.

  • Payment links. A hosted checkout page you can drop into a bio, email, or text. Stripe’s Payment Links let you build one without writing a line of code, and it works for a one-time tip or a recurring pledge. PayPal’s Payment Links do the same, accepting cards, Apple Pay, and Google Pay where enabled.
  • QR codes. Same hosted link, different delivery. Print it on a table tent, a merch tag, or a slide at a live show, and anyone can scan and pay in seconds.

Links win on reach and simplicity. In-page blocks win on conversion, since the visitor never leaves your content. QR codes win when you’re standing in front of someone and a link would be clumsy.

How do you set up card and wallet tipping?

Getting a working tip flow live doesn’t take a developer. It takes about twenty minutes if you already have a bank account ready to link.

  1. Pick a processor and finish onboarding. Stripe or PayPal both work well; you’ll verify your identity and connect a bank account before you can accept live payments.
  2. Create your link or activate a tips block. Set your preset amounts (commonly three or four choices) and decide whether to allow a custom amount field.
  3. Turn on mobile wallets. Most processors enable Apple Pay and Google Pay automatically once your account is verified, but check your settings, and confirm domain verification if you’re embedding a block on your own site.
  4. Generate a QR code for the same link. Add your branding, write a short thank-you note that will trigger after payment, and run one real test transaction before you share it publicly.
  5. Check your payout settings. Confirm your bank routing details are correct and note how often payouts land in your account.

Pro Tip: Send yourself a $1 test tip before you share the link anywhere. It’s the fastest way to catch a broken wallet setting or a typo in your payout details before a real supporter hits the same wall.

Once wallets are confirmed live, Apple Pay and Google Pay tend to convert better on mobile than typing in a full card number, since the phone autofills everything.

What fees come out of a credit card tip?

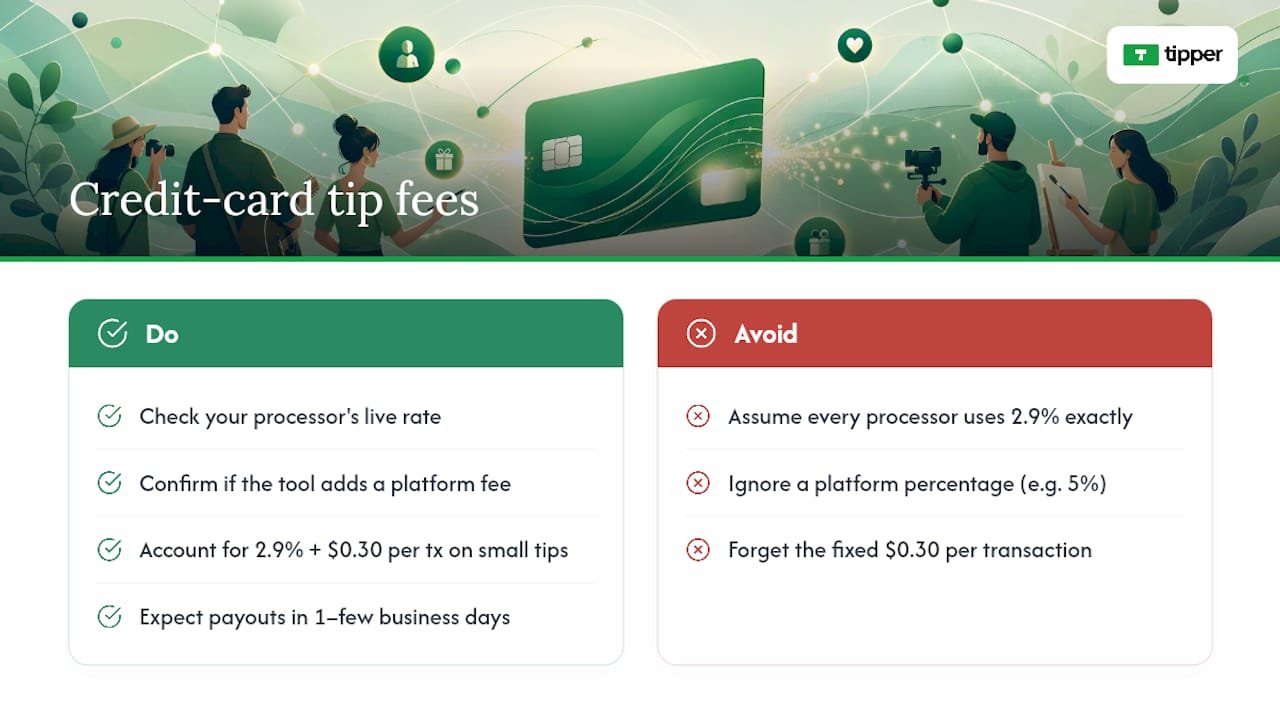
Card processing isn’t free, and knowing the math up front keeps you from being surprised at payout time. A typical US processor fee runs around 2.9% plus $0.30 per transaction, though you should always check your processor’s live rate, since these shift.

Card processing fees reduce a $5 tip by about the processor’s percentage plus a fixed fee, leaving most of the tip amount in your account. Similarly, larger tips have a slightly larger total fee but still leave the majority of the amount to you.

The bigger question is whether your tipping tool only passes along that processor fee, or adds its own percentage on top. Some platforms take a cut of every tip beyond what the card network charges; others don’t touch it at all. That distinction is worth confirming before you commit to a tool, since a 5% platform fee on top of standard processing meaningfully changes what you keep. Payouts themselves usually land in your bank within one to a few business days, depending on the processor and your account history.

What fees come out of a credit card tip? — overview diagram

How can you get more people to actually tip?

Getting the payment flow working is the easy part. Getting people to tap the button is where most creators leave money on the table.

  1. Put the option where attention already is. End of a video, your bio link, the footer of a newsletter, a QR code on a receipt or merch tag. Don’t bury it on a page nobody visits.
  2. Offer three preset amounts with an obvious middle choice, plus an optional custom field for the person who wants to go bigger. Most tips blocks default to this structure for a reason: choice paralysis kills conversions.
  3. Write one line of context above the button. “Buy me a coffee” or “Support this week’s episode” does more work than a bare “Tip” label, because it gives permission and sets expectations in the same breath.
  4. Send a thank-you the moment the tip lands. A short text note, a photo, or a quick video reply reinforces the gesture and makes the next tip more likely.
  5. Change one variable at a time. Swap the preset amounts, then measure. Swap the copy, then measure. Stacking changes makes it impossible to know what actually moved the needle.

Pro Tip: If you only test one thing this month, test your preset amounts. A middle option that’s slightly higher than you’d guess often lifts average tip size without hurting conversion at all.

Keeping the flow embedded rather than sending people to an external page tends to help here too, since every extra click or redirect is a chance for someone to lose momentum and change their mind.

Is it safe to collect card tips, and what about taxes?

A hosted checkout page does more than look clean. It also keeps most of the compliance burden off your plate.

  • PCI scope stays small. When Stripe or PayPal hosts the actual checkout, you’re not storing card numbers on your own server, which limits your PCI compliance obligations considerably compared with building your own payment form.
  • Collect only what you need. Ask for a name or note if you want it, but don’t require personal details that aren’t necessary for the transaction, and be upfront about what appears on a receipt.
  • Tips are income. Keep records of what comes in, reconcile it against your payouts periodically, and talk to a tax professional about how to report it. Occasional gifts from friends are different from a steady tipping stream tied to your work, and that distinction matters for how you categorize it.

The best tip flow in the world does nothing if nobody sees it. A few channels consistently outperform the rest for creators and small businesses.

  • Social bios and link pages. Tools like Linktree’s Commerce Links let you accept cards and wallets right from your bio without sending anyone off-platform.
  • Email footers and newsletter CTAs. A direct payment link at the bottom of every send costs nothing and reaches people already invested enough to open your email.
  • QR codes at live shows and events. Print one on signage, merch, or a tip jar sign, and let people scan and pay in a few seconds.
  • An embedded tips block on your own site or storefront, similar to how businesses use customizable payment request pages to make paying (and tipping) feel like a natural part of checkout rather than an afterthought.

Why Tipper bets on frictionless, account-free tipping

We built Tipper around one observation: every extra step between “I want to tip you” and “the money moved” costs you supporters. Requiring an account, a login, or a redirect to some unfamiliar checkout page kills impulse generosity, and impulse is most of what tipping actually is.

Keeping the flow on the creator’s own page, backed by Apple Pay and Google Pay, mirrors what helps creators build sustainable tipping revenue instead of one-off donations that never repeat. The tools that win here aren’t the ones with the most features. They’re the ones that get out of the way fastest.

— Tipper

Start Accepting Card and Wallet Tips With Tipper

If you’ve been weighing a payment link against an embedded block against a QR code, here’s the shortcut: Tipper gives you all three from a single personalized link, no account required for the person sending the tip. You get card payments, Apple Pay, and Google Pay support out of the box, a customizable tip page that matches your brand, and thank-you messages you can send back as text, a photo, or video.

Tipper

Setup takes a few minutes: connect your payout details, set your amounts, and you’re live. Before you share it anywhere, send yourself a real $1 tip to confirm the whole flow works end to end. Then head to Tipper and build your link.

Sources

For the setup details covered here, the official documentation is worth bookmarking: Stripe Payment Links, PayPal Payment Links, and UniLink’s Tips block guide. For platform-specific comparisons, see Tipper’s guide to digital tipping platforms.

FAQ

Can I accept credit card tips without a merchant account?

Yes. A processor like Stripe or PayPal handles the merchant relationship for you, and a hosted payment link or a personalized page from a platform like Tipper lets you accept cards without ever setting up your own merchant account.

Does Apple Pay or Google Pay cost more to accept than a regular card?

No, mobile wallets typically run through the same processor fee as a standard card transaction. The benefit is speed and conversion on mobile, not a different price.

How much of a $5 tip do I actually keep?

After a typical processing fee of around 2.9% plus $0.30, a $5 tip nets most of its amount, though your exact rate depends on your processor and whether your tipping tool adds its own platform fee on top.

A QR code is usually better in person since it turns a physical sign or receipt into an instant scan-and-pay moment, while both options point to the same hosted checkout page behind the scenes.

Do I have to report credit card tips as income?

Yes, tips are income and should be tracked and reconciled against your payouts; consult a tax professional for how to report them based on your specific situation.

Set Up Credit Card Tipping in 20 Minutes for Creators2026-08-30T01:30:56+00:00

5 Minutes to a Working Twitter Tip Link That Actually Pays

Turn on Tips inside Edit Profile, connect at least one payment method, then put the link where people actually see it, your bio or a pinned post, instead of burying it in every tweet. That’s the whole job. The setup itself takes about five minutes; getting people to actually use it depends far more on what you post than on which payment app you pick.


TL;DR:

  • Connecting your payment accounts correctly and testing the tip link beforehand ensures supporters can send money without errors or delays.
  • Placing your tip link in your bio or a pinned post, rather than in every tweet, significantly increases the chances of receiving spontaneous tips.
  • Offering multiple payment options and using a link service like Tipper reduces friction, encouraging more supporters to tip with a single tap.
  • Verifying that your profile displays the money icon and testing each payment method helps prevent missed tips and builds trust with supporters.
  • The cost of tips depends on the payment provider’s fees, especially if supporters use credit cards, which can add around 3% to the tip amount.

Table of Contents

The native Tips feature sits inside your profile settings on both mobile and web, and the path is nearly identical either way. Twitter (now X) built this as a direct pipeline to third-party payment services rather than its own processor, so setup is really about connecting accounts you may already have.

Here’s the sequence:

  1. Open the X app or go to x.com and tap your profile icon, then Edit profile.
  2. Scroll to Tips and open it. You’ll be shown the General Tipping Policy, which covers acceptable use and payment provider terms. Read it before you accept, since violating it can get the feature disabled.
  3. Toggle Allow tips on.
  4. Enter your payment usernames or links in the fields provided. Formatting matters here. A Cash App tag needs the “$” prefix, a Venmo handle needs to match exactly what’s on your Venmo profile, and a PayPal.me link needs the full URL. A typo in any of these sends someone’s money to the wrong place or nowhere at all.
  5. Save your profile.
  6. Confirm the small money icon now appears next to your profile, near the message and follow buttons.

Mobile and web walk-throughs show the exact same flow, just with slightly different menu depths, so don’t expect the Android version to differ meaningfully from iOS. One common snag: the icon doesn’t always appear instantly. If it’s missing after a minute, back out of Edit Profile completely and reopen it rather than refreshing the page, which sometimes fails to pull the update.

Which Payment Methods Actually Get You Tipped?

X’s Tips menu typically surfaces a handful of familiar names, Cash App, Venmo, PayPal, and in some regions Patreon or a personal Chime handle. Which ones show up depends on your account region and app version, so check your own Edit Profile screen rather than assuming a list applies to you.

The method you pick matters more than most people think. A supporter who has to download a new app or create an account just to send $5 will abandon the process more often than one who can tap Apple Pay and confirm with Face ID in three seconds. That gap between “willing to tip” and “actually tipped” is almost entirely about friction, not generosity.

A few practical notes on formatting and choice:

  • Double-check your Venmo and Cash App usernames match your public profile exactly, including capitalization.
  • If you have a PayPal.me link, use the full URL, not just your username.
  • Consider listing two options instead of one. Some supporters have Apple Pay set up but not Venmo, and vice versa.
  • A dedicated link service like Tipper consolidates Apple Pay, Google Pay, and card payments into a single one-click page instead of routing to separate apps.

Pro Tip: Test every payment link yourself from a phone that isn’t logged into your own accounts. It’s the only way to catch a broken username before a supporter does.

Your bio and your pinned post are the two spots that actually convert, and for a specific reason: they’re visible without requiring the visitor to scroll through your timeline or catch a tweet at the right moment, as suggested by practical guidance on using profile bios and pinned posts from Link in Bio Hub.

The mistake most new creators make is leading with the ask. A tweet that opens with “Tip me here” and a link tends to underperform posts that lead with value, because the link itself eats into the punch of the first sentence and reads as a pitch before it reads as content. Twitter’s own character economics reward front-loading your hook and pushing links toward the end of a post, not the start.

A better structure looks like this:

  • Pin a post that teaches something useful or shares a genuinely interesting take, then mention the tip link as a secondary line, not the headline.
  • Use your bio for the permanent, always-visible link, since that’s where curious new followers look first.
  • Reply to your own threads with something like “If this helped, the tip jar’s in my bio” rather than repeating the ask in every original post.
  • Space out direct mentions. A tip request in every third or fourth post reads as promotional; one every couple of weeks paired with strong content reads as an update.

Sprout Social’s research on tipping etiquette backs this up directly: framing a tip as appreciation for value already delivered, rather than a request made before you’ve built any goodwill, measurably increases follow-through. That’s a sequencing problem, not a persuasion problem. Earn the relationship first through replies and useful posts, then let the tip option sit quietly where people can find it.

Don’t assume the toggle worked just because the app didn’t show an error. Check it the way a stranger would encounter it.

  1. Open your profile from a browser you’re not logged into, or ask a friend to pull it up on their phone, and confirm the money icon appears next to your name.
  2. Tap the icon yourself and walk through what a supporter sees. Does it list the payment options you expect, and do the links land on the right accounts?
  3. Send yourself or ask a friend to send a small test tip, a dollar or two, through each connected method to confirm the money actually arrives.
  4. If a tip fails or the icon is missing, go back to Edit Profile, re-check your username formatting for typos, and re-save. A mismatched username is the single most common cause of a failed payment.
  5. If the icon still won’t appear after re-saving, log out and back into the app entirely. Cached profile data sometimes prevents the icon from updating on the first try.

Testing before you promote the link matters more than testing after. A broken tip flow discovered by a supporter, rather than by you, usually means that supporter doesn’t try again.

That matters for the small, spontaneous tips that make up most creator income, the $3 and $5 gestures sent in the moment right after someone reads something useful. Anything that adds a signup screen kills a chunk of those.

A supporter who has to leave the app, install something new, and create a login before paying you $5 is a supporter who, more often than not, just closes the tab instead.

Creators who pair a pinned, value-first post with a one-tap link tend to see steadier tip flow than those who post the link cold. Add a short thank-you note or video reply through Tipper after a tip lands, and the relationship compounds. Supporters who feel personally acknowledged tip again.

What Should You Know About Privacy When Turning on Tips?

Enabling Tips means putting a payment identifier, a Cash App tag, a Venmo handle, a PayPal.me link, in front of anyone who visits your profile, including people who don’t follow you. That’s a different exposure level than posting content, so it’s worth thinking through before you flip the toggle.

Your payment username is not the same as your bank details, but it does let a stranger find your public payment profile, which on some apps shows a transaction history or friend list unless you’ve locked that down separately. Check your Venmo and Cash App privacy settings independently of your Twitter settings; making a payment string public on Twitter does nothing to protect what’s visible once someone clicks through.

Avoid connecting a payment account that’s tied to your real name if you post under a pseudonym, since some services display your registered name at checkout regardless of your display name on Twitter. A few practical habits reduce risk here: use a payment handle you don’t rely on for private transactions with friends and family, review each connected app’s own privacy settings before saving your profile, and periodically confirm nothing has changed after an app update. A link service that doesn’t require the sender to create an account, like Tipper, also reduces the amount of your payment history a stranger can browse, since the transaction happens on a page you control rather than inside someone else’s app.

What Happens After Someone Sends You a Tip?

Once your Tips setup is live, the actual receiving process happens almost entirely inside whichever payment app you connected, not inside Twitter itself. Twitter doesn’t hold or move the money; it’s purely a signpost pointing to your Cash App, Venmo, or PayPal account.

That means your notifications come from the payment app, not from Twitter. If someone sends $5 through Venmo, you’ll get a Venmo notification, and it may not mention Twitter at all unless the sender leaves a note referencing your post. This disconnect trips people up early on. Check your connected apps directly rather than expecting Twitter to alert you when a tip lands.

Payout timing follows each individual service’s own schedule, not a unified Twitter payout system. Cash App and Venmo balances are typically available instantly or within one to three business days for a bank transfer, depending on which transfer speed you choose, while PayPal balances can be withdrawn on your own schedule. A platform like Tipper, by contrast, handles the tip and the notification (including any thank-you note or video the sender attaches) in one place, so you’re not piecing together where a payment came from across three different apps.

It’s worth checking each connected service weekly at minimum, especially early on, so a tip doesn’t sit unnoticed for weeks because you weren’t watching the right app.

Who Can Turn on Twitter Tips?

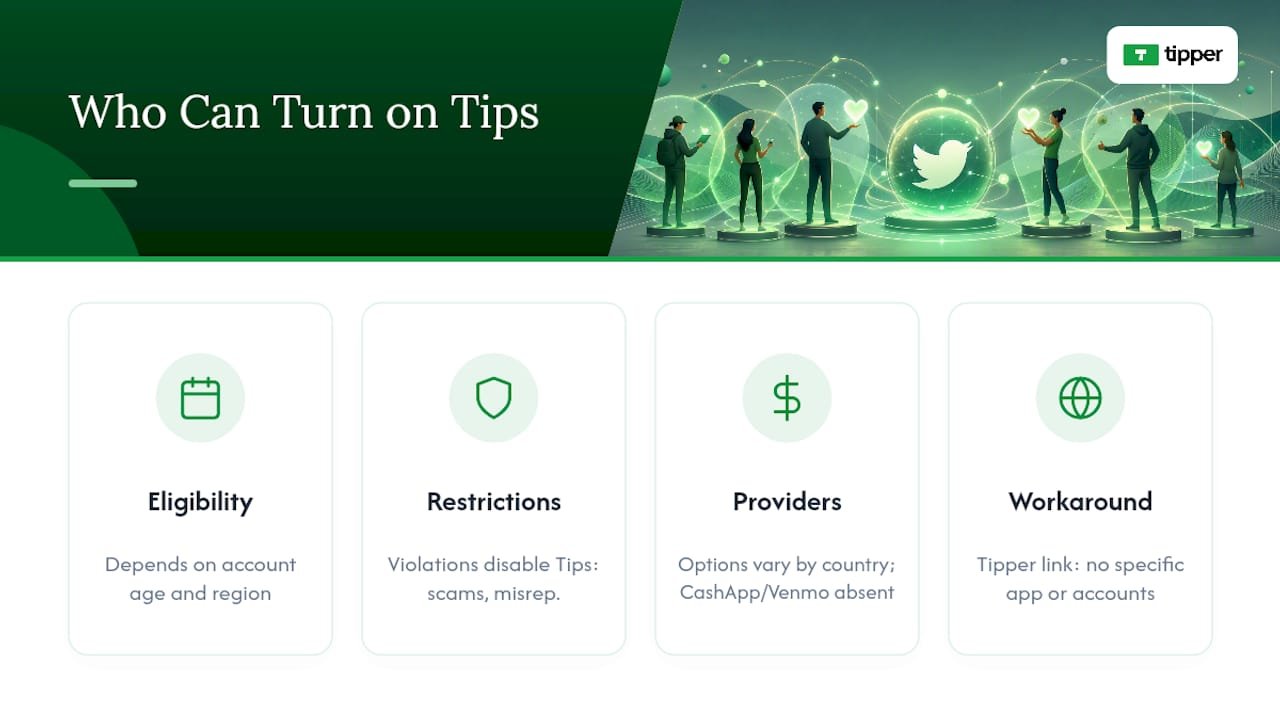
Twitter’s Tips feature isn’t universally available the moment you create an account. It rolled out gradually after its 2021 launch, and access has historically depended on account age, region, and whether Twitter has flagged the account for policy violations. A brand-new account created yesterday may not see the Tips option at all yet.

Beyond eligibility timing, the feature itself carries restrictions worth knowing before you build a promotion plan around it. Accounts that violate the General Tipping Policy, soliciting tips in exchange for prohibited content, misrepresenting what a tip funds, or using the feature for scams, risk having it disabled. Twitter also doesn’t guarantee every payment provider is available in every country, so a creator outside the US or a handful of other markets may find Cash App or Venmo simply absent from their options, leaving PayPal or a third-party link as the practical fallback.

There’s also a subtler limitation: Tips is a pass-through to external services, so if you’re not eligible for a Cash App or Venmo account for any reason, age, region, banking access, you won’t be able to use that particular option regardless of whether Twitter’s own feature is enabled. This is where a service like Tipper offers a workaround, since its personalized link doesn’t require the supporter to have any specific app installed and doesn’t require the creator to hold accounts with multiple regional payment providers.

Who Can Turn on Twitter Tips? — overview diagram

What Does It Cost to Receive Tips?

Twitter itself doesn’t charge a platform fee for using the native Tips feature, but that doesn’t mean tipping is free. Every payment still routes through a third-party processor, and each one has its own cost structure that applies whether the tip comes through Twitter, a QR code, or a direct request.

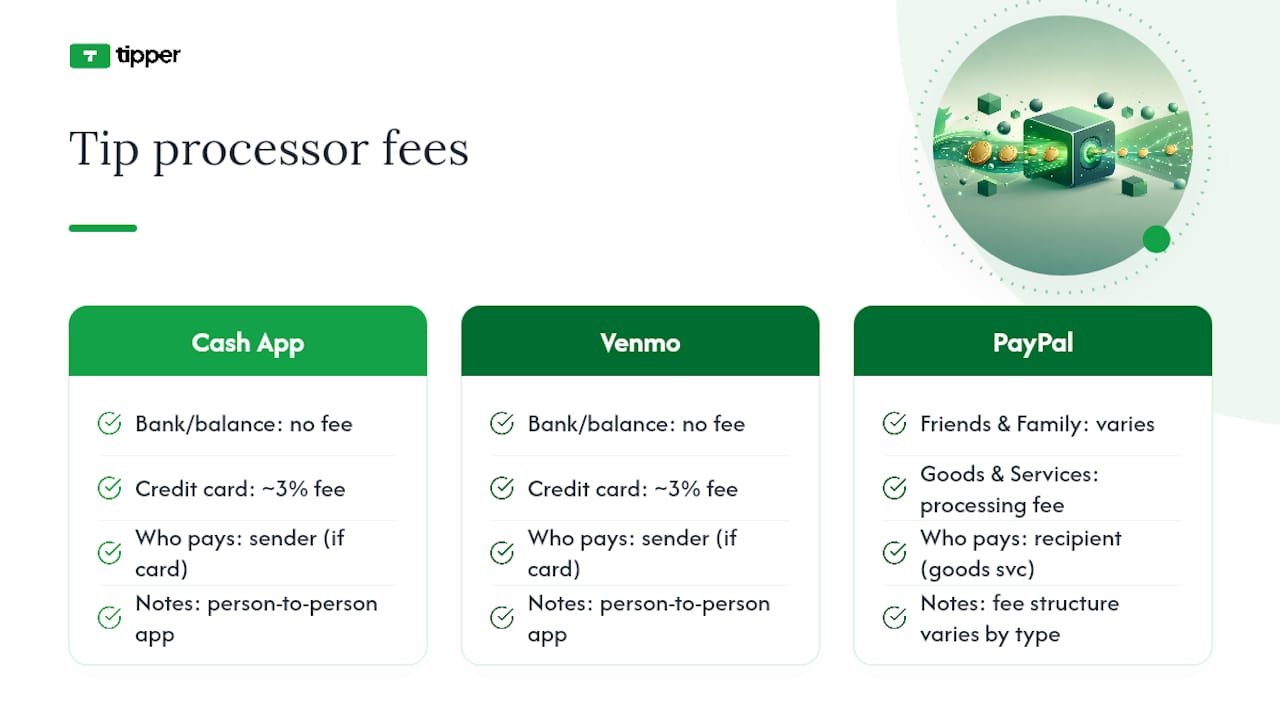
Comparison chart of tip payment fees

Cash App and Venmo generally process person-to-person payments funded by a bank account or balance without a fee, but a fee typically applies when the sender pays with a credit card, often in the range of 3%, charged to whoever initiates the payment depending on the app’s current terms. PayPal’s fee structure varies by transaction type and whether the payment is sent as “friends and family” or “goods and services,” with the latter carrying a processing fee absorbed by the recipient in most cases.

This is where the math shifts depending on your setup. Compare that against a native Tips setup where you might unknowingly lose a percentage to card processing fees you never explicitly agreed to, buried in the payment app’s own terms rather than Twitter’s.

The Setup Advice Nobody Emphasizes Enough

Most tutorials treat enabling Tips as the finish line. It’s the easy part. The actual leverage sits almost entirely in what you post around the link, not in which toggle you flip.

The conventional wisdom, “add the link, mention it often,” gets the sequencing backward. Buffer’s own guidance on link-first posts confirms what most creators discover the hard way: a tweet that opens with an ask reads as a pitch, and pitches get scrolled past. The creators who build steady tip income are the ones who treat the link as something supporters discover after they’ve already gotten value, not something they’re pitched before they know you.

If you take one thing from this guide, prioritize the five minutes of setup, then spend real time on the pinned post and bio placement rather than treating those as afterthoughts. A perfectly configured Tips toggle attached to a spammy timeline still won’t convert. A modest setup paired with genuinely useful, consistent posting will outperform it every time.

— Tipper

Tipper skips the part where a supporter has to hunt down your Venmo, install Cash App, or create an account just to send you $5.

Tipper

That matters most for the creators this guide is written for: people collecting small, frequent tips rather than occasional large ones, where every extra step between “I want to tip you” and “payment sent” costs you money. Tipper also lets you send a thank-you note, photo, or video back to each supporter, which the native Twitter flow simply doesn’t offer. If you’ve already built the habit of pointing followers to a tip link, set up a Tipper page and swap it into your bio in place of a scattered list of payment handles.

Sources

FAQ

Go to Edit Profile, open Tips, accept the tipping policy, toggle Allow tips on, and enter your payment usernames or links, then save and confirm the money icon appears on your profile.

What is the 4-1-1 rule on Twitter?

It’s a content-mix guideline suggesting that for every four value-driven or entertaining posts you share, post one soft promotional message and one direct ask, keeping self-promotion, including tip requests, a small minority of your overall posting.

How do I get a link to a specific Twitter post?

Tap the share icon on the tweet and select “Copy link to Tweet,” or click the timestamp on the post to open it individually, then copy the URL from your browser’s address bar.

How do I get more tips on Twitter?

Lead with genuinely useful or entertaining content, place your tip link in your bio or a pinned post rather than in every tweet, and use a frictionless payment option like Tipper so supporters can tip in one tap without creating an account.

5 Minutes to a Working Twitter Tip Link That Actually Pays2026-09-08T03:08:42+00:00

Instagram Tipping: How Creators Get Paid With Gifts and Badges

Instagram tipping means fans can send creators money directly through Gifts on Reels or Live Badges during broadcasts. Both convert into real payouts once you connect a payout account. The fastest path forward: open your Professional Dashboard, check eligibility, and turn on Gifts if it’s available to you.


TL;DR:

  • Creators need to have a professional account and meet follower and regional eligibility criteria to turn on Gifts or Badges features.
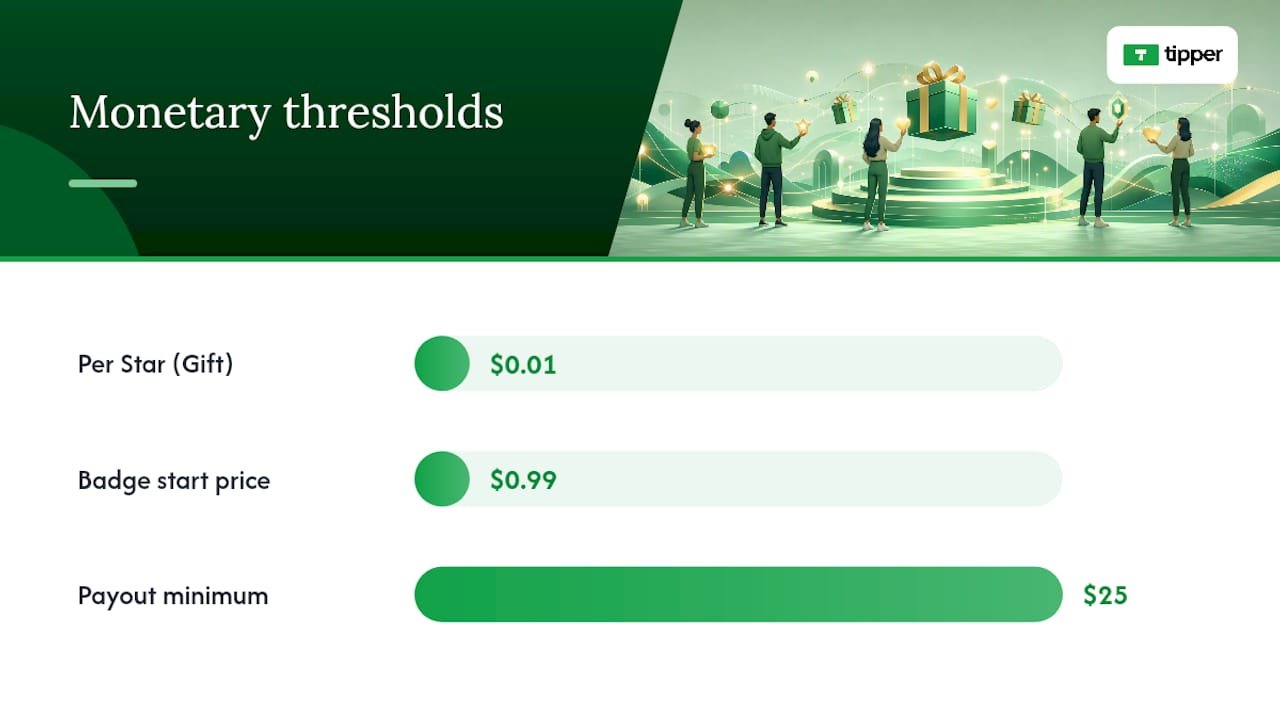
  • Instagram pays about $0.01 per Star sent via Gifts, but app store fees reduce actual earnings, especially on larger tips.
  • Both Gifts and Badges are driven by different user habits: Gifts favor frequent Reels posting, while Badges are better for regular live streamers.
  • Using a personalized tipping link off-app can help supporters give larger tips directly, bypassing platform fees and increasing actual earnings.
  • Consistent engagement and active promotion of tipping features significantly boost support from followers.

Table of Contents

What Instagram Tipping Features Actually Do

Instagram tipping comes in two distinct forms, and confusing them will cost you money and momentum. Gifts work on Reels: fans buy Stars, a virtual currency purchased inside the app, and send them on any Reel through the Send Gift button. It’s asynchronous, meaning a fan can tip a Reel you posted three weeks ago while scrolling at 2 a.m. Live Badges only work during live broadcasts. A viewer buys a badge, and it shows up next to their name in the comment thread instantly, giving you the chance to shout them out on camera.

The mechanics shape who should focus on what:

  • Gifts favor consistent Reels posters. If you upload multiple times a week, Gifts accumulate quietly in the background without you doing anything extra.
  • Badges favor regular live streamers. The real-time recognition is the entire draw, so if you rarely go live, badges will sit unused as a feature.
  • Badges tend to convert better per interaction because the buyer gets instant social proof (their name lighting up on screen), while Gifts rely on the fan feeling generous after watching a clip.

Neither replaces the other. Most active creators eventually run both, since they serve completely different viewing habits.

How Do You Qualify for Gifts and Badges?

Instagram doesn’t hand tipping access to every account. You need a professional account (Creator or Business), and Meta reviews follower counts, age, and location before turning on either feature. Typical thresholds run in the low hundreds of followers for Gifts and the low tens of thousands for Badges, though Meta adjusts these as it rolls features out by region.

Here’s the setup sequence that actually works:

  1. Switch to a professional account if you haven’t already, under Settings.
  2. Check your Professional Dashboard for a Gifts eligibility notice; toggle it on if it appears.
  3. Confirm you’re 18 or older and located in an eligible country since Instagram restricts payouts by region.
  4. Set up payouts by linking a bank account or PayPal and submitting tax documentation. In the US, that means a completed W-9.
  5. Confirm your payout minimum of $25 before expecting your first deposit.
  6. Enable badges separately inside your Live settings once you meet the follower threshold.

If Gifts or Badges never appear as an option, the usual culprits are a personal (not professional) account, a recent community guidelines strike, or simply not yet qualifying by follower count.

Pro Tip: Check your Professional Dashboard every few weeks even if you were previously ineligible. Meta rolls these features out gradually by account activity and region, so a “not available” status today can flip without warning.

What Do Creators Actually Earn From Tips?

The published rate is straightforward: Meta pays creators $0.01 per Star a fan sends through Gifts. Badges work differently, sold in price tiers that start at $0.99 and climb from there depending on the tier a viewer selects.

What Do Creators Actually Earn From Tips? — overview diagram

The gross number isn’t what lands in your account, though. In-app purchases run through Apple’s or Google’s payment systems, and those platforms take a cut of roughly 30% on the purchase side before Stars or badge revenue ever reaches Instagram’s ledger. Meta itself doesn’t add an extra platform fee on top of that for badges, but the app-store cut still shapes what a fan’s dollar is actually worth to you.

Payout logistics matter just as much as the rate:

  • Payouts process on a monthly cycle, generally around the 21st.
  • You need a $25 minimum balance before Instagram releases anything.
  • US creators file a W-9 for tax reporting, and earnings count as taxable income.

A nano creator posting a few Reels a week might see tips amount to grocery money. A micro creator with an engaged live audience could see meaningfully more. For most people, though, tipping supplements brand deals and subscriptions rather than replacing them, since creators generally rely on stacked income streams rather than any single source.

How Can You Get More Tips on Reels and Live?

Fans rarely tip unprompted. They tip when a creator makes the ask feel natural instead of desperate.

  • Say it out loud during Lives. A simple “if you’re enjoying this, badges show up right in the comments” works better than a hard sell.
  • Use text overlays on Reels that mention Gifts without derailing the content itself.
  • Announce new features in your Stories the first time you enable Gifts or Badges, since a lot of your audience won’t notice the button otherwise.
  • Thank tippers by name, live, the moment their badge appears. That immediate acknowledgment is what makes Badges convert better than almost any other prompt.
  • Pin a comment during Lives thanking recent supporters to keep the momentum visible to new viewers.
  • Follow up in DMs for larger Gifts, and send a Story shout-out for repeat supporters.

Your Instagram Insights will tell you which Reels or Live topics actually drove Gifts, not just views. Creators who treat that data seriously, testing formats and adjusting based on what earns tips rather than just what earns likes, tend to build steadier tipping habits among their audience over time.

Pro Tip: Recognition compounds. A fan who gets a genuine thank-you the first time they tip is far more likely to tip again than one who sends a Gift into the void.

Hands giving a small gift box

Native Gifts and Badges are frictionless for small, spontaneous tips, but they’re not your only option once a supporter wants to give more. Tipper lets creators generate a personalized tip link or QR code that fans can pay through instantly, using Apple Pay or Google Pay, with no account required on their end.

That matters because routing larger or recurring payments off-app sidesteps the app-store fees that eat into Stars and badge purchases. Creators also keep 100% of what comes through Tipper, which changes the math meaningfully on a $50 tip compared to the equivalent in Stars.

A practical hybrid approach:

  • Keep Gifts and Badges on for casual, in-the-moment tipping during Reels and Lives.
  • Drop your Tipper link in bio, Stories, or during a Live when you want to invite a bigger, direct contribution.
  • Use Tipper for audiences or platforms where native tipping isn’t available at all, like a podcast or a newsletter tied to your Instagram presence.

Running both isn’t redundant. It’s covering two different moments in how someone decides to support you.

Building Tips Into a Real Income Strategy

Creators who treat tipping as a bonus, not a backup plan, tend to build it into something sustainable. The mistake we see most often is over-asking, mentioning tips in every single post until it reads as pressure instead of appreciation. The second mistake is worse: creators enable Gifts, forget to finish payout setup, and leave earnings stuck in limbo for months.

Stack your income sources deliberately. Native tipping catches the casual, impulsive supporter. A direct link catches the fan who wants to give more and skip the app-store cut entirely. Neither works if you treat it as an afterthought instead of a real part of how you get paid.

— Tipper

Native Gifts and Badges are great for casual support, but if you want fans to send you a real tip without app-store fees eating into it, Tipper gives you a direct alternative. Set up a personalized link or QR code in minutes, and supporters can pay instantly with Apple Pay, Google Pay, or a card, with no account or sign-up required on their end.

Tipper

You keep 100% of what comes through, and every tip can carry a thank-you note, photo, or video back to the person who sent it. That’s the kind of connection Stars and badge tiers can’t replicate. If you’re ready to add a direct option alongside your native Instagram tools, create your tipping link and drop it in your bio today.

Sources

FAQ

What is the 5-3-1 rule for Instagram?

It’s a posting framework suggesting five pieces of curated content, three original posts, and one video per week to keep an account active without burning out on content creation. It has nothing to do with tipping eligibility, but consistent posting under a rhythm like this helps Gifts accumulate since more Reels means more chances for fans to tip.

What is the 3-2-1 rule on Instagram?

It’s a content-mix guideline: three engagement-focused posts, two educational posts, and one promotional post per week. Creators who diversify content this way tend to keep audiences engaged longer, which supports both organic reach and tipping activity over time.

How do I start receiving tips on Instagram?

Switch to a professional account, check your Professional Dashboard for Gifts eligibility, and set up your payout method with tax information. Once approved, you can also enable Live Badges separately if you meet the higher follower threshold.

What are the best tips for posting on Instagram to encourage tips?

Announce new tipping features in Stories, thank supporters by name during Lives, and use text overlays on Reels that mention Gifts without disrupting the content. Consistency matters more than any single tactic, since regular posting gives fans more opportunities to tip.

Yes, and many creators run both simultaneously. Native Gifts and Badges handle small, impulsive tips inside the app, while a Tipper link works better for larger contributions since it avoids app-store fees and lets creators keep 100% of what they receive.

Instagram Tipping: How Creators Get Paid With Gifts and Badges2026-08-28T02:00:28+00:00

How to Set Up Payment Processing for Tips as a Creator

The fastest way to accept gratuities is a personalized tip link or QR code that supports Apple Pay, Google Pay, and card payments, no account needed on the sender’s end. Set one up today, run a $1 test tip through it, and label every prompt “optional” or “voluntary” so it stays classified as a tip rather than payment for access or services.

Two moves matter most before you promote your link anywhere:

  • Create your tip page or QR code and confirm Apple Pay/Google Pay both trigger correctly.
  • Write your call-to-tip copy so it reads as clearly voluntary, not a paywall or condition of access.

On taxes: track net receipts separately from gross, since platform fees get deducted before the money reaches you, and save your monthly statements. You’ll need them whether a 1099-K arrives or you’re reporting the income yourself.

Key Takeaways

Accepting tips successfully comes down to choosing a direct payment rail, keeping the ask genuinely voluntary, and separating gross tips from net deposits for tax purposes.

Point Details
Choose a direct rail Personalized links and QR codes with wallet support net more than platform-native tools after fees.
Keep the ask voluntary Use “optional” phrasing and place tip prompts after content, not before, to align with IRS examples.
Track gross versus net Fees get deducted before payout, so log both figures separately for accurate tax reporting.
Save records for three years Export monthly statements and fee breakdowns from every rail you use.
Use Tipper for setup Tipper offers no-account sending and Apple Pay/Google Pay support for creators.

Table of Contents

Practical Methods for Payment Processing for Tips

Your choice of rail affects both what you keep and how easy taxes are later. Here’s how the main options stack up.

Personalized tip links work anywhere you can paste a URL: a bio, a video description, a Discord pin, an email signature. They’re the most portable option because they don’t depend on which platform the viewer is using.

QR codes solve the in-person problem: a table tent, a business card, a tip jar sticker. A customer scans, pays, and walks away in under fifteen seconds with no app download required.

Tip jar with QR code on café counter

Apple Pay and Google Pay buttons cut friction to almost nothing since the payment method is already saved on the phone. That one-tap flow is a big reason mobile wallet tipping converts better than manual card entry for spontaneous, low-dollar tips.

Hand poised to tap mobile wallet pay button

Platform-native tip tools (built into a streaming or social app) are convenient because they’re already there, but they usually take a larger cut and report the income under the platform’s own rules, not yours.

Stream overlays and in-video prompts work best as a nudge, not the mechanism itself, pointing viewers to your link or QR rather than trying to process payment inline.

  • Direct links: most portable, best for cross-platform audiences
  • QR codes: best for in-person, no typing required
  • Wallet buttons: fastest checkout, highest completion rate
  • Platform-native tools: easiest to enable, costliest long-term

How Much of a $5 Tip Do You Actually Keep?

A typical card transaction carries a processing rate around 2.9% plus a fixed fee near $0.30, on top of whatever percentage the platform itself takes before payout.

Pro Tip: Run the same $5 tip through both a direct-link rail and a platform-native tool once, side by side. The gap in what lands in your account tells you more than any fee schedule.

On a direct processing rail, a $5 tip loses roughly $0.45 to card processing, leaving you close to $4.55. Route that same $5 through a platform that also takes a revenue-share cut on top of processing, and you can lose another 5 to 20 percent depending on the platform, landing closer to $3.80 to $4.30.

  • Card processor rate: typically 2.9% + a fixed per-transaction fee
  • Platform take-rate: separate from processing, and stacks on top of it
  • Fixed fees hurt small tips disproportionately more than large ones

The reporting side matters just as much as the math. Processors and platforms both report gross payment volume, not your net take, so reconciling gross figures against fee statements is the only way to know what you actually earned versus what shows up on paper.

Here’s the sequence that gets you live in under 30 minutes.

  1. Pick a direct tip rail first. A rail that pays you directly, rather than pooling funds inside a platform, gives you cleaner net receipts and simpler records come tax season.
  2. Build your tip page. Add your name or brand, a short thank-you line, two or three preset amounts ($3, $5, $10), and a custom-amount field. Tipper’s tip page setup lets you add a text, photo, or video thank-you note that plays after the tip lands, doing more for repeat tipping than a generic receipt ever will.
  3. Generate your QR code. Most tip-link tools generate this automatically from your page URL. Print it or screenshot it, then scan it yourself on a second phone to confirm it opens the right page.
  4. Enable Apple Pay and Google Pay. These should show up automatically on supported tip pages. Run one real test transaction, even a small one, before sharing the link publicly.
  5. Set up payouts. Add your bank details, complete identity verification (standard KYC for any payment platform), and confirm your payout schedule so you know exactly when funds actually hit your account.

Pro Tip: Test your link on both an iPhone and an Android device before posting it anywhere. A broken wallet button on one operating system will quietly cost you tips you’ll never know you missed.

Wording and Placement That Keep Tips Voluntary

How you phrase the ask affects both conversion and your legal footing. The IRS’s recent guidance on digital creator tips makes voluntary, post-access payments more clearly classifiable as tips rather than compensation, which is exactly the distinction you want on your side.

  • Use phrasing like “If you’d like to leave a tip” or “Completely optional” near every prompt.
  • Place your link where it doesn’t gate content: a pinned comment, a post-stream overlay, or a printed QR on a receipt, never a wall before access.
  • Offer three preset amounts plus a custom field. Round numbers convert better than odd ones, and a visible custom option signals you’re not fishing for a specific figure.
  • Never preselect or pre-check a tip amount at checkout. That single UX choice is what turns a tip into something that looks compulsory.

Bookkeeping and Tax Steps for Tip Income

Tip income is taxable regardless of whether a form arrives in your mailbox, so build your bookkeeping around your own records, not just what a platform sends you.

Form 1099-K reporting covers gross payment volume, including cash tips reported in Box 1c, while 1099-NEC or 1099-MISC typically covers payments for services rather than voluntary gratuities. That distinction, voluntary tip versus paid compensation, is exactly why your on-page wording matters for how income gets classified in the first place.

  • Export monthly statements from every rail you use and store them somewhere searchable.
  • Log gross tips and net deposits separately; the difference is your fee history.
  • Keep a running note of which platform charged what, since rates change.
  • Save everything for at least three years in case of a reporting question.

Creator tax guidance generally treats tip income as self-employment earnings, which means quarterly estimated payments and, per TurboTax’s guidance for content creators, reporting through Schedule C. Many creators set aside 25 to 30 percent of net tip income for taxes and bring in a CPA once volume gets consistent month over month.

What to Verify Before You Trust a Tip Rail

Direct processors typically pay out in 1 to 7 business days; platform-native tools often run slower. Confirm the rail uses tokenized card data (never stores raw numbers) and is PCI compliant. Decide upfront whether tips stay anonymous or record sender details, since some supporters expect to send a tip without creating an account at all.

What Creators Get Wrong About Tip Compliance

Most advice on this topic treats tip collection as purely a UX problem: pick a nice-looking button, add some preset amounts, done. That’s backwards. The wording problem comes before the design problem. A gorgeous tip page with checkout copy that implies payment is expected, or worse, required, undoes any compliance benefit from choosing a “tip” rail at all.

The overlooked piece is timing. Tips requested before someone accesses your content read differently than tips requested after, and that sequencing shows up directly in how the IRS’s own examples treat voluntary payments. Ask for support after you’ve delivered value, not as a condition of it.

If you take one thing from this guide, take this: set up your link, make the ask genuinely optional in both wording and placement, and keep your fee records separate from day one. Everything else, overlays, preset amounts, wallet buttons, is optimization on top of a foundation that has to be right first.

— Tipper

Start Collecting Tips Without Asking Supporters to Sign Up

Tipper gives creators a personalized link and QR code that accepts Apple Pay, Google Pay, and card payments, and the person sending a tip never has to create an account. That removes the single biggest drop-off point in tip collection: the moment someone has to sign up just to give you money.

Tipper

Every tip page can include a thank-you note back to the supporter, in text, a photo, or a short video, which turns a one-time tip into a reason someone comes back. Set up your personalized tip page today, generate your QR code, and send yourself a $1 test tip before you share the link anywhere public.

Sources

FAQ

Do I Have to Report Tips If I Don’t Get a 1099-K?

Yes. Tip income is taxable whether or not a form arrives, and you’re responsible for reporting it based on your own records.

What Makes a Tip “Voluntary” Instead of a Payment?

Voluntary tips are requested after access is granted, with clear optional wording and no preselected amount, which is the distinction the IRS’s guidance draws between tips and compensation.

Does Tipper Require Supporters to Create an Account?

No. Tipper lets supporters send a tip through Apple Pay, Google Pay, or a card without signing up, which removes a major source of drop-off at checkout.

How Much Should I Set Aside for Taxes on Tip Income?

Many creators set aside a substantial portion of their net tip income as a reserve for taxes, since it’s generally treated as self-employment earnings subject to quarterly estimated payments.

Which Fees Reduce a Small Tip the Most?

Fixed per-transaction fees hurt small tips disproportionately, since a $0.30 charge takes a much bigger bite out of a $5 tip than a larger one.

How to Set Up Payment Processing for Tips as a Creator2026-08-27T02:00:36+00:00

The Fastest Way to Add an Instagram Tip Link

The quickest way to start collecting tips from your Instagram audience is to create a dedicated tip link, like the one Tipper generates, and drop it into your bio. A tip link is different from a regular URL: it opens a mobile-first checkout where a supporter can pay with Apple Pay, Google Pay, or a card in a few taps, with no account or app download required on their end. You get a notification the moment someone tips, and the money lands in your account directly.

Here’s what that setup actually gets you:

  • A checkout built for phones, since almost every click will come from someone scrolling Instagram on their phone
  • Instant alerts so you know exactly when and how much someone sent
  • Direct payouts without waiting on a middleman platform to release your earnings

The next move is simple: create your tip page, copy the link, and paste it into your Instagram bio or add it through the Links editor in your profile settings.

Key Takeaways

A working Instagram tip link needs a no-account checkout, correct payout setup, and placement in your bio’s top link slot to actually convert.

Point Details
Use a dedicated tip page Choose a provider like Tipper that supports Apple Pay, Google Pay, and cards without requiring the sender to sign up.
Claim the top bio link slot Instagram’s Links editor allows up to five links, but the first one gets the most visibility.
Test before promoting Send yourself a small test tip and confirm the notification, receipt, and payout all arrive correctly.
Confirm payout details early Missing bank or tax information can delay or forfeit funds that already came through.
Tipper keeps creators fully paid Creators keep 100% of their earnings on Tipper, with thank-you notes and videos available for supporters.

Table of Contents

Getting a tip link live takes less time than editing a Reel. Here’s the order that works.

  1. Pick a tip page provider and create your account. Tipper is built specifically for this job, letting anyone send a tip without creating an account of their own, which removes the single biggest source of drop-off on payment pages.

  2. Customize your page. Add your display name, a profile photo people recognize from your Instagram grid, and a short line explaining what the tips support. Include at least one micro-tip option ($1 to $3) so first-time supporters have a low-pressure way in.

  3. Connect your payment methods. Cards, Apple Pay, and Google Pay should all be active before you share the link anywhere. Bio sites with tip jar features typically route these through a processor like Stripe, and some tools let you choose between an external payment link or an integrated checkout that keeps the sender on your page instead of bouncing them to another app or site.

  4. Set up payouts. Add your bank details and any required tax information now, not after your first tip arrives. Skipping this step is the most common reason creators see a payment go through but never see the cash.

  5. Generate your shareable URL and QR code. Copy the link for your bio, and grab the QR version for in-person use, like a tip jar at a pop-up shop or a sticker on a merch table. If you want to track which posts drive tips, shorten the link and tag it with a UTM parameter first.

Pro Tip: Create two versions of your link before you post anything: one plain link for your permanent bio slot, and one UTM-tagged short link you swap into captions or Stories for specific campaigns. That split lets you see which content actually drives tips instead of guessing.

Your bio is prime real estate, and Instagram’s Links editor now lets you add up to five external links to your profile. The first link you add is the one that shows with the most visibility, so your tip link should almost always take that top slot, especially if you’re not running it through a separate link-in-bio hub.

Beyond the bio, a few placements consistently outperform a single static link:

  • The link sticker in Stories, used right after a tutorial or a piece of content that clearly helped someone
  • A pinned post with your tip link in the caption, so it stays visible at the top of your grid
  • Direct messages, reserved for higher-value asks or one-on-one requests where a personal touch matters

Keep your link title and bio copy short and low-pressure. “Buy me a coffee” or “Send a tip if this helped” reads friendlier than “Donate here,” and it sets the expectation that tipping is optional appreciation, not an obligation. Bitly’s guidance on bio links recommends pairing one permanent bio link with trackable short links for individual campaigns, which lets you measure which specific posts actually convert into tips instead of lumping everything into one number.

Getting Tips Without Annoying Your Followers

Nobody likes a feed that feels like a nonstop ask. The creators who tip well tend to follow a pattern, not a script.

  1. Offer three price points. Offer three price points with low, mid, and higher options to accommodate casual supporters, regular followers, and your biggest fans.
  2. Use a short CTA tied to value, not guilt. “If this saved you time, leave a tip” works better than a bare “Donate now,” because it reminds people why they’d want to give in the first place.
  3. Time the ask around value-first content. Attach your tip link to the post where you actually delivered something useful. A tutorial, a template, or a thread that solved a real problem earns a tip request far better than a random selfie.
  4. Acknowledge every tip. A quick public shoutout or a private thank-you note (or video) turns a one-time tipper into a repeat one. Visible acknowledgment tends to increase repeat tipping, since it makes the transaction feel like a relationship instead of a payment.

Pro Tip: Save your best-performing CTA line and reuse it. Followers respond to consistency, and a familiar phrase like “Send a tip” builds recognition the same way a catchphrase does.

A few unglamorous checks now save you a frustrating email later.

  • Fees: expect a standard payment processing fee on card, Apple Pay, and Google Pay transactions, plus any platform fee your provider charges. Confirm the exact numbers in your account settings before you promote the link widely.
  • Payouts: enter your bank details and tax information correctly the first time. Incomplete payout setup can delay or forfeit funds that already came through on the sender’s end.
  • Privacy: make “no account required” messaging visible near your link so first-time supporters aren’t confused about what’s expected of them, and keep any privacy note short enough that people actually read it.

Don’t promote a link you haven’t tried yourself. Run through this before it hits your bio.

  1. Open the link on a few different devices. Check that Apple Pay, Google Pay, and card fields all render correctly on both iPhone and Android.
  2. Send yourself a small test tip. A dollar is enough. Confirm you get the notification, the sender gets a receipt, and the money shows up in your payout account.
  3. If nothing shows up, check three things first: your payout settings, your email for a receipt you might have missed, and the transaction log in your dashboard. If it’s still missing, contact support with the transaction ID ready.

Why Tipper Fits What Creators Actually Need

Most friction in online tipping comes from asking supporters to create an account just to send a few dollars. Tipper skips that step entirely, letting anyone tip through a personalized link or QR code using Apple Pay, Google Pay, or a card, with no sign-up on the sender’s side.

The bigger draw for creators is what happens after the tip lands.

A tipping tool only earns trust if the person sending money feels zero friction and the person receiving it feels fully rewarded. That’s the gap Tipper is built to close.

A few specifics worth knowing before you set up your page:

  • Thank-you messages can be sent as text, photo, or video, so appreciation feels personal instead of automated
  • Notifications arrive in real time, so you know the instant a tip comes through
  • Setup guidance and onboarding resources walk you through connecting payments and generating your link

The Real Priority Creators Miss

Most advice on this topic obsesses over link placement and ignores what actually determines whether someone tips: how much friction sits between the tap and the payment landing in your pocket. Creators spend hours debating whether the link sticker or the bio slot converts better, and almost no time checking whether their payout details are even filled in correctly.

Hand adjusting smartphone payment settings

That’s backward. A perfectly placed link that fails at checkout is worse than a mediocre placement with a flawless payment flow, because a failed tip rarely gets retried. Test the entire path, sender tap to your payout landing, before you worry about optimizing where the link sits.

Diagram comparing tip link placements and payment flow success

The other overrated habit is treating tip requests like a marketing campaign. The creators who build real recurring tipping income tend to ask rarely and only after delivering something worth paying for. Ask constantly, and even generous followers start to tune it out.

If you take one thing from this: fix the payment experience first, keep the ask occasional and specific, and let the placement details come second.

— Tipper

Start Collecting Tips With Tipper Today

Tipper is the alternative to juggling app downloads and account sign-ups just to collect a few dollars from a follower. Supporters tip through a personalized link or QR code using Apple Pay, Google Pay, or a card, with nothing to install and no account to create, and you keep 100% of what comes in.

Tipper

Setting up takes about the same time as writing a caption. Create your page, add a short description and your suggested tip amounts, connect your payment methods, and copy your link straight into your Instagram bio. If you already run a bio hub with multiple links, you can add tipping to that setup without disrupting anything else you’re linking to. Creators who also teach or sell courses can look at platforms like Hopper for combining a linked storefront with payments in one place.

Ready to see it live? Create your Tipper page and have a working tip link ready before your next post goes up.

Sources

FAQ

Create a tip page through a provider like Tipper, then paste the link into your Instagram bio using the Links editor or add it as your top link if you use multiple.

Do Supporters Need an Account to Send a Tip?

No. Tipper lets anyone send a tip through Apple Pay, Google Pay, or a card without creating an account first.

Put it in the top slot of your bio, then reinforce it with Story link stickers and pinned posts tied to your most valuable content.

Send yourself a small test tip and confirm you receive the notification, the sender gets a receipt, and the payout appears in your account.

What Fees Should I Expect on Instagram Tips?

Expect standard payment processing fees on card, Apple Pay, and Google Pay transactions, plus any platform fee, both visible in your account settings before you promote your link.

The Fastest Way to Add an Instagram Tip Link2026-08-26T02:01:08+00:00

Best Creator Tip Link Strategy: Setup, Presets, and Payouts

The best creator tip link strategy starts with an in-page tip block or a branded tip link, not a redirect to a generic donation page. Set three preset amounts, highlight the middle one, and put the link where your audience already looks: your bio, your video description, your newsletter footer. Do this today and you can collect your first tip within the hour.

Here’s the immediate playbook:

  • Create your tip link or embed a tip block on your profile.
  • Set three presets (a low, a highlighted middle, and a fan tier).
  • Drop the link into your bio and pin it in your latest post’s link-in-bio dashboard comments.

Pro Tip: Mobile saved-payment methods like Apple Pay and Google Pay cut checkout to two taps. If your tip flow requires typing a card number on a phone, you’re losing tips before they happen.

Key Takeaways

A creator tip link strategy works best when it pairs a low-friction preset structure with a fast thank-you follow-up and consistent placement across a creator’s existing content.

Point Details
Pick the right category first Validate with an external link, then upgrade to native or branded routing once repeat tippers appear.
Use three presets A low, highlighted middle, and fan-tier amount converts better than a single custom field.
Track every placement Add UTM tags to your bio, footer, and pinned-comment links to see which spot actually produces tips.
Thank supporters fast A personal reply within 24 hours meaningfully increases the odds of a second tip.
Choose payout-friendly tools Tipper lets creators keep 100% of tips beyond processing fees, with no account required for supporters.

Table of Contents

Every creator tip link strategy falls into one of three buckets, and picking the wrong one for your stage costs you real money.

External hosted tip services send supporters off your page to a dedicated tipping site. They’re the fastest to set up, often live in minutes, and require zero technical work. Native or in-page tips keep the transaction on your own page or post, using a widget or block so nobody leaves your content to pay you. Branded short link routing uses a link you control (something like yourname.tip/creator) that redirects to whichever tipping destination converts best, letting you swap the backend without changing the link everywhere it’s posted.

The trade-off is speed versus control. External links win on setup speed. In-page tips win on conversion because tips blocks with quick-pick presets convert better than campaigns that require reading a goal or a tier list — supporters tap and pay without context-switching. Branded routing wins on measurement: a short link with per-platform slugs lets you re-point traffic instantly and see exactly which platform sends paying supporters.

Start where you are. If you’re testing whether your audience tips at all, validate with an external link first before investing in anything more custom. Once you see repeat tippers, upgrade to native tips or branded routing so you keep more control over the experience and the data.

  • Under 1,000 followers: external link, no setup friction.
  • Growing audience with repeat engagement: native in-page tip block.
  • Multi-platform creator running promotions: branded short link with routing.

Getting a working tip link live takes less time than editing your next post. Here’s the fast path.

  1. Pick a destination and processor. Choose a tipping platform that supports Stripe or PayPal for payouts, then connect your bank details so money actually lands somewhere.
  2. Set your presets. Configure three tap amounts, plus an optional custom field for outliers who want to give more.
  3. Write short, human button copy. Skip generic “Donate” language. Something like “Buy me a coffee” or “Tip — thanks!” performs better because it sounds like a person, not a nonprofit form.
  4. Place the link. Add it to your bio, embed it in a post, or paste it into your link-in-bio dashboard alongside your other links.
  5. Send one live test tip. Use your own card or ask a friend to send $1 so you confirm the money actually reaches your payout account before you promote it publicly.
  6. Add UTM tags. Tag the link by placement (bio, video description, newsletter) so you know which spot actually produces tips, not just clicks.

That last step matters more than most creators realize. Tracking from day one with UTM parameters lets you test one variable at a time, whether that’s your button copy or where the link sits on the page, instead of guessing why conversion changed.

Watch two numbers after launch: click-through rate on the link itself, and tip conversion rate once someone lands on the page. If clicks are healthy but tips are low, the friction is on your payment page, not your promotion.

What Preset Amounts and Copy Convert Best?

A structure of a small low option, a highlighted middle, and a bigger fan tier is the most common effective preset setup, and it’s not arbitrary. The middle amount anchors the decision. Most people don’t want to pick the smallest option (it feels cheap) or overthink the largest (it feels like a real financial choice), so they default to the option in the visual center.

Hand tapping medium preset tip button

A workable starting range looks like $2 / $5 / $10, or $1 / $3 / $5 if your audience is younger or your content is short-form. Both a low/mid/high structure with the middle highlighted show up consistently as the best-converting preset pattern. across creator tipping tools.

Button copy matters almost as much as the amount. Compare these:

  • “Donate now” — reads transactional and slightly cold.
  • “Buy me a coffee” — casual, low pressure, widely recognized.
  • “Support my work — $5” — direct, states the ask and the amount together.
  • “Tip — thank you!” — short, warm, works well on mobile where space is tight.

Should you include a custom amount field? Yes, but keep it secondary. A visible custom field next to your presets adds almost no friction and captures the rare supporter who wants to give $50 instead of $10. Making custom the default option, with no presets, does the opposite: it forces a decision instead of offering one, and decisions kill impulse tips.

Placement decides whether your tip link ever gets seen, let alone clicked. The strongest spots share one trait: they show up right after someone has already gotten value from you.

  1. Profile bio. The first place anyone checks when they want to support you.
  2. End of content. A video outro, the last line of a newsletter, or a podcast sign-off, right when goodwill is highest.
  3. Pinned comment. On platforms where bios are buried, a pinned comment under your best-performing post keeps the link visible.
  4. Newsletter footer. Recurring readers see it every send, which builds familiarity without repeating the ask loudly.
  5. Link-in-bio dashboard. If you run a multi-link page, position the tip link above the fold, not buried under merch and socials.

Promotion rhythm matters more than promotion volume. Mention the tip link around real moments: hitting a subscriber milestone, publishing something that took unusual effort, or answering a reader’s question in depth. Thank tippers publicly when appropriate (with permission), then go quiet again. A once-weekly light mention beats a link stapled to every single post.

Pro Tip: Tag each placement with its own UTM parameter. If your newsletter footer converts three times better than your bio link, that tells you exactly where to double down next month.

How Do You Turn One-Time Tippers Into Repeat Supporters?

The first tip is nice. The second tip is the real signal, since a supporter who tips twice is far more likely to become an ongoing source of income than someone who tips once and disappears.

Respond fast and personally. A quick DM, a short thank-you video, or a shoutout (with permission) after a tip lands does more for retention than any feature you could build. Small, low-cost rewards reinforce the relationship without turning your tip page into a paywall: early access to a new video, a heads-up before you publish, or a small digital extra like a wallpaper or behind-the-scenes note.

  • Send a personal thank-you within 24 hours of the tip.
  • Offer one small, easy-to-deliver perk for repeat supporters.
  • Track your repeat-tipper rate monthly, not just total tips collected.

A healthy early target is getting a meaningful share of first-time tippers to tip again within a couple of months. If you’re below that, your thank-you process probably needs to feel more personal, not more elaborate.

Which Payment Methods and Integrations Actually Matter?

The payment rails behind your tip link decide how many people finish the transaction they started. Saved-payment methods matter most on mobile, since a tipper who already has Apple Pay or Google Pay loaded on their phone can confirm a tip in two taps instead of typing out sixteen digits of a card number.

  • Prioritize Apple Pay and Google Pay support above almost anything else on mobile.
  • Expect similar percentage-based processing fees between Stripe and PayPal, with payout timing varying by provider and account history.
  • Check that your billing descriptor (what shows on a supporter’s bank statement) clearly names your brand, not a generic processor string that looks unfamiliar and triggers disputes.
  • Confirm your platform has a clear refund and dispute process, since even small tips occasionally get contested.

Keeping the transaction on your own page rather than redirecting off-site also preserves context and lets saved-payment methods complete the checkout faster, which is exactly why native tip blocks tend to convert better than external redirects for casual, in-the-moment tips.

How Tipper Puts This Strategy Into Practice

Tipper builds the entire strategy above into one flow. Creators get a personalized link or QR code, supporters pay with Apple Pay, Google Pay, or a card with no account required on their end, and creators keep 100% of what they earn minus standard payment processing.

A quick worked example:

  1. Create your Tipper link and set three presets, say $3, $7, and $15.
  2. Add the link to your bio and pin it under your most-viewed post.
  3. Send yourself or a friend a test tip to confirm the payout flow works end to end.
  4. Record a 15-second thank-you video and attach it to your tip page so first-time supporters see it immediately.

A tip page that shows a real thank-you message, not just a payment confirmation screen, turns a transaction into a moment of connection between creator and supporter.

That personal layer, thank-you notes as text, photo, or video, is what separates a tipping tool from a payment form. Try it with one friend before you promote it publicly, and see how the flow feels from the supporter’s side.

Comparing Fees, Commissions, and Payout Timing

Fee structures across tip link services generally fall into two categories: platform commission plus payment processing, or payment processing alone with no platform cut. The difference compounds fast for creators earning small, frequent tips rather than occasional large ones.

Most standard card processing runs in the 2.9% plus a small fixed fee per transaction range, industry-standard territory regardless of which tipping tool sits on top of it. What varies is whether the platform adds its own commission on top of that processing fee.

Payout schedules matter just as much as the fee itself if you’re relying on tips for regular income. Some platforms batch payouts weekly or on a fixed monthly date; others offer near-instant transfers to a linked debit card for an added fee. If you’re a freelancer covering rent with tip income, a platform that holds funds for two weeks before releasing them creates a real cash flow problem, even if its percentage fee looks competitive on paper.

Before committing to any tip link service, check three things: the platform commission (if any), the processing fee percentage plus fixed cost per transaction, and the standard payout timeline. A slightly higher processing fee with next-day payouts often beats a lower fee with a two-week hold, depending on how tight your cash flow runs.

Keeping Tips Secure and Supporters’ Data Private

Security on a tip link cuts two ways: protecting the creator’s payout information and protecting the supporter’s payment details. Neither should require either party to hand over more information than the transaction actually needs.

For supporters, the strongest privacy feature is simply not requiring an account. A tip link that lets someone pay with Apple Pay or Google Pay without creating a login, verifying an email, or saving a password reduces the amount of personal data exposed anywhere, and it removes the single biggest reason people abandon a tip halfway through.

For creators, look for a platform that uses established payment processors like Stripe or PayPal on the back end rather than handling raw card data itself. That matters because these processors carry PCI compliance and fraud protections that would take a small platform years to build independently. Ask, too, how the platform displays your payout details: your bank account number should never be visible to a supporter, only a masked reference or nothing at all.

Dispute and refund handling deserves attention before it becomes a problem, not after. A supporter who doesn’t recognize a charge on their statement, often because a billing descriptor is unclear, is far more likely to file a chargeback than contact the creator directly. Clear, brand-recognizable billing descriptors reduce that risk substantially. Creators should also know their platform’s stance on refunds for accidental tips, since a supporter who tips the wrong amount by mistake needs a straightforward path to a fix that doesn’t involve emailing customer support and waiting a week.

A tip link without tracking is a guess dressed up as a strategy. The minimum setup is three data points: link clicks, tip conversions, and repeat-tipper rate, tracked separately for every placement where you share the link.

UTM parameters make this possible without any custom development. Tag your bio link, your newsletter footer link, and your pinned-comment link with different UTM codes, and your analytics will show you exactly which placement produces tips rather than just clicks. Instrumenting this funnel early also lets you run low-budget retargeting toward people who clicked but didn’t tip, which tends to recover conversions that a single visit misses.

Once you have baseline data, test one variable at a time. Change your button copy for two weeks and compare conversion against the prior two weeks before touching your preset amounts. Changing both at once tells you something moved, but not what moved it.

Beyond your own dashboard, visibility across the wider internet matters too. Consistent, diverse mentions of your tip link across communities, podcasts, and forums increasingly function as trust signals for AI-driven search, not just for human readers clicking through. A creator whose tip link shows up naturally in fan-run wikis, Reddit threads, or guest podcast show notes builds a kind of discoverability a paid ad can’t replicate.

Set a simple monthly review: total clicks, conversion rate, repeat-tipper percentage, and top-performing placement. Adjust one thing based on what the numbers show, then check again in 30 days.

Tips you receive through a personal link are taxable income in the United States, the same as freelance payment or ad revenue, regardless of which platform processes the transaction. The IRS doesn’t distinguish between a $5 tip from a stranger and a $500 invoice from a client; both count as self-employment income that you’re responsible for reporting.

Most payment processors issue a 1099-K form once you cross certain transaction thresholds, which vary by processor and have shifted in recent years, so check your specific platform’s current reporting rules rather than assuming last year’s threshold still applies. Even if you don’t receive a 1099-K because you’re under the threshold, you’re still legally required to report the income yourself.

Keep basic records as you go: total tips received per month, the platform’s processing fees (which are typically deductible as a business expense), and any related costs like equipment or software you use to create the content people are tipping for. A simple spreadsheet updated monthly saves a scramble come tax season.

One nuance creators miss: tips sent as a genuine personal gift with no expectation of content in return are treated differently under tax law than tips sent as payment for your work or access to it. In practice, nearly all creator tipping falls into the second category, since supporters are tipping because of content you produced, so treat it as income by default. If your situation is unusual, a licensed tax professional familiar with self-employment income is worth the consultation fee before your first filing season.

Most tips happen on a phone, often seconds after someone finishes watching a video or reading a post, so a tip page that loads slowly or requires zooming to tap a button loses money you never see.

Test your tip page the way a real supporter would encounter it: from a social app’s in-app browser, not your desktop Chrome window. In-app browsers on platforms like Instagram and TikTok render pages differently, and a layout that looks perfect on your laptop can break, overlap, or force horizontal scrolling inside those environments.

Three checks matter most. First, confirm your preset buttons are large enough to tap accurately with a thumb, not sized for a mouse cursor. Second, verify Apple Pay or Google Pay appears as the default option on supported devices, since forcing a manual card entry on mobile is where most abandoned tips happen. Third, time how long the page takes to load from a tap. Anything over two or three seconds on a typical mobile connection will cost you supporters who simply move on.

Keep the page itself short. One clear thank-you line, three preset amounts, and a button are enough. A tip page with multiple sections, a long creator bio, and unrelated links buried above the actual tip button asks a mobile user to scroll past friction to reach the one thing they came to do.

Thumb about to tap tip button on smartphone

Why Testing Beats Perfection in Your Tip Strategy

No tip link strategy works perfectly on the first try, and chasing a flawless setup before launching just delays real data. Keep every ask light and tied to genuine value, then revisit your presets, copy, and placement every 30 days using the click and conversion numbers you’re already tracking.

— Tipper

Everything in this article, presets, placement, thank-you follow-up, mobile-first checkout, is built directly into Tipper. Sign up, create your personalized link or QR code, set your three preset amounts, and connect payouts in a single session with no subscription fee to maintain the page.

Tipper

Payout timing depends on your linked bank and payment method, and the only cost on your side is the processing fee applied at checkout, no platform commission on top. If you run a physical business alongside your content, Tipper’s point-of-sale tipping options extend the same no-signup-required model to in-person tips. The fastest way to know if this fits your audience is the smallest possible test: create your link right now and send yourself or a friend a $1 tip to see the full flow, thank-you message included, before you ever share it publicly.

Sources

FAQ

What Are the Best Tips for Content Creators to Succeed With Tipping?

Keep your ask simple: three preset amounts, a highlighted middle option, and a link placed where supporters already look, then follow up with a genuine thank-you to encourage repeat tips.

What Are the Three C’s of Content Creation?

Definitions vary across sources, but a common version refers to Content, Community, and Commerce, the idea that consistent content builds a community, and that community eventually supports commerce, including tips.

Is Content Creation Still Profitable in 2026?

Content creation remains profitable for creators who diversify income beyond ad revenue, and tips through a personalized link are one of the lowest-effort additions since they require no new content, only a link and a payment method.

Track click-through rate on the link itself and tip conversion rate separately using UTM tags on each placement; a placement with high clicks but low conversion usually points to friction on the payment page, not the promotion itself.

Best Creator Tip Link Strategy: Setup, Presets, and Payouts2026-09-08T03:08:47+00:00
Go to Top